The magic combination of three ingredients — do it yourself (D.I.Y.), curiosity and tenacity — are essential to the success of audio entrepreneurs who have more passion than cash. Thanks to the Internet, that tradition has been reinvigorated on message boards, user’s groups and by companies that have found new ways to help everyone — from newbies to veterans — learn and build stuff that looks less like a homemade prototype and more like the first in a new professional product line.
THE WAY IT WAS
The industrial revolution fueled the growth of technology well before the 20th century, but D.I.Y.’s evolution was sparked in the early 1920s when vacuum tubes brought AM radio into the home. Back then, people listened on the “crystal” sets — passive radio receivers that required no batteries or power supply. Believe it or not, there is enough current in the air to drive a pair of 2k-ohm headphones!
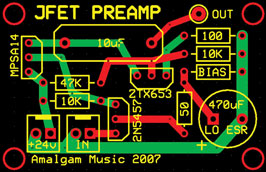
Figure 1a: One of Ciletti’s students took advantage of ExpressPCB.com by laying out this circuit board for a simple JFET preamp (circuit courtesy of Scott Hampton/Hamptone.com).
Before active electronics (and loudspeakers) became affordable to the masses, D.I.Y.’ers made their own crystal sets using many household remedies, such as winding coils around an oatmeal container or coupling the headphone to a horn to provide enough acoustic amplification to share with a friend or two. Kits and plans are still available for these simple, yet remarkable devices.
When high fidelity arrived in the ’50s, kit companies like Dynaco, HH Scott, Fisher, McIntosh, Eico, Heathkit, Allied Radio/Knight-Kit and Lafayette Radio made hi-fi ham radio and electronic test equipment affordable for D.I.Y.’ers. Buying the kit version was a no-compromise way of getting a name-brand product, with the educational bonus of D.I.Y. Fully assembled Japanese goods arrived in the ’60s and ’70s that rivaled American prices and quality.
As those classic American companies were nudged toward the fade-out, one kit company — PAiA — was fading in, with electronic musical instrument kits as its D.I.Y. niche. PAiA’s first products appeared in the late ’60s, and 40 years later one of my students walked in with a brand-new FatMan analog MIDI synth that he built and wanted to modify.
GET BENT
It had to happen sooner or later, but from vintage analog it’s a natural progression to vintage digital. These days, there’s a geeky, underground electronic music movement known as “circuit bending.” It starts simply enough with the poking and probing of everyday toys and games to get unusual “internal” sounds, but that quickly evolves into a remarkable artistic and technical subculture and support group. Creating software and interfaces — such as adding a MIDI to a Game Boy — provides access to the primitive sounds of the “low-bit” world (2, 4 and 8-bits’ worth) to make music that relies heavily on creative ways of making a little go a long way.
GOT THE PAPERWORK?
In 1985, about 10 years into my audio career, I built a reissue of a Dynaco PAS-3X, a vacuum tube preamp kit — the one I always wanted but couldn’t afford. Looking back, every step was meticulously detailed (and part of a checklist), with much attention paid to soldering and wiring basics. Helping a friend sell a kit online, plus teaching, has made me that much more aware that the documentation is just as important, and possibly more important, than the kit itself.
CREATING MY LESSON PLAN
Which brings me to my most recent D.I.Y. project: teaching a 10-week basic electronics course in which students build their own preamp. On one hand, the technology is simple enough, but interconnecting it all can be a challenge for students without much specialized, fine-motor-skill experience. (Live and recorded videos were projected to assist students in developing their geek technique.) I refine this course every quarter, but I am always struggling for balance. Making the project easier would dilute its educational aspects, but it still has to be easy enough to complete within approximately 40 hours.
In addition to the basics, students are required to analyze the power supply by midterm and be able to draw the audio circuit schematic from memory for the final exam. In between, they stuff and solder all the components on the printed circuit boards (see the PCB in Figs. 1a and 1b), then wire all the connectors, pots, switches, etc.

Figure 1b: The completed circuit board with solder mask and silk screening. Students stuffed and soldered all of the components.
YOU WILL NEED…
At one time, CAD and PCB-layout software cost hundreds — or even thousands — of dollars. Manufacturing circuit boards requires lots of chemicals, both photographic and for etching copper. The elements required to fabricate a front panel — engraving and the drilling of holes — now come under the umbrella of CNC (Computer Numerical Control).
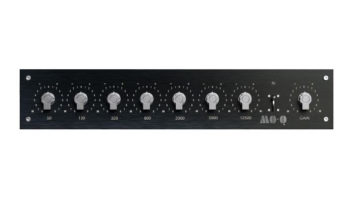
Now it’s easier to make a D.I.Y. project look less like a prototype, thanks to Internet-savvy companies that realize more business by “giving the tools away.” I’m talking about free software that, while somewhat limited (and mostly designed for the Wintel OS), is more than enough to get you started. A year ago, one of my grad students took advantage of Express PCB and Front Panel Express. I was so impressed with the end results that I used his circuit board layout for this project and designed my own front panel. Twenty panels like the one in Fig. 2 cost $500, plus shipping. It really helped inspire my students — building a mic preamp that looked manufactured (at least from the outside) and gave them a sense of pride.
A LITTLE HELP FROM OUR FRIENDS
The most recent kit was made easier when a local manufacturer provided a finished chassis (a scratch and dent sale) and power supply components that required minimal modifications to work with our electronics and custom-made front panel. It was not quite as ambitious as Fig. 2 might imply; students were only required to connect the phantom-power switch, hi-Z input, sensitivity and output level controls — the additional holes were for future options. It’s better to have nicely drilled, unused holes (filled with hole plugs) than to have to drill by hand and label later.
EXTRA CREDIT
Figure 2: This front panel was designed using online software from Front Panel Express. It inspired students to work extra hard on the guts.
In addition to power supply and amplifier electronics, I felt it necessary to include input and output transformers so students would have a better grasp of their benefits. Their ability to convert a signal from unbalanced to balanced increases the Common Mode Rejection Ratio (CMRR). In addition, they isolate the ground from one piece of gear to another, further reducing power- and ground current — related noise.
The other thing that transformers do is impedance matching, with ratios of 1:1 and 1:10 being a typical range for line and mic transformers, respectively. The power is equal on each “side” of a transformer — primary and secondary — a 1:10 (pri:sec) ratio matches the microphone’s low impedance (lo-Z) to the high impedance of JFETs or vacuum tubes. Voltage gain is the result on the secondary side, with a corresponding loss of current (power = volts × amps).
In addition to a transformer’s obvious benefits, one of the most interesting differences is that each type has a sonic signature. Lower ratios are more sonically transparent, higher ratios require more care (in manufacture and implementation) to maintain transparency. Transformers are not “one-way” devices. To reap the benefits of impedance matching, it’s important to understand, for example, how the load on the secondary can be reflected back to the primary; this effect was demonstrated by the load switch on the prototype preamp.
Fortunately, the Websites from most transformer suppliers provide application notes on how best to optimize the circuitry around the transformer. The Jensen Website (www.jensen-transformers.com) is perhaps the best for “white papers” on how transformers work.
QUALITY CONTROL
After creating this course, I can say that these are great times to be a geek. All of the tools are out there to help make your next custom project look professional. All it takes is a bit of discipline, some time and the motivation to get started.
Eddie would like to thank all of the transformer manufacturers for just being: Altran, AMI, CineMag, Edcor, Jensen, Lundahl and Sowter. Additional thanks to Great River Electronics for the chassis.