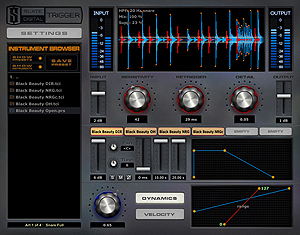
All of Trigger’s operations are performed on one screen.
Trigger by Slate Digital is a cross-platform (Mac/PC) drum-replacement plug-in supporting VST, RTAS and AU formats. It offers dual operating modes: Live for near-zero latency, real-time performance triggering; and Accurate for studio use, which offers 11 ms of sample latency.
Trigger comes with the Steven Slate Drums library, which includes 29 kicks, 44 snares and 26 toms that are each broken down further into layers by subsets labeled Z, NRG and SSDR, resulting in a dizzying number of available choices. For example, within each drum, subsets Z1, Z2 and Z3, respectively, have some overheads mixed in, a slightly compressed attack and enhanced decay, and are straight, close-miked samples. The NRG samples were recorded at NRG Studios’ A Room in North Hollywood using unprocessed stereo room mics, and the SSDR samples are ambient stereo options that were recorded in a concrete warehouse and processed with EQ, compression and other effects. Trigger also includes a Deluxe set with a Black Beauty snare, DW kicks (hard beater and soft beater) and a Heuer Crank snare. All samples were recorded directly to 2-inch tape through premium mics, preamps and processors, and they sound like it—they are excellent.
COMFY YET?
Getting comfortable with Trigger is an easy matter, with its one-stop GUI being its greatest asset. All operational tasks are performed within one window; there are no tabs and there is no need to leave the interface. This was a great time-saver, allowing me to load, audition, mix and adjust my samples quickly. Each instance of Trigger will hold six unique samples. Simply click on one of the six Empty buttons, and browse to the drum of your choice.
Each sample has its own mixer, with volume, panning, solo, mute and polarity controls; ASR (attack/sustain/release) controls; tuning (±100 cents); and dynamics and velocity curve controls. Dynamic curve settings let you set how far the sample’s loudness will vary when triggered. This is great if you have an inconsistent drummer and you want the kick or snare hits to sound more even. The Velocity control sets the linearity of the sample, where you can make a soft trigger’s sample louder and vice versa, or keep it linear. The user’s manual has some handy starting points for these values should you get stuck. Once you have a group of samples you like, you can save them as a preset for later re-use or recall. The drum library comes loaded with some presets if you want to grab and go, but I had more fun making my own.
ONE WINDOW DOES IT ALL
Trigger’s main display shows the waveform, main mix control (0 to 100 percent), highpass filter and Suppression amount (more on that later). You can also audition selected samples or the output of all samples by clicking respectively in the display’s left or right quadrant. I used this feature over and over; it’s a valuable way to quickly get an idea of which of my mix elements needed tweaking. The main window also toggles to a Settings window to set the Detection mode (live or accurate); MIDI options (in/out, on/off, note selection); Articulation controls (more on those later); and the Browser Preset Path.
Below the main display you can set the incoming trigger’s volume and the plug-in’s master output level. Other essential controls include Sensitivity, which sets the engine’s responsiveness to low-level input—aka noise and leakage; Retrigger, which sets a “dead zone” after a trigger input to keep the engine from flamming a sample; and Detail, which is the gate that allows the incoming trigger into the engine for re-sampling.

The Instrument editor is intended for porting external samples into Trigger.
The well-laid-out GUI operates smoothly, providing the exact amount of visual feedback needed to tweak the settings. For instance, the scrolling waveform display enters from the right just as you’re triggering the sample. This display gives you instant confirmation when you alter the Suppression, Sensitivity or Retrigger settings. The suppressed inputs turn red in the display; Sensitivity is measured by the distance of the horizontal line above/below center; and the Retrigger “zone” after the sample hit turns red and gets wider as you turn it up. The ASR, Dynamics and Velocity settings also have generous displays that give you visual cues on what exactly you’re doing when you turn those knobs. Trigger gets high marks for interactivity and user feedback.
If I had to pick a favorite feature, it would have to be Suppression. This nifty ducker lets Trigger ignore everything but the sample you want triggered. To use it, you have to instantiate Trigger on a stereo instrument input. Simply send what you want triggered to the left input and what you don’t want triggered to the right. Then adjust the Suppression control in the main window (30 to 45 worked for me) until you get the desired result. This allows you to set the Detail incredibly low so you’re sampling on the leading edge of the trigger without missing low-level nuance. This feature will save you hours of tweaking.
Speaking of tweaking, Trigger’s controls can be automated, if desired. I found this necessary at the end of one song where the band broke the song down to a soft exit. I automated the Sensitivity and changed the articulation to ignore the loud samples, and that was that. The Articulation settings I just spoke of let you filter out soft or hard hits on toms, kicks and snares, providing two or four levels of nuance, depending on the drum.
OPTIONS, OPTIONS
I’m a Pro Tools user and do a lot of session prep in LE and M-Powered on a laptop. During the review, I was prepping a project for a mix where running Trigger live along with my regular mixing setup would pose a DSP challenge for my Pro Tools TDM host computer. For this reason, I needed to commit to my sounds and record them into my session. Because the non-TDM Pro Tools Version 8 doesn’t offer delay compensation, I used Nuendo 5 and Trigger to replace the drums and take advantage of the DAW’s delay compensation. (This review was written before I could get my hands on Pro Tools 9, which now has delay compensation in the Native versions.) Once I figured out the workflow, it was an easy matter to tighten up my drum kit with Trigger, record the sounds and use Nuendo 5’s new Batch Export feature to get my tracks out to Pro Tools and into my mix session.
This workflow also gave me a chance to triple dip and see how well Trigger triggered, as well as how well Nuendo 5’s Delay Compensation and Batch Feature worked. Everything worked excellently. Once the recorded Trigger samples were alongside my original tracks in Pro Tools, I did a quick accuracy test by setting my Pro Tools Transport window to read in samples, then tabbed-to-transient on my kick, snare and tom hits, and compared them to the samples on the Trigger tracks. They were all spot-on to the sample. Impressive.
COMPARATIVE ANALYSIS
The elephant in the room is how Trigger compares to its primary competition, WaveMachine Labs’ Drumagog 5. Comparatively speaking, Drumagog 5’s filter section offers a fully parametric EQ with bandpass, shelving and Listen options, whereas Trigger’s filter section is fixed. Also, Trigger has no effects; it cannot apply plug-ins, doesn’t offer MIDI output in RTAS and AU formats, and doesn’t offer the depth of instantly compatible sample libraries that Drumagog offers.
Slate Digital is releasing new Trigger sample sets in Q1 2011 and admittedly has some catching up to do. They are also working on new features that expand MIDI capture/export functions and link the Dynamics and Velocity curves for easier operation. Currently, you can port samples into Trigger using the included Instrument Editor, but this is clunky. There’s no batch import/export facility, which means you’d have to individually import and save multilayered samples, figuring out the layering options and other sample nuances as you go. It wouldn’t be easy. I found the Instrument Editor’s manual to be very basic, and it doesn’t offer tips on optimizing your sounds and settings like Trigger’s plug-in manual does.
The bottom line for me: Trigger’s WAV display looks better and offers feedback that is more useful and visual than the competition’s, and I liked the simplicity of its interface. All operations are on one screen, without tabs, right in front of me, ready to adjust. I didn’t miss the effects and processing options, as I prefer to apply these outside the plug-in. GUI preferences aside, Drumagog 5 shines in its access to more sounds. You make the call.
PULL THE TRIGGER
Trigger is an excellent drum replacer. The Suppression feature alone is worth the price of admission and is simply brilliant. I like how the tech disappears once you get your head around basic operations. Although you do have deep levels of adjustment across a number of parameters, for the most part it works very well without a lot of tweaking. In short order, it’s easy to load sounds, audition them individually or in a group, and then hear them triggered accurately. But don’t take my word for it: Steven Slate gave a demo of the product at the 2010 Esquire House studio and engineers David Rideau, Ed Cherney and Tony Maserati were all as impressed as I was. It’s a time-saver, sounds great, is easy to get around and the tracking is spot-on. What’s not to like?
Kevin Becka is
Mix
’s technical editor.
Click on the Product Summary box above to view the Trigger product page.