I’m glad vacuum tubes still exist, but owning vintage or retro gear is not a casual relationship. When vacuum tubes are part of a circuit, knowing when too much current is flowing — and taming it — will maximize tube life and go a long way toward consistent performance. And while there are plenty of sonic nuance issues, this month’s focus is strictly nuts and bolts. Take notes as you tweak and listen.
ALL YOU NEED IS EYES
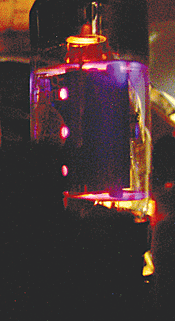
The technically challenged owner doesn’t require any special apparatus to know if a tube amp is running too hot. All you need is eyes and some darkness. Figure 1 defines tube temps in a pair of snapshots. Seeing red in the wrong places means it’s time to become proactive.
Common failure for power tubes ranges from fatigue to transit accidents, such as fall-out and breakage. Previously, power tubes were replaced as they went “bad” — as opposed to today’s matched-pair, everything’s-gotta-be-better-than-original mode — and users took a more haphazard, fill-the-missing-hole approach. Unless someone was particularly conscientious, only the broken tubes were replaced with whatever was lying around.
Figure 1a: A 6L6 in the dark is a warm and wonderful thing. The red glow from within is from the filament (think light bulb), and the hint of blue is normal, too (most of the time).
Before re-biasing, the plate side of the output transformer should be tested with an ohm meter. The resistance from the center tap to each end should be reasonably close; otherwise, no amount of tube matching or bias balancing will even things out.
DOES IT HAVE ISSUES?
There are three reasons to investigate the power stage of a vacuum tube amplifier: current consumption, tube balance and sonic nuance. The first goal is to optimize plate current so that it’s safely within design parameters. If the tubes are truly very close, a quick test will determine if matching/balance is an issue. Variations within the safe region for sonic purposes are your territory. Amps of 25 watts and more typically have adjustable bias, while low-powered amps have fixed bias. In either approach, the grid is made negative relative to the cathode.
Bias adjustments come in three flavors; let’s call them global, balance and matching. Global bias applies the same voltage to both tubes (such as in a Fender ’65 Bandmaster AA763). Balance varies the bias between the tubes (’77 Bassman 10), and matching adjusts the bias on one tube so its current matches the other nonadjustable tube (’67 or ’68 Bassman AB165). Look on the Web or check out the CD-ROM companion to The Tube Amp Book, Deluxe Revised Edition from
www.groovetubes.com to collect schematics for your model and learn about the production variations.

Figure 1b shows the same tube, biased hot, with too many electrons striking the plate. This is reason to turn the amp off and have it serviced.
Excessive current will damage the tubes and, eventually, the output transformer. Both are costly failures. For amps with two or more tubes (always in pairs), knowing the current through each tube can help determine if the tubes are matched (electronically similar) and doing their fair share. Mismatched tubes (or other components) can also affect tone or possibly cause premature failure of the output transformer.
THE OPTIONS
There are three ways to adjust bias on a guitar amp: have it done by a service shop (usually about $50), externally (D.I.Y. 1) or internally (D.I.Y. 2). D.I.Y. 1 does not require the amp to be removed from its case, but it does require that you own or have access to an external bias meter (such as the $200 Alessandro Bias and Matching Meter from www.alessandro-products.com), which has socket adapters and direct reading meters so the user can avoid high-voltage contact. Other companies make less-expensive inline tube-socket adapters for connecting to your meter so that you can safely measure bias voltages. Both D.I.Y. approaches require that you know the adjustment location and the optimum bias voltage. Most kits include a table of suggested settings for a variety of tubes, as well as the bias adjustment location for popular amps.
D.I.Y. 2 requires that you pop the hood, but be warned of the hazards of high voltage (no water, no bare feet, one hand in your pocket). If you’re uncomfortable with working around high voltages, skip this path entirely and stick to D.I.Y. 1 or have a pro do the dirty work. You must also own or have access to a multimeter, a soldering iron and a pair of resistors to make a small modification. Access to a real (or virtual) tube manual/databook is essential.
Figure 2: A typical power amplifier output stage.
HOW I DO IT
The goal is to measure plate current, but measuring the high-voltage side of that circuit can be hair-raising. The safest place to measure bias is at the cathode. Fixed-bias amplifiers tie the two cathodes (pin 8) to ground with a single resistor. Measuring current is done via Ohm’s law (I=E/R). Simply measure the voltage drop across the resistor and divide by the resistor value. (Divide again by two for the single-tube current consumption.) To change the current up or down, make the resistor smaller or larger, respectively. In this circuit, the grid is at ground potential and the resistor allows the cathode to be above ground.
Higher-powered amps use an adjustable negative-voltage power supply. Each tube’s cathode (pin 8, Fig. 2) is tied directly to ground (the green symbol pointing right) and the grid is made more negative to reduce plate current. I measure current by inserting a resistor on each cathode to ground using a value that’s much smaller than fixed-bias designs, so as not to change performance too radically. A range of 1 to 20 ohms is suitable; the latter (as shown in Fig. 2) will allow an easily measurable drop. In this case, 1.76 volts across a 20-ohm resistor yields a current of 88 mA — about as max as you want to go.
I chose a 1-volt drop across the resistor before removing it. (The customer was very happy.) The table details RCA’s suggested plate current range for a 6L6 and a 6L6GC; the latter has a higher power rating. Other nonadjustable variables include plate voltage and output transformer impedance.
STOP, LOOK AND LISTEN
Keep an eye on the plates (in the dark). If you see red, try reducing the current by 5 or 10 milliamps until the tubes stop glowing and listen again. Now, if the amp’s making groovy tones, its tubes will last longer. Be conservative with modern tubes, unless running close to the edge makes your sound and you can afford to replace tubes often.
Checking tube bias is quite similar to checking the oil in your car — it’s not overly complicated, but keeping your tubes healthy and happy will provide better sounds, improved performance and a longer, trouble-free life for your amp. It’s a small investment that pays off in the long run.
Eddie thanks Evan Dvorsak of The Gilded Age and Logan Erickson for allowing the ’65 Bandmaster to fall under the knife. Visit Eddie at
www.tangible-technology.com.
PLATE CURRENT OPTIONS, COMPARED
Table: Plate current options for two common power tubes. Class-A/B1 is closer to Class-A and is likely to be sonically richer. Class-A/B2 is more
efficient and closer to Class-B. You be the judge.