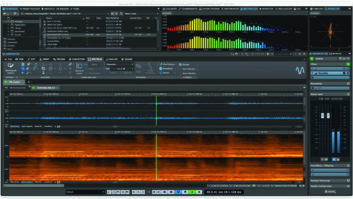
In Spectrum mode, users can identify and edit specific frequencies, leaving adjacent frequencies nearly untouched.
For years, I’ve been using WaveLab to edit half-hour radio shows and assorted podcasts, as well as for CD mastering. My own decision to upgrade to Version 6 was made easier by the addition of several new features to a stereo editor I already enjoy using. The new functions are not eye- or ear-candy, but serious productivity-enhancing tools. Here are some of my favorite shortcuts for using WaveLab 6.
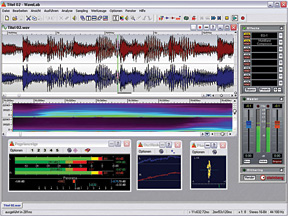
THE NEW VIEW
Take advantage of WaveLab 6’s ability to view audio in Spectrum or Loudness Envelope modes. Spectrum displays a spectrographic image with frequency on the vertical axis and intensity represented by color. Try enabling the Spectrum editor in this mode, which lets you define and edit specific frequency regions. Alternatively, Loudness Envelope displays a graph of loudness over time for the overall signal, as well as within three definable frequency bands. As both displays are independent in the overview and main windows, you can choose to view Loudness Envelope in the overview window and Spectrum in the main window.
SURGICAL EDITING
Together, these two modes make quick work of cleaning up audio. The Spectrum option is particularly useful because it shows things that may not be visible in any other view and the editor allows for surgical removal. For example, low rumble due to air conditioning is usually visible as a line running through the Spectrum view. Using the Spectrum selector, you can select a portion of that line that appears in a quiet passage and extend that selection throughout the audio file.
Using the editor, the selected noise can be “damped” or filtered out with a linear phase filter whose slope is variable up to a steep 96 dB/octave, or can be set to “infinite,” which Steinberg says gives a slope in excess of 1,000 dB/octave. The selection can also be faded out and back in for a more subtle approach. By adjusting the crossfade time, WaveLab smooths out the areas where the filtered audio meets the unfiltered. The results are every bit as good as I get using a broadband noise-reduction plug, but without the artifacts.
P-P-P-PLOSIVES
When dealing with nasty vocal plosive sounds, the Loudness Envelope shows these artifacts quite clearly for editing, and the Spectrum editor also takes care of them. By editing the lower frequencies only, nasty “p” and “t” sounds can be tamed without affecting the intelligibility of the audio.
NAVIGATING THE MODES
Both Spectrum and Loudness Envelope modes recalculate the display when you scroll or zoom, which can be very slow, especially when you are working with long audio files. To avoid this, switch to the Wave view before scrolling or zooming, and then switch back to Spectrum or Loudness Envelope mode. The default key commands for Wave, Spectrum and Loudness Envelope modes are 1, 3 and 5 on the upper keyboard row, so this is quickly accomplished.
ADDING ROOM TONE
Sometimes it’s necessary to add some space between lines of dialog or remove a cough without affecting the timing of the surrounding sentences. WaveLab 6 has expanded its Silence command, adding an option to insert room tone instead of pure silence. Just save a small file of clear room tone and load it into the Silence dialog box. You can either insert the tone at the cursor or use it to replace a selected region. If the room tone is shorter than the audio to be replaced, WaveLab will loop it for you.
CREATE PRESETS
WaveLab lets you create presets for many (if not most) operations, so as you work, don’t forget to create presets — lots of them. WaveLab 6 stores the plug-in settings (as well as their order) in Master Section presets, so if I am using the same plug-ins more than once, then I’ll create a preset for that chain of effects. I’ve built a half-dozen versions of a compressor/tube saturation/EQ/compressor chain for an in-your-face sound, each using different compressors and different settings, and everything is stored in the preset. It is far faster to recall a preset and tweak settings than it is to rebuild an effects chain from scratch. The same advice holds true for other operations, such as normalization, window layouts and time stretching.
FASTER SAVES
Version 6 seems faster even when it isn’t. WaveLab creates .gpk “audio peak” files to accurately display a waveform. Previous versions displayed a blank screen while creating this file, and the only indication was a creeping progress bar at the bottom. In V. 6, WaveLab displays the waveform as it is being created. While this does not appreciably speed up the process, at least it seems faster. Version 6 also offers the ability to specify one folder for all of your .gpk files. Doing this will go a long way toward cleaning up your hard disks, and the program’s disk operations actually are faster than they were in previous versions.
TO UPGRADE OR NOT
For existing WaveLab users, it would be just plain foolish not to upgrade to V. 6 for the Spectrum editor alone. Add to that the Master Section presets that store plug-in settings, improved time-stretch algorithms featuring DIRAC technology and a better-looking display overall, and the $199 upgrade price verges on being a bargain.
Steve Cunningham is on the faculty at the University of Southern California.