By 1999, MIDI was, if not dead, certainly an obsolete and uninteresting technology. Today, it’s hotter than ever. What changed? Virtual instruments came of age. Advances in CPU speed have made computer-based synthesizers and samplers essential in any well-equipped studio. As a result, engineers and producers with years of audio experience are grappling with the finer points of MIDI sequencing.
This article is not about the basics. We’ll assume you know how to get MIDI from your controller keyboard into the computer, how to assign plug-in synths to tracks and so on. But maybe you’re not satisfied with the sound of your MIDI tracks and would like to take them to a higher level. Here are some tested techniques.
GRAB THOSE KNOBS AND FADERS
MIDI was developed to control keyboard instruments. As a result, a typical MIDI performance provides, at best, a gross and imprecise description of how the music should sound. To paraphrase an old joke, “Note-on, note-off, repeat if necessary.” To create an expressive MIDI track, grab the knobs and sliders on your hardware controller and start caressing the sound.
But before you can do that, you’ll need to assign the knobs and sliders to useful parameters in the synth or sampler. Many soft synths have a MIDI Learn feature for just this purpose: Go into MIDI Learn mode, wiggle the slider and the link is set. Having a (mostly) fixed set of assignments for all of your presets will make it easier to remember what each slider does and to learn playing techniques.
The parameters most often assigned to real-time modulation include expression, filter cut-off, envelope attack time, vibrato depth, panning and effect wet/dry mix. Expression (CC11) is usually mapped to volume. The difference between expression and master volume (CC7) is that master volume is used to control the level of the entire track, while expression is applied to individual notes and phrases. If you’re playing a brass or woodwind sound, it may already have MIDI breath controller (CC2) mapped to do the same thing.
Instead of recording a wind section by playing chords on the keyboard, MIDI experts who are going for a realistic orchestral sound will track each part separately, on its own MIDI channel, so that each “player” can have individual controller moves. With string section sounds, try layering the section sample with one or two solo instrument samples mixed in at a low level. This can add to the immediacy of the sampled section, as well as create tiny variations from note to note.
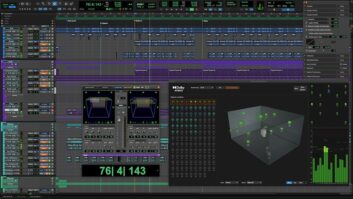
A good way to work is to record the MIDI notes first and then perform your wheel and slider moves as overdubs into the same track. When adding vibrato to a short note, the Pencil tool may work even better than real-time overdubbing (see Fig. 1), but I generally avoid drawing pitch-bends with the pencil because they never sound the way I want them to.
To learn to use a physical pitch-bender, spend some time practicing lead lines. Practice microtonal blues bends upward in the middle of a note, fast bends up from below at the start of a note, subliminal fall-off bends downward at the end of a note, slow and fast bends from one pitch to another and so on.
I like to assign one physical controller to do several things at once. For instance, I’ll increase the vibrato depth, open the filter a little, shove the wet/dry mix of a distortion effect over toward wet and compensate for the added level by pulling back on the output level — all from the mod wheel. If the depth of each modulation is set with care, then the result can be striking. Moving the mod wheel increases the sound’s perceived intensity rather than just adding vibrato.
Figure 1: drawing a MIDI controller contour in Ableton Live. Live’s controller loops can be unlinked from the MIDI note loop, so panning or filter changes can be different each time the notes repeat.
Unfortunately, many soft synths are not set up to allow multiple controller assignments of this type. With a little ingenuity, however, you may be able to engineer a workaround. (See “More Expressive Controller Moves With Reason” sidebar on page 36.) Rather than use MIDI Learn for direct assignments of MIDI controllers to parameters, you may be able to give one CC message several destinations in the synth’s general-purpose modulation matrix, if it has this feature.
IDIOMATIC TRACKS
Because most MIDI controllers are keyboards, and many sequencer users got into technology in the first place because they were keyboard players, it’s only natural that most users play MIDI tracks using their keyboard chops. Natural, but wrong. To produce great MIDI tracks, you need to think like an orchestrator.
Better still, think like each member of the band in turn. If you want a great bass track, then listen to some great bass players. For a realistic string orchestra, study how chords are typically voiced in a string section. If the tune calls for a Hammond organ track, then listen to how Hammond players work the drawbars and the Leslie speed switch. If you’re recording a flute or sax solo, then don’t forget that wind players have to breathe!
With so many great drum loop libraries readily available, you may never need to learn how drummers play, but if you’re building a drum track one note at a time, knowing about typical kick patterns, tom fills and ghost notes will help a lot. And study the genre you’re trying to capture. In Latin music, pay close attention to the hand percussion. In jazz, listen to the ride cymbal and the way the snare moves around rather than locking into the backbeat.
Many sample libraries include sampled fret noise and other performance artifacts. These are often mapped to the keys at the keyboard’s far ends. By deploying these samples at strategic points, you can give listeners the subliminal impression that a real steel-string guitar, for example, was used. Check your libraries for glissando (slide) samples, brass fall-offs and so on.
GROOVE-BASED QUANTIZING
Quantizing is a dirty word in some circles because it’s all too easy to make a track sound rigid and mechanical by quantizing the notes to a strict rhythmic grid. Sometimes, as in dance styles, dead-on quantization is what’s called for. But if the music needs to breathe, there are several tools you can deploy.
First, use a strength setting of less than 100 percent. Quantizing with 50-percent strength, for instance, will move each note halfway from where it was played to the nominally “correct” starting time. This will tighten up the timing of the worst played notes without producing a robotic effect.
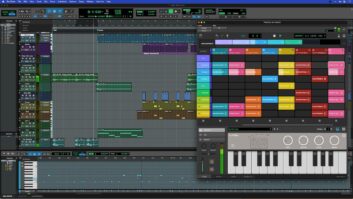
Second, look for the Groove Template menu in the Quantize box. Most sequencers provide a variety of grooves to which a track can be conformed. You may also be able to define and store your own custom grooves (as in Fig. 2) or even extract the groove from an audio clip and apply it to the MIDI notes. Various styles, such as Latin and jazz, require different kinds of grooves. A groove may delay the fourth beat in each bar, for instance, to give the snare a more laid-back feel.
When recording drum tracks, I’ve found it useful to apply a different swing/shuffle percentage to different instruments. The kick and snare might need only an 8-percent swing (meaning that the second and fourth 16th notes in each beat are moved 8 percent of the way toward the following 16th), while a cowbell or shaker part in the same song might benefit from 20-percent swing. This can give the subliminal impression that the percussion parts were played by different musicians.
Even if the MIDI percussion parts are all being played by the same module, you may want to record each to its own track. This makes it easier to apply velocity and timing offsets to individual drums.
I tend to tightly quantize the bass and drums to give the track a solid, rhythmic foundation. However, I’ll quantize other parts much more lightly or not at all. A lead line should breathe. If I’ve played a lead sloppily (as I often do), then I’ll move notes one at a time by hand in the piano-roll editor rather than quantizing.
I generally don’t recommend using the Humanize setting in the Quantize box; this adds a bit of randomness to the note start times, but human players don’t play randomly. Above all, quantize only the note start times, not the durations. Duration quantizing is switched on by default in some DAWs and it’s deadly. The moment when a note is released has a lot to do with the phrasing.
VELOCITY PROCESSING
The only type of control data associated with a MIDI note is key velocity. A velocity between 1 and 127 is actually embedded in the note-on message. When a piano’s keys are struck harder, the note is both louder and brighter, and these parameters (amplitude and LPF cut-off frequency) are most commonly associated with MIDI velocity. Depending on your synth or sampler’s features, however, you may be able to use velocity for other things. For instance, higher velocities can bring out a stronger attack transient at the beginning of a sound. By editing the voicing parameters, you may be able to accentuate or tame this effect.
With multisampled sounds that use velocity cross-switching, a few notes in a keyboard performance may stick out because they’re triggering different samples. Sampled Rhodes and Wurlitzers are notorious for this unfortunate effect. One solution is to scale the velocities in a track down by a percentage, but this can make the track sound bland. I prefer to find the “too loud” velocities in the piano-roll editor and drag them down with the Pencil tool, thus preserving the dynamic character of the part as much as possible. While I’m at it, I may bring up a few velocities that are too low to balance a chord voicing.
LEGATO AND MONO SUBTLETIES
A synth can often do a respectable job on a bass line because the bass’ role in pop music is largely functional: to fill in the low end. But paying attention to the duration and overlap of bass notes is essential, and there’s often no way to get it right except by hand-editing, note-by-note, in the piano-roll window. The type of necessary editing will depend on whether the bass preset is in monophonic single-trigger mode or in polyphonic mode.
If the bass is in Mono mode, then any notes that overlap previous notes won’t be given new attacks by the envelope generators. This smooth effect may be appropriate at some spots in the phrase, but not in other spots. By dragging the end of the note so that it’s almost, but not quite, at the next note, you can get legato phrasing while also preserving the attack of the next note. (See Fig. 3.)
If the preset is polyphonic, then every note will have its own attack transient, but wherever notes overlap, there will be a little splash of mud because two low-pitched notes are sounding at the same time. In this case, tightening the end of the preceding note so that it overlaps the new one by, at most, a few clock ticks will often clean up the mix’s low end in a surprising way.
Figure 2: the Groove Edit window in Mackie Tracktion. The timing of each step can be pushed or pulled by moving the “plungers” up or down.
In either case, you’ll need to shut off snap-to-grid while dragging the right end of the note. Each sequencer uses its own keystroke for doing this. In Digidesign Pro Tools, use the Trim tool and switch to Slip mode (F2). In Steinberg Cubase, turn snap-to-grid on and off with the “J” key. In Ableton Live, hold “Alt” (Windows) or “Command” (Mac) to bypass snap.
PRESET CORNUCOPIA
Nothing makes a MIDI track more useless than choosing the wrong preset. Even if it sonically fits, it may send the wrong message stylistically. (String pads in grunge rock?) If the tone color is fighting with another track, then EQ may fix it, but grab a different preset and you may not need EQ. Editing the existing preset by changing the filter or waveform settings will sometimes turn a trash track into a keeper.
After making any edits in the voicing, save the edited preset (or an entire preset bank) to your project folder for easy backup. Give the preset a descriptive name, including the project name or initials.
One of the great time-wasters in the studio is spending half an hour hunting through lists of hundreds of presets searching for just the right tone color. If your instrument supports it, then create a bank of favorite presets for quick loading.
I generally name my MIDI tracks using the preset name. If I load the song file again six months later, after I’ve downloaded some new banks of presets and items have moved around in the Preset menu, it’s easier to recapture the original sound. To be extra safe, you may want to bounce or freeze MIDI tracks as a project nears completion. Next year, you may be working on a different computer and may no longer have that soft synth installed, but the audio bounce will still sound the same.
MIDI MANIA
Rather than use MIDI, would I prefer to have a live band who could read my scribbled charts, never make a mistake, be available in my modest project studio seven days a week and never charge for the session? Sure. Well, maybe not always.
Synthesizers can make some amazing sounds that no live band could ever create. But whether you use it for realistic emulations of traditional performances or for wild-eyed sonic experiments, it’s safe to say that MIDI is here to stay. It’s not a perfect technology, but it’s good enough to make some great music if you put in the effort.
Jim Aikin writes and edits books and articles about music technology.
MORE EXPRESSIVE CONTROLLER MOVES WITH REASON
Propellerhead Reason is a great general-purpose MIDI module when used as a ReWire client. By instantiating several layered synths and effects in Reason’s Combinator module, you can control parameters in all of the modules from a single Combinator Rotary knob. The knob can be assigned to respond to incoming MIDI controller data, but in Reason 3, the knob won’t respond to MIDI over ReWire, making this type of macro-controller assignment tough to use with a sequencer.
Fortunately, there’s a workaround: Don’t use ReWire to send MIDI to the Rotary. Instead, use MIDI-Yoke (Windows freeware, www.midiox.com) or the Mac Inter-Application Communication (IAC) bus. Assign the MIDI track output in your host DAW to the MIDI pipeline (Yoke or IAC) instead of to Reason directly. In Reason, go to Edit/Preferences/Control Surfaces and Keyboards. In this window, activate the MIDI pipeline as an “external” control surface. Now the Combinator Rotary will respond to the MIDI controller data in the DAW track, not just to the notes.
— Jim Aikin