Like a Polaroid left out in the sun, the hegemony of multiroom tracking facilities in our industry is fading fast. With it goes the seasoned team of recording engineers and technical support staff, a brain bank that green assistants and experienced pros alike could turn to when a session suddenly went off the rails.
Those life rafts are gone. Each of us, whether studio owner or freelance engineer, must now face whatever storm a tracking session hurls at us—alone. It’s sink or swim, and we’d better get back on dry land before the advancing clock sours our clients on a stalled session. Whatever crises arise, our reputation depends on finding solutions quickly.
This month, Mix looks at five nail-biting problems engineers are likely to face at some point in their careers while tracking. We’ll offer solutions to get your session back on track quickly, and we’ll explain the technical reasons why they work. First up: an instant fix for unruly acoustics.
The Ringing Booth
A band wants you to track all their instruments and keeper lead vocals at once, to capture the energy of their live performance. You stick the singer in a small booth that offers the best isolation. Running down the first song, you immediately know you’re in trouble. The powerhouse singer keeps hitting a note that excites a resonant frequency in the iso booth’s observation window, polluting the track with a discordant, ringing tone. You rue the day you decided to use an off-the-shelf thermal window assembly in the window’s construction; its parallel panes of glass are prone to sympathetic resonance, and the chicken has now come home to roost.
You certainly can’t stop the session and replace the window on the spot. In fact, your budget precludes a rebuild at any time. You’re stuck with that window.
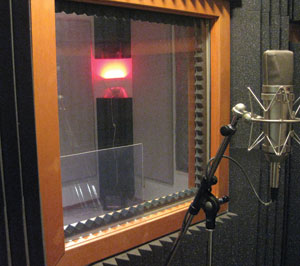
Fig. 1: To eliminate sympathetic resonance in an iso booth’s observation window, Acoustics First BlockAid Transparent Vinyl Sound Barrier is pressed against the lower left corner of the glass pane.
The solution is to press a small patch of transparent vinyl sound barrier against a bottom corner of the glass pane facing into the booth (see Fig. 1). The vinyl barrier needn’t take up more than 20 percent of the pane’s total surface area to be effective. Simply breathe on the side of the vinyl that will abut the glass surface to make it tacky enough to stick to the pane, and sit the bottom edge of the vinyl barrier on the sill to support its weight. The barrier will damp the ringing vibration of the glass and, because it’s transparent, the performer will be able to see through it. Problem solved in 60 seconds!
Let’s take a closer look at this problem and its solution. Sympathetic resonance is a fairly common headache for small booths that use off-the-shelf thermal window assemblies in their construction. When two panes of glass of equal thickness are mounted parallel to each other, they act much like a drum and ring sympathetically at the same frequency. (The rigidity and low mass of glass make it prone to vibration.) In a small booth, it’s difficult to place a singer or instrument far enough away from the glass to prevent loud notes at a specific fundamental frequency from exciting it.
Vinyl sound barrier stops the glass from ringing in two ways. First, it damps the glass’ ability to vibrate. Second, the vinyl barrier effectively increases the mass of the pane it’s adhered to, changing its resonant frequency from that of its opposing glass pane and preventing sympathetic resonance between the two panes. In fact, you can stop the glass from ringing by adhering to it any viscoelastic material (such as rubber or soft plastic) having sufficient mass. Vinyl barrier is a particularly great solution because you can see through it and its pliable, slightly tacky nature allows it to mold uniformly to a glass surface when it is barely damp (vapor from your breath does the trick). Acoustics First Corporation sells its BlockAid Transparent Vinyl Sound Barrier at a cost of $103 for roughly 12 square feet (4 feet wide x 1 yard long, the minimum size they’ll ship). Buy a longer roll to completely cover large windows in order to block sound transmission through them while letting in light.
The Missing Speaker
You’re recording a famous Hollywood actor narrating a book, for release on CD. At the start of the session, the talent declares that he doesn’t want to perform while wearing headphones, as they sound unnatural and are distracting; he wants to just read the book and hear his voice supported by the natural acoustics of the room. The producer, however, needs a way to communicate often with the talent from her seat in the control room. Problem is, you have no speakers wired up in your tracking room; you’ve always relied on routing talkback to headphones.

Fig. 2: To enable talkback in the studio, an active monitor is connected directly to a tieline for headphones.
You consider wiring up a spare speaker in the tracking room, but there’s a hitch: None of the spare audio cables you have on hand are 50 feet long, the length required to span the distance between the control room and the talent’s position in the tracking room. You could patch together multiple cables in series, laying them out on the floor between rooms, but that would still risk having the talent and producer trip over cables as they’re walking in and out of the control room and studio.
The solution is to use an existing tieline for headphones to wire up a spare active monitor in the tracking room. To set this up, first disconnect one of the cables that’s plugged into a discrete channel output on your headphone amp in the control room; this line should already be hardwired on its other end to a headphone jack on your tieline panel out in the studio. Plug the free cable end directly into an unused aux send on your mixer—specifically, an aux send that talkback can be routed to. In the tracking room, plug a short cable into the headphone jack served by the aux send, and connect the other end of the cable to your spare active monitor (see Fig. 2). To avoid a feedback loop, make sure the output for the talent’s audio track is not routed to the aux send you’re using to feed the monitor out in the studio. (To keep a session moving along, producers of high-profile book-on-CD projects typically never play back takes for the talent to hear, but simply have them reread on a separate take any section they feel might not have been up to snuff. An editor cobbles together the various takes later.) It should only take you about three minutes to reroute the headphone feed directly to an aux send and wire up a monitor to the tieline. Problem solved!
The Wimpy Hat
An inexperienced band is tracking basics in your studio. The drummer is hammering the overhead cymbals and snare drum, but he’s playing the arrangement’s intricate, all-important hi-hat pattern like an old lady. As a result, the cardioid mic on the hi-hat is picking up bleed from the snare drum and overhead cymbals exponentially louder than the actual hi-hat sounds it’s intended to capture. What to do?
Fig. 3: To increase track separation, an AKG Vintage TL mic (bottom right) is placed under a hi-hat and set to bi-directional mode with its null point facing the snare drum.
Ditch the cardioid mic. Place a side-address, multipattern condenser mic under the hi-hat and, if possible, point it up at the hat from directly below where it’s being struck (see Fig. 3). Set the mic’s polar pattern to figure-8 mode, and engage a highpass filter to compensate for the pattern’s bass proximity effect. Orient the top of the mic—a null point—to point at the shell of the snare drum so it will reject its sound. The hi-hat itself will form an acoustic shadow—a de facto metal gobo—that will shield the mic from bleed from the overhead cymbals. Problem solved in two minutes!
Why does this solution work so well? A figure-8 polar pattern rejects sound 90 degrees off-axis. For a side-address mic, this means the mic will not only reject sound arriving at its sides, but also at its top and bottom and any other point that lies in the plane that is perpendicular to the head capsule. Furthermore, high frequencies have very short wavelengths that have difficulty wrapping around objects—like a hi-hat. A mic positioned underneath a hi-hat will be shielded from the highest frequencies produced by overhead cymbals, provided there is not a clear sight line from overhead cymbal to mic.
The Loudmouth
You’re recording a performer’s acoustic guitar in stereo with a spaced pair of mics while simultaneously recording her voice with a third mic. Unfortunately, her singing is louder than her guitar playing. How can you curb vocal bleed into the two guitar mics? Also, the singer has a high, thin voice you may need to bolster by using upper-bass and low-midrange EQ boost during mixdown; you realize any guitar bleed into the vocal mic will also receive that boost, making the instrument sound boomy. You need to minimize bleed into all three mics as much as possible so you can balance levels and EQ for their discrete tracks at mixdown.
Here’s the fix: Set up three ribbon or bi-directional condenser mics; that is, side-address mics with figure-8 polar patterns. Position two of the mics (preferably a matched pair) as a spaced pair slightly higher than the guitar, and angle their capsules slightly downward so they aim at the guitar’s bridge and 12th fret, respectively. (This is just a suggested starting point.) Fine-tune each mic’s height and angle so that the top of its head grille—the mic’s null point—is aimed at the singer’s mouth, rejecting the sound of her singing.
Hang the vocal mic upside down so that its capsule is aimed at the singer’s mouth (or slightly higher or lower as needed to respectively capture more head or chest register). The top of the vocal mic—its null point—will be pointing down at the guitar, rejecting its sound. As an added bonus, the mic’s bass proximity effect—substantial with a bi-directional polar pattern—will boost the singer’s bass and low-midrange frequencies, bolstering her inherently thin tone.
If the singer’s voice sounds too boomy or blurry, reduce the bass proximity effect by pulling the mic away from her mouth. Lower the mic slightly and readjust its angle so that the capsule is pointing back up at her mouth and the top of the mic remains pointing at the guitar.
You may need to compromise a bit in your orientation of the mics’ null points. Oftentimes, a little bleed has to be tolerated in order to aim the mic capsules so that they capture the best sounds from the guitar and singer. Nevertheless, using bi-directional mics smartly should give you superior track separation.
The Bleeding Amp
While setting up to track basics for a hard rock album, the producer tells you he wants no mic bleed between any of the instruments. Unfortunately, you’ve run out of iso booths in which to put the guitarist’s amp and, judging by the dude’s big hair, you just know that amp’s going to be cranked up to 11. The drums are in the big room, bass is going direct and the singer and other instruments have laid claim to all of your iso booths. You don’t have an iso box big enough to accommodate the guitarist’s amp. The guitarist insists he’s got to be in the big room with the drummer—the focal point of all sight lines—so he can cue all the players in real time as to the musical transitions for the rubato track.
Fig. 4: The Radial SGI Studio Guitar Interface System can purportedly drive cable runs up to 300 feet without signal loss.
Your only recourse is to place the amp in a narrow hallway outside the tracking room or in a bathroom down the hall. To keep the amp and its mic from impeding foot traffic in the hallway and suffering the corridor’s horrid flutter echoes, you opt to place the amp in the bathroom. The bathroom presents two challenges: First, it’s around 80 feet away from where the guitarist wants to stand; an unbalanced line that long is bound to fall victim to electrical noise and lose high frequencies en route to the amp. Second, the bathroom is very reverberant—not conducive to recording. This conundrum is going to require a two-part solution.
First, break out a Radial SGI Studio Guitar Interface System for the guitarist to use. The SGI system includes the SGI-TX transmitter and the SGI-RX receiver (see Fig. 4). The SGI-TX, placed in the tracking room, will convert the noise-prone unbalanced guitar signal into a balanced signal and drive it over the long haul to the bathroom, where the SGI-RX will convert the audio back to an unbalanced signal the amp can accept. Have the guitarist plug his standard-length guitar cable into the unbalanced input of the SGI-TX. Route a long balanced, low-capacitance mic cable with 100-percent shield coverage—such as Mogami W2549—from the SGI-TX’s balanced output to the bathroom and the SGI-RX’s balanced input. (The cable’s ultra-low capacitance will help preserve high-frequency response, and the full shield coverage will block electromagnetic interference.) Patch a short guitar cable from the SGI-RX’s unbalanced output to the guitar amp’s input. The SGI system’s transformer balancing will reject hum and buzz from ground loops. The guitarist can temper the signal’s high-frequency response by turning the SGI-TX’s Drag Control pot, which adjusts impedance from 22 kilohms to 1 megohm (1 megohm providing the brightest sound).
On to the next challenge: The nightmare bathroom, which has a tiled floor, sounds like a funhouse. You need to create an acceptable acoustic environment within the bathroom for the amp and its mic. This will require absorbing as many peashot echoes and as much room tone as possible. Place a directional mic close to the amp’s grille to maximize the pickup of direct sound. Surround the front of the amp and its mic with tube traps and sofa cushions—anything you have on hand that’s absorbent—and place acoustic foam or a blanket over the top of your sound-absorbing enclave. Heap throw rugs and blankets over any remaining exposed tile, leaving a walkway from the bathroom door to the amp so the guitarist can tweak the amp’s controls, if necessary. Problem solved!
Grace Under Pressure
It’s hard enough handling a potential showstopper while tracking, but it becomes even more difficult when anxious clients are looking over your shoulder. How you react to the challenge will set the tone for the rest of the session. So let the storm winds blow and the waves of chaos rush in. But never let ’em see you sweat.
Mix contributing editor Michael Cooper is a recording, mix, mastering and post-production engineer and the owner of Michael Cooper Recording in Sisters, Oregon.