Condenser microphones are the topic this month and I have a greatstory about them with a funny ending. But first, mes amis, Imust tease you with the usual geek diversions, so hang in, okay? Iattempted to repair a condenser mic capsule using a generic materialthat is most likely available at your local science museum and,certainly, on the Net. I don’t have much self-control, but let’s see ifyou can do me one better and read the whole story — nopeeking!
THE AGING PROCESS
A pair of AKG CK-1 cardioid capsules came in for evaluation, thetype used on the 451/452 Series preamp bodies. One capsule was dead,and the other noisy. Outwardly, condenser microphone mechanics arerelatively simple (like any capacitor), with a pair of conductorsseparated by a nonconductor. That is, of course, until it becomesdesirable to expect identical performance from each capsule. Parameterssuch as frequency response, noise and output level rely on consistentdiaphragm tensioning, low-noise components (active and passive),high-quality insulators and long-life materials, including adhesives.That’s the nature of it. Noise in condenser microphones can be elusive.More than the typical spurious emissions from tubes and transistors,the capsule itself can be a noise source.
D.I.Y. CAP
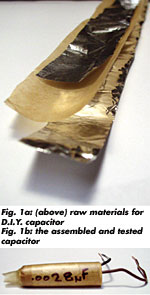
For a better appreciation of how delicate, yet resilient, theselittle critters are, let’s mentally roll our own capacitor, then shrinkit down to “microphonic” size. Take two sheets of aluminumfoil sandwiched around two sheets of paper insulators, wrap around thecenter connecting wire, add a wire to the outer foil and thenencapsulate with shrink tubing (or dip in wax if you’re feelingold-fashioned). I actually did this just for fun (see Figs. 1a/1b),creating a 0.0028-micro-Farad cap in the process.
KEY THREE
For a condenser mic, the principle components are the diaphragm, airand backplate. With the CK-1, there is an insulating ring around theperimeter of the backplate. The diaphragm’s base material is a thinplastic sheet — a nonconductor — with a molecularly thincoating of a conductor, such as gold, aluminum or nickel, on one side.Total thickness is typically between 3 and 6 microns, thin enough tosee through to the backplate, which is a metal part with“holes” that act as either air cavities or vents, asneeded. In the rear of the CK-1 is a vent capped with a cintered bronzeplug used to restrict airflow. AKG used a similar material as awindscreen/pop filter on some of its earlier handheld mics.
The capsule has a measurable capacitance; for the CK-1, it’s about30 pico-Farads (pF). A DC polarizing voltage is applied to the capsuleso that changes in sound pressure vary the capacitance and, in turn,the DC voltage. This tiny signal is fed to an ultrahigh-impedancevoltage amplifier before exiting the XLR and making the journey throughsome length of cable. The impedance issues are not just electronic, butalso mechanical and acoustic, which contribute to sonic character anddirectional characteristics. After achieving precision in themanufacturing process, it’s relatively simple to maintain repeatablecontrol over each facet.
Of the vulnerabilities, human breath and other forms of highhumidity will eventually deposit a layer of organic funk on thediaphragm, plus there is a possibility of puncture wounds by vocalistswho have a propensity for projectiles. That makes a pop filter, if nottwo, de rigueur. For some capsule designs, the funk can grow over areaswhere there is no plating and the resulting conductivity may produceintermittent noise. Even worse: A particularly “wet”plosive can short out the capsule.
THE EXPERIMENT
Of the two CK-1 capsules, the dead one was disassembled, revealing adiaphragm that had separated at the edge either from age or, morelikely, during a previous disassembly/cleaning attempt. I normally sendcapsules out for repair and had no intention of making a career change,but a recent trip to the science museum with my kids yielded a spaceblanket that seemed like it might serve as a crude diaphragm material.I had to see just how far my science fair exercise would go.
The first step was to determine which side of the film wasconductive. In Fig. 2, note that the space blanket has a gold and asilver side. The gold side was conductive, so it would go on theoutside. Five-minute epoxy was chosen as the glue. Now, all I had to dowas suspend the film in such a way to eliminate wrinkles and minimizetension; the backplate assembly would create tension by its ownweight.
A solder-wick spool was used to suspend the material, Scotch tapesecured the edges and glue was applied to the outer rim of the capsule(a band of white plastic insulating material that, by my guess, is mostlikely Teflon). After allowing sufficient time for the adhesive tocure, the space blanket material was trimmed and the capsule reinsertedinto its housing and screwed into the head amp. When it worked rightoff the bat, I was completely blown away. That it compared quitefavorably to the reference capsule in terms of output and spectralresponse added to my amazement. Figure 3 depicts a normal CK-1 capsuleside-by-side with the mutant space blanket version.
This fascinating detour increased my appreciation for microphonedesign and manufacture. I dove back into a short book, simply entitledMicrophones by Dr. Gerhart Boré, which was published byGeorg Neumann GmbH in 1973 and reprinted in 1989. The book details alltypes of microphones, including the types of tensioning and dampeningemployed in various designs to achieve what we ultimately take forgranted: a usable microphone. To say that I got more out of this bookthe second time around after some hands-on experience is anunderstatement that reinforces what this column is about: encouragingthe scientist within.
As challenging as it was to work with space blanket material that,by my estimate, was somewhere between 10 and 20 microns thick (0.001inches = 1 mil = 25 microns), I can only imagine the challenge ofworking with 3-micron material. Of course, having the proper tools andinstruments would make the process easier. One can never have enoughtools — a micrometer is only $150.
In closing, I would like to thank David Josephson at www.josephson.comfor recommending Boré’s book to me several years ago. Also, whilethis article provided a fun excuse for some home-brew experimentation,neither myself nor the publishers of Mix magazine accept anyresponsibility for the action of readers who destroy irreplaceablevintage or modern condenser microphones in their attempts to duplicatethe space blanket diaphragm-replacement procedure described herein.
Visit Eddie Ciletti atwww.tangible-technology.comfor morefun!