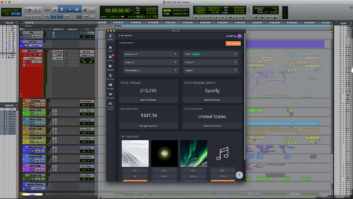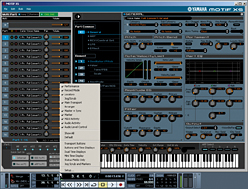
The Yamaha Motif XS Studio Manager window running in Cubase, with the voice-editing panel opened. At the bottom is the Cubase Transport, with a pop-up menu containing options for altering its appearance.
I’ve been using Cubase for many years — not because it’s necessarily superior to any other program, but because I’m fast on it. Even so, the software has hundreds of features I’ve never tapped, so your list of favorites will be different from mine. Here are some suggestions for taking your Cubase experience to the next level.
TEMPLATES
If you have several setups that you use often, create an empty project for each of them and use the Save As Template command in the File menu. Many aspects of Cubase’s appearance can be customized, and your templates can reflect the various options. Right-click on the Transport and choose the controls you want to see: For example, I never use the jog/scrub wheel or the Arranger section, so I hide those. You can do the same thing with the toolbar above the main Track window. Also, the Setup item in the pop-up menu opens a window where you can change the order of the items in the Transport and toolbar.
Above the track list area is a row of buttons (including Global Mute and Solo). At the right end of this row is the incredibly useful Divide Track List button. Clicking this creates a horizontal separator between two independent track views. I always put my Marker track in the upper-view by itself so that the Marker track is always visible, no matter how I scroll the rest of the track area. If you have a lot of tracks, then you may also find it useful to add an extra Ruler track lower down in the track list.
MARKERS
Cubase inserts numbered markers starting with 1, but after creating a few markers I generally use Ctrl-M to open the Markers window and renumber them starting with 3. The keys on the numeric keypad locate the Transport to marker locations, but keys 1 and 2 are reserved for the left and right locator points. (You can get to markers 1 and 2 by shift-typing the number keys above the QWERTY row.)
When using looped playback or record, add a Cycle marker using the button on the marker track. This will store the current left and right Locator points as a Cycle marker pair. You can then move the Locators instantly to any Cycle marker from the drop-down Cycle menu in the marker track. Markers can be named in the Marker window or (more conveniently) in the info line above the track area.
KEY COMMANDS
The keys I most often use are F3 (open/closes the mixer window), F11 (open/closes the VST Instruments window), the numeric keypad asterisk (starts recording) and F, which switches Follow mode on/off for the current Edit window, causing the window to scroll with the playback cursor or stay at the current location. In the piano roll editor, Q quantizes the selected notes. If nothing is selected, it quantizes all notes. Shift-I performs an “iterative” (partial) quantize, based on the setting in the Quantize Setup box.
If you need key commands that aren’t in the factory set, then open the Key Commands window (from the File menu). Just about every command in the program is available here. If you do a lot of audio editing, for instance, you can assign key equivalents to the items in the Audio > Process menu. You can also create key-command presets, which could be handy for different types of projects or for different users.
The J key switches the snap grid on and off. I find J especially useful when editing MIDI parts in the piano roll because I don’t like to snap the ends of notes to the grid. After dragging the start of a note to a precise rhythmic location, I hit J and then move the end of the note slightly to control the phrasing. Complete screen layouts can be stored using Ctrl-NumPad-0, and then recalled using Alt-NumPad plus a number. Any changes you make in the currently active layout, called a Workspace, will be stored unless you lock the Workspace with Alt-NumPad-0.
YAMAHA STUDIO MANAGER
As plug-ins demand more and more CPU power, my 3-year-old PC is starting to bog down. For meat-and-potatoes MIDI tracks, I’ve turned to my Yamaha Motif XS, which links to Cubase using an mLAN FireWire cable.
Once you’ve installed the Motif driver and editor, select Studio Manager from Cubase’s Devices menu to open an empty Studio Manager window. In its File menu, select Setup. You’ll see the Motif XS in the Device Editor column. Click the Add button and then OK to add a Motif Editor (shown above) to the Studio Manager window. Double-click this editor’s icon to see a big mixer window with slots for the Motif’s 16 multitimbral parts.
To link with the Motif, click the green Offline button. This opens the Auto-Sync window. Click the Start button near the bottom of this window; when the progress bar finishes moving, the Motif mixer window will return, where a green button will glow and indicate Online. Now any changes you make will be mirrored in the Motif and the entire setup will be saved with your Cubase project, just as if the Motif were a VSTi.
Jim Aikin (www.musicwords.net) is a frequent contributor to Mix and other music magazines. When he began using Cubase, it was a MIDI-only sequencer running on the Atari ST computer.