No matter what amenities you associate with world-class facilities, space is the biggest luxury. Forgive the generalization, but facilities that begin on a much smaller scale tend to have less space and, conversely, require more attention to acoustic detail. And no matter what, there is a point where the acoustic treatment decisions become as subjective as the recording process itself — a mixture of art, intuition and science.
Whether we realize it or not, we are all students of acoustics. Yes, there is an art to microphone choice and placement, but when the results fall short of the mark, too often it’s the transducer that is unfairly judged. For the moment, consider the mic as a piece of test equipment that’s simply “reporting” on the surroundings. Now, assuming you have a decent mic and its placement is okay, if you don’t like what you hear, then perhaps you should think about the recording environment.
In the ’70s, I struggled to capture ambience in acoustically dead studios. Now, I often work in smaller, “harder” spaces. If I’m not careful, I end up with a much more brash sound: too much is being reflected back into the mics. This also occurs when musicians are playing to that imaginary arena in their heads rather than playing to accommodate the space. Smaller spaces generally need a more complex approach to acoustic treatment.
THE ACOUSTIC TRIO
Absorption at frequencies above 500 Hz is fairly easy to comprehend. No smoke is required, but the simple use of a few carefully placed ordinary mirrors will allow you to see the most obvious reflective paths, such as from the side walls to the listening position in a control room.
Trapping from 500 Hz down to the bass region is a bit more challenging — another facet of the treatment process that I addressed in my April 2005 column. Simple bass traps placed in corners are effective down to about 100 Hz. In either case, the goal is to get an even decay time across the frequency spectrum rather than excessively absorb any one region.
Diffusion is another animal altogether. Whether in a control room or studio, the goal is to break up an obvious reflection in an area that does not require absorption. For example, two parallel reflective surfaces will ping. Diffusion breaks up a single obnoxious ping into many more “random” reflections that contribute in a more subtle and positive way to the decay time. This parameter tweak is included in better reverb/room simulators, hardware and virtual.
CRATE R. B. WARE
In the old days, the creative home studio geek nailed egg cartons to the walls, breaking up flat surfaces to fix the obvious pings. While the mere thought of this makes acousticians cringe — even more so than shag carpeting — it was a positive conceptual step for those on a budget. Diffusion needs to be more random or, at least, psuedo-random. Not only are egg cartons a fire hazard, but the many pockets of identical cavities have the potential to resonate and tend to affect a very narrow range of frequencies.
This brings us back to what makes a diffuser. Surely you’ve seen the skyline-style diffusers made from wooden building blocks (or molded plastic) of various heights and roof angles. The “buildings” are as important as the cavities they create.
This month, I enlist the help of two acoustic scientists to write about their soapbox issues. Terry Hazelrig is an Alabama-based acoustician who has been helping me understand the math and science behind the art of creating diffusers. (See “What’s the Diff?” sidebar.) During our conversations, Hazelrig casually mentions more than a passing interest in the recently closed Muscle Shoals Studios. The resulting overflow will be included in the online version of this column at www.tangible-technology.com.
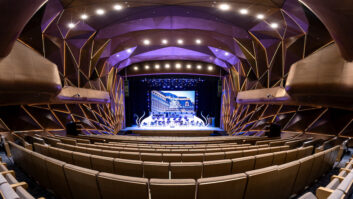
Three of Hazelrig’s vertical panels are shown in the photo on the previous page. These were designed to surround the drum area at Fur Seal, a Minneapolis-based studio. One face is partially covered with absorptive panels and the opposite side with cedar shakes. The shakes are at different heights to improve their effectiveness in dispersing sound coming from almost any angle. The panels can be rotated to optimize the sound to an engineer’s taste. The space between the panels allows the drums to “breathe.”
Sometimes we forget or overlook the obvious, to which there may be a simple solution. The near-field monitoring environment is addressed by Todd Rosso. (See “Don’t Forget the Little Guys” sidebar.) Rosso is a physicist who teaches basic acoustics at IPR (The Institute of Production and Recording) in Minneapolis.
The more you learn, the more you realize what you don’t know. While acoustics is a science, there are only so many known quantities to plug into an equation. After construction, it is still necessary to listen and make adjustments. It cannot be over-emphasized that there is no one “fix,” and excessive treatment can be as bad as no treatment. Be moderate and be well!
WHAT’S THE DIFF
Diffusion (for audio purposes) is the control of reflection’s phase relationships in a recording studio or performance venue. There are several ways to achieve diffusion in the studio. One is to alternately place acoustically absorbent materials with reflective ones. (Think of a checkerboard.) This is frequently recommended when replacing/upgrading acoustic foam panels. Another way to make reflective surfaces irregular is by placing stairway “stringers” of different elevations side-by-side on a wall and nailing boards to it to create a “zigzag” pattern.
A more complex approach is to use mathematical sequence diffusers that are designed so that each elevation of the unit — its wells — are precise mathematical ratios to one another. This gives excellent diffusion and is extremely effective in controlling reflections. They are not easy to build — so they can be quite costly — but are well-worth the investment. These types of diffusers provide either one- or two-dimensional diffusion: Some reflect only in the horizontal plane while others reflect in the horizontal and vertical planes. One is not “better” than the other; each does its job in different ways.Lastly, using curved panels — shaped like a cylinder, half- or quarter-moon — has been around for much longer and proves to be very effective. These poly-cylindrical elements — or “polys” — provide diffusion by virtue of their rounded shapes, sending any incident sound wave in different directions according to where it strikes the surface. Only waves directly on-axis are reflected back toward the source, thus creating a diffuse sound field. (Note: When the angle of incidence equals the angle of reflection, it is referred to as being “specular” in nature.) TubeTraps® are a form of poly-cylindrical diffuser (currently manufactured by ASC), a well-designed product that can make a big difference in smaller studios.DON’T FORGET THE LITTLE GUYS
By Todd Rosso
More often than not, near-field reference monitors are the primary critical-listening tool. Here are some simple tips to optimize the near-field listening environment.ISOLATION AND REFLECTION
Placing near-fields on the console’s meter bridge creates the combination of direct and delayed sound, which causes a comb filter effect, a cyclical cancellation of frequencies. Reflections from the console surface will affect mid- to high frequencies. As an experiment, send pink noise to one monitor, sit in the stereo sweet spot and have an assistant lift the speaker off the meter bridge. You will hear the difference almost immediately in the midrange.Sound travels faster through solids than air, causing the low to mid-frequencies to arrive slightly before the direct sound. A dense rubber pad between the monitor and the bridge minimizes mechanical transmission, but doesn’t solve problems at the other end of the spectrum.You can kill two birds with one stone by placing the monitors on speaker stands behind the console. It’s still a good idea to mechanically decouple the speakers to avoid transmitting sound through the floor. The rear “face” of the console should be acoustically absorptive to minimize potential reflections.LOCATION AND SYMMETRY
As a starting point, speakers should be the same distance from each other as they are from the listening position, forming an equilateral triangle. Angling the monitors 30 degrees toward the center will improve the stereo image and minimize reflections to nearby surfaces outside of the primary listening area.Consider the room boundaries. For example, parallel left/right side walls should be acoustically treated with absorptive material. In the design stage, splaying the side walls out — so that reflections are directed toward the rear of the room — requires less treatment.LEVELS AND BALANCE
Confirm that your stereo bus is balanced by sending tone through a channel strip, panning hard left to set the reference level — 0 VU if analog; between -14 dB below fs and -20 dB below fs if digital — and then pan right to hopefully see the same level.Pink noise and an SPL meter can be used to calibrate and balance monitor levels. Achieving proper phase (timing) and level balance from each monitor to your ear will not only improve the stereo image, but also allow the monitors to deliver their designed frequency response.Eddie, Todd and Terry love to experiment. You can hook up with them at
www.tangible-technology.com.

