At first glance, Objeq Delay appears to be a conventional stereo delay plug-in. But what makes it unusual is that it processes the dry signal by exciting a virtual acoustic resonator—a drumhead, string, plate or beam—before sending it on to delay lines. What’s more, because the virtual resonators are not derived from convolution or fixed samples, you can change the characteristics of the resonators in subtle or dramatic ways to create a wide variety of timbres—including prominent resonances—in the delay signal.
The cross-platform Objeq Delay is available in AU, VST, RTAS and AAX Native plug-in formats. I reviewed Version 1.0.4 of the AU plug-in in Digital Performer 9.5, using an 8-core Mac Pro running OS X 10.9.5.
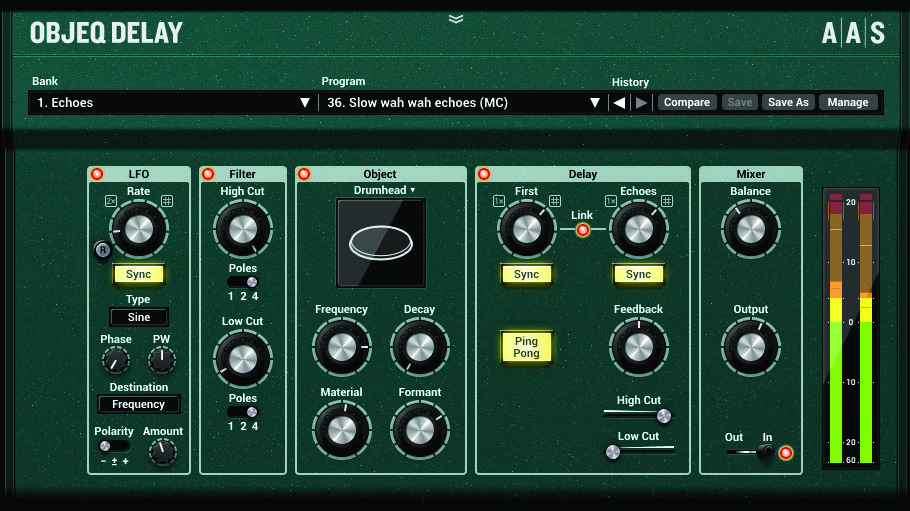
Objeq Delay’s input signal is first (optionally) processed by Low Cut and High Cut filters, followed by one of four acoustic resonators you select from a dropdown menu. From there, the signal passes through a pre-delay, followed by a second delay fitted with a feedback loop. An included LFO can be routed to a single filter, resonator or delay parameter. Controls for adjusting output gain and wet/dry mix are included.
Time-based parameters can be synched to your host sequencer’s tempo and set to any note value ranging from a 32nd to whole note. The LFO module can also be synched to dotted or triplet note values. You can quickly change the current note value by using an automatable control that multiplies the current note value by a factor of ½, ⅔, 1 (unchanged), ¾ or 2 (twice the current value).
In the GUI’s Object control section, you can alternately select a model of an elastic string, rectangular beam, rectangular plate or circular membrane (drumhead) to process the input signal and change its timbre. The object you select is virtually vibrated and caused to resonate by your input signal, producing a sound that’s subsequently run through the plug-in’s delay lines. You adjust the virtual object’s primary resonant frequency from 20 to 4,000 Hz using the rotary Frequency control; this is akin to changing the size of the object in the real world.
Turning the Decay knob clockwise increases the decay time for resonant partials (harmonics) generated by the vibrating object, adding sustain. Rotating the Material control clockwise increases the decay time for higher partials, resulting in a more metallic sound. As you adjust the Formant control, you move the spot at which the input signal will excite the virtual object and cause it to vibrate, which in turn changes the relative amplitude of the different partials generated; a full counterclockwise setting makes the input signal excite the edge of the object, whereas a full clockwise setting applies excitation at its center.
The resonators can be further conditioned to resonate only at bass, midrange or high frequencies by adjusting the Low Cut and High Cut filters that process the input signal beforehand. You can adjust the cutoff frequency for each of these filters from 20 to 20k Hz and independently change their filter slopes to be -6 dB/octave (“1 Pole” setting), -12 dB/octave (2 Poles) or -24 dB/octave (4 Poles).
After the input signal is processed by the cutoff filters and your chosen resonator, it goes on to two stereo delay lines, the parameters for which are adjusted in the plug-in’s Delay control section. The First control adjusts delay time for the first delay line in the audio path, which is a simple delay with no feedback control or filters. The Echoes control adjusts the delay time for the second delay line. The second delay line also has controls for adjusting feedback (decay rate of re-circulated delay signal) and cutoff frequencies for High Cut and Low Cut filters that process its re-circulated echoes. You can adjust the delay time for each delay line independently—setting their values either manually (shown in seconds) or in sync to your DAW’s tempo (displayed as note values)—or link them so that they both have the same value. Activating the Ping Pong button re-circulates echoes alternately in left and right channels.
In the GUI’s LFO control section, you can select from a wide variety of LFO waveforms to modulate a parameter for a filter, resonator or delay. Alternatively, the selected LFO can modulate the amplitude of Objeq Delay’s wet output signal. Unfortunately, only one parameter can be modulated at a time. Perhaps more important, modulating a parameter doesn’t animate its control knob nor produce a dynamic readout for the changing parameter values; you’ll need to rely solely on your ears to tell across what range of values the parameter is being swept.
From a dropdown menu in the LFO control section, select a Sine, Triangular, Square, Random or Random Ramp basic waveform; the latter two selections are respective variations on the Square and Triangular waveforms that introduce erratic amplitude values. By adjusting the PW (pulse width) control, you can stretch or compress the selected basic waveform at different points in its cycle, creating asymmetric shapes; this greatly expands the variety of LFO waveforms you can use to modulate Objeq Delay’s parameters.
The LFO’s Phase control adjusts the starting point of each waveform (for example, at a peak or trough). Turn the Rate knob to adjust the LFO’s rate in Hertz or, when the LFO’s Sync button is activated, in note values synced to your DAW’s tempo. Turn the Amount knob to adjust the amplitude of the modulation signal. A three-position switch labeled Offset changes the polarity of the LFO waveform and/or decreases the relative amplitude of its destination’s value; that last bit is a mouthful, but rest assured the operation manual provides helpful illustrations that make the effects rendered by the switches easy to understand.
Like the output-gain and wet/dry balance controls, Objeq Delay’s Mixer control section includes an Out/In switch that determines whether the input signal will go through the plug-in’s effects (In position) or not (Out). When you place the switch in the Out position, any preceding echoes will still go to the plug-in’s output—a great feature, because it lets you apply effects to isolated phrases when used while deactivating your DAW’s effects bypass button. A hidden, fixed limiter (with no controls) is placed at Objeq Delay’s output, affecting summed wet and dry signals at or above -1 dBFS level.
Objeq Delay can create conventional slapback echoes, echo trails, ADT effects and so on when you bypass the Object control section, but the magic begins when it’s activated. I created fascinating ping-pong echo trails with shifting timbres by modulating the Drumhead resonator’s Frequency control with a sine wave LFO. By modulating the Decay control and cutting highs and lows in the Filter module, I crafted a telephone-speaker timbre on echo trails with constantly changing sustain—a great effect for vocal tracks.
Using the String resonator alone (Delay and LFO bypassed), I tuned a kick drum to the key of the current song. And depending on how other controls in the Object control section were set, cranking the Decay control on vocal tracks could be made to produce wild sounds ranging from whistling noises to a cross between R2D2 and ringing church bells; while not broadly useful, sweeping the Frequency knob with such setups can create cool dive-bomb effects. These are just some of the many unique delay effects Objeq Delay delivers.
Objeq Delay offers no independent pan and output-level controls for left and right delays in the plug-in’s stereo configuration. Regardless, I give Objeq Delay high marks for what I value most in a plug-in: its ability to cook up unique sounds my other tools can’t produce.
PRODUCT SUMMARY
COMPANY: Applied Acoustics Systems
PRODUCT: Objeq Delay
WEBSITE: applied-acoustics.com
PRICE: $139
PROS: Produces unique delay effects. More than a dozen parameters—including the resonators’—can be modulated. Good documentation.
CONS: Modulating a parameter doesn’t animate its control. No pan and output controls for left- and right-channels’ wet signals.