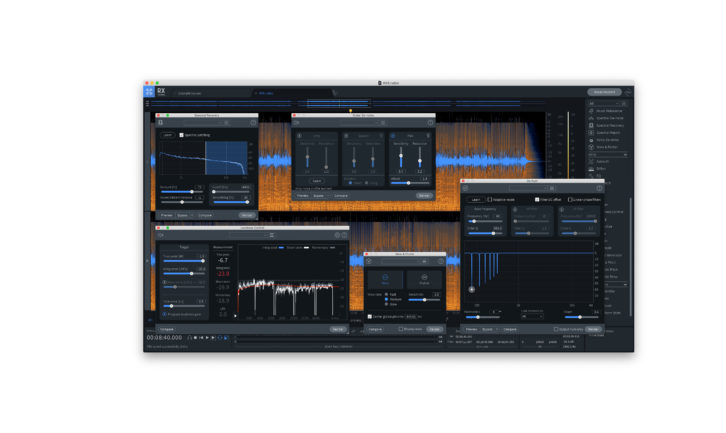
I always look forward to version updates of iZotope RX, the company’s module-based audio repair suite, because I know they will include powerful new features. RX8 (Mac and PC) holds true to form, offering several new modules and significant revamps of several returning ones.
RX comes in three versions, RX8 Advanced and the more affordable RX Standard, and the inexpensive RX Elements. The latter has a minimal feature set, and I’ll focus here mainly on the Advanced and Standard versions.
RX Advanced has become a mainstay in audio post-production, and the Standard version has found its way into plenty of home studios. In this review, I’ll look at the many new and improved features, but first a quick overview of RX for those unfamiliar.
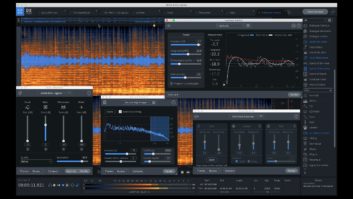
RX is an audio editor centered around an editable, overlaid spectrogram/waveform display that lets you control how much of each is visible.
It comes with an extensive suite of audio repair and manipulation tools useful for audio editing and repair for film and video, broadcast, podcasts, music, and more. Many of the modules also come in plug-in form, allowing you to open them inside of your DAW.
The modules include various de-noising tools for specific issues such as hum, clicks, bleed, clipping, crackle, plosives and mouth clicks. You also get tools for tasks such as EQing, adjusting gain, leveling audio, changing pitch and time, and adding dither.
RX also includes an AI-based Repair Assistant feature, which analyzes your audio and suggests several options for cleaning up problems that it detects.
Guitar-Noise Destroyer
One of the highlight additions in RX8 is a module called Guitar De-Noise (Advanced and Standard). It features three sections: Amp for reducing amp noise; Squeak for getting rid of finger squeaks; and Pick to control harsh pick attacks.
You can use any combination of the sections and Render their processes individually or simultaneously. Each section has sliders for adjusting Sensitivity and Reduction (amount), and the presets provide typical settings for each.
iZotope designed Amp to reduce static, tonal noises like buzzes and hum, and hums that are too harmonically complex for the De-Hum module.
I tried it out on guitar tracks with a lot of amp buzz and found that it worked as advertised. You first select a section of noise that’s by itself and click the Learn button so that Amp can calculate the necessary reduction settings. The only drawback is if you’re not able to find a spot of noise by itself, in which case the Learn function won’t work and you’ll probably have to use one of RX’s other de-noising tools instead.
For removing finger squeaks, Squeak is a real time-saver. In the past, I would use RX’s Spectral Repair module for that task, but I had to address each squeak individually, and that could be time-consuming on a song-length, squeak-heavy part.
With Squeak, you only have to choose whether the Squeaks are short (under 200 ms) or long (up to 1,000 ms) and try different settings with the Sensitivity and Reduction sliders, keeping them as low as you can while still reducing or removing the squeaks. Settings too high can make the track sound muffled.
I wasn’t always able to remove all squeaks while keeping the settings low enough not to degrade the audio. But even when it didn’t remove them all, it reduced them sufficiently that they were no longer problematic. If need be, you can always go in with Spectral Repair after the fact to fix a troublesome squeak or two.
The Pick section is designed to reduce harsh pick transients. In addition to Sensitivity and Reduction sliders, it also has an adjustment for attack speed. I found it useful for subtly adjusting pick attack and smoothing it out where necessary.
In Recovery
Spectral Recovery (Advanced) is a new feature aimed squarely at post-production. Its purpose is to restore upper frequencies to bandwidth-limited spoken-word audio, such as interviews or other content recorded through Skype or Zoom or one of the other VoIP services.
The workflow is simple: You press the Learn button, and it analyzes your audio and makes settings suggestions for the Cutoff Frequency (where the existing audio stops) and Smoothing parameters. The latter controls the width of the crossfades between new and existing audio. You can also set the Amount control, which governs the amount of energy added above the cutoff frequency.
As with all the other modules, you can preview your settings, and when you’re happy with them, press Render. If you compare the spectrogram before and after you render, you’ll see that the upper frequencies get restored, and the holes in the audio from compression artifacts get filled in.
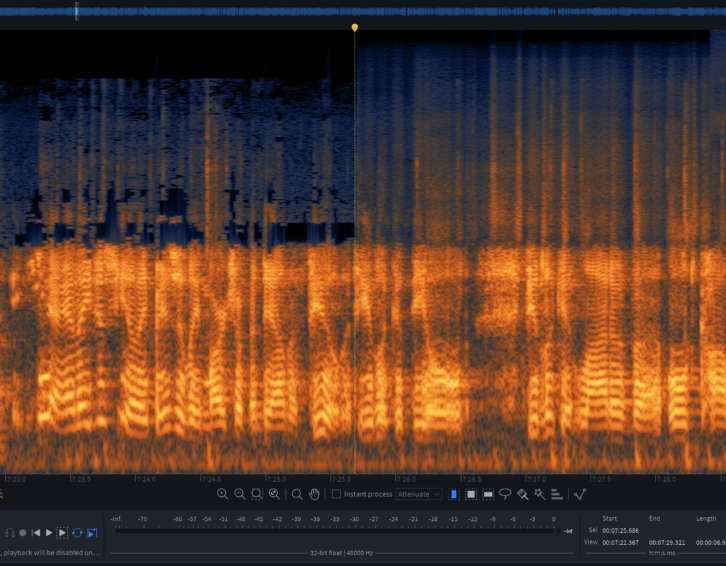
I tried it on several different recordings with limited bandwidths, including Skype interviews, and it always worked as expected, filling up the empty parts of the spectrogram.
For post-production, podcast production, corporate audio and other situations, Spectral Recovery seems destined to become a regular part of many workflows.
Music Rebalance Module
RX8 also brings an improved version of the Music Rebalance module (Advanced and Standard), which iZotope introduced in RX7. Its purpose is to separate the elements of a mix into Voice, Percussion, Bass and Other Instruments, and allow the user to adjust levels independently. You can use it to rebalance an existing mix, strip out elements for remixes, and create instrumental versions.
iZotope changed the control set of Music Rebalance. Gone are the individual Sensitivity sliders for each category. In their place is one slider called Separation. The lower it is set, the better the resulting quality, but the more bleed between categories.
Another significant change is that you now separate the four components into their own files with one push of the Separate button. The process can take quite a few minutes, depending on the length of your material. Nevertheless, it saves time in the long run because you don’t have to go through the multi-step process to strip out the components that you used to.
You still have the option to adjust the individual levels of the four components using the sliders in the Music Rebalance GUI, as well. When you have a balance you like, pressing Render writes your new mix over your original file (in RX but not on disk).
iZotope also improved the algorithms in Music Rebalance. I compared the results of separating the same material in RX8 and RX7, and the new ones sounded better and cleaner.
Because Music Rebalance is so CPU-intensive, it doesn’t offer full-quality previewing. So, if you want to listen to or adjust the relative levels of the components in the Music Rebalance GUI, you have to audition the results with a lower-quality preview. It takes a few seconds to compute, and it sometimes stops and starts.
I experienced how valuable Music Rebalance can be while mastering a song for streaming. I discovered the vocals in the bridge were too quiet and I didn’t have access to the multitrack session to revise the mix. Instead, I selected the area in question in RX8, raised the vocal level in Music Rebalance, and rendered it with seamless results.
[Shortly before this review was completed, iZotope released an update that allows Music Rebalance to be opened as an ARA plug-in in Logic Pro X. It was already available as an AudioSuite plug-in in Pro Tools.]
Getting Loud
The module formerly known as Loudness is now called Loudness Control (Advanced and Standard). It allows you to conform audio levels to your choice of broadcast and other standards. It also has options for target levels for audiobooks, podcasts, music streaming and more.
The new version also includes a graph that calculates True Peak, Long Term, Short Term and Momentary LKFS (LUFS), and Loudness Range (LRA) over time. It also provides numerical readouts for all of those measurements.
The value of such a tool for broadcast is obvious, but it’s also useful if you’re mastering music for streaming. It gives you an accurate reading of loudness levels on a mix, and you can use it to make your music compliant with streaming services.
In the main, it makes its adjustments by changing gain, but it will use a post-limiter for certain True Peak adjustments. So, when using it for mastering, make sure your dynamic range hasn’t been affected after you render.
Another new module is called Wow & Flutter (Advanced), and iZotope designed it to reduce those wavering pitch issues that plague vinyl, tape and optical transfers. I tried it out on an orchestral recording that had significant wow and flutter that made it unlistenable. The module’s ability to minimize them was quite impressive.
Another handy feature is called Center Global Pitch. If you check it, it defaults to 440 Hz, but you can set it for any pitch center you want. It gives RX a pitch to base its corrections on. Otherwise, RX goes by the average pitch.
But Wait, There’s More
RX8 doubles the number of tabs (open files) you can have at any one time from 16 to 32 (Advanced, Standard, Elements). Not only is that more convenient, but because RX includes a feature called Composite View, which consolidates all the open tabs temporarily into one editable file, it could be particularly useful with unmixed multitrack recordings that have common issues that need addressing.
You could open all the tracks and use Composite view to consolidate them and apply a single process to all. Then you turn off Composite view and revert to the default view and save each file separately.
The Batch Processor (Advanced and Standard) also got a major facelift and now works with Module Chain. It’s easier and faster to use and quite potent.
Also, iZotope revamped the De-Hum module (Advanced, Standard and Elements) with a new interface and independent frequency-reduction bands. I tried it out on a file with a 60-cycle hum, and De-Hum quickly and easily removed it without affecting the fidelity of the source audio at all.
Finally, iZotope added trackpad-based horizontal scrolling in all its versions. If you’re working from a laptop, especially, this will be a handy addition for screen navigation.
Audio Savant
RX8’s new and revamped features make an already robust application even more comprehensive. For post-production, the Spectral Recovery and Wow & Flutter modules in RX Advanced are powerful new tools for audio restoration. For both Advanced and Standard, Loudness Control, Guitar De-Noise and the improved Music Rebalance are key additions.
In the past, iZotope saved most of its top-of-the-line new features for RX Advanced. But over the last couple of versions, the company has been strengthening RX Standard and positioning it as a version aimed at music production.
If you don’t need the dialog-repair tools and other specialized post-production related features, Standard is almost as powerful and less than half the price. Whichever version you choose, you won’t go wrong.
PRODUCT SUMMARY
COMPANY: iZotope
PRODUCT: RX8
WEBSITE: izotope.com
PRICE: RX 8 Advanced: $999 introductory ($1,199 regular); RX 8 Standard: $299 introductory ($399 regular); RX 8 Elements: $99 introductory ($129 regular)
PROS: Spectral Recovery for restoring bandwidth-limited recordings. Improved Loudness Control. Guitar De-Noise. Improved Music Rebalance. Wow & Flutter module. Tab limit increased from 16 to 32. New De-Hum capabilities. Batch Processor.
CONS: Only lower-quality previews possible in Music Rebalance. Music Rebalance renders adjusted mix over original file. Amp section of Guitar De-Noise requires a noise-only section of the audio.