Plug-in manufacturer Zynaptiq has time and again wowed me with products that are both offbeat and extremely useful. The company’s latest disruptor, Intensity, uses algorithms typically employed in facial recognition software to enhance inherent detail and increase clarity, loudness and density in audio for mixing, mastering and sound design applications. While it’s not a compressor, Zynaptiq suggests you can grok Intensity by imagining an infinite-band compressor with zero-value time constants and no threshold. The cross-platform plug-in is available in AU, AAX, VST and RTAS formats.
At the Controls
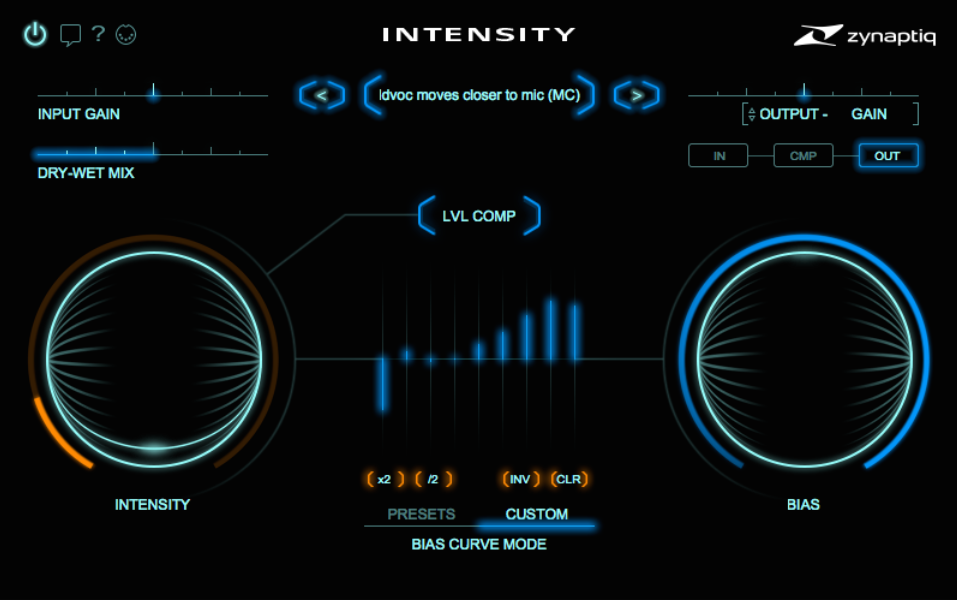
To understand how Intensity casts its mojo, it’s helpful to first learn the basics of operation. Raising the titular Intensity control (see Fig. 1) increases your track’s clarity, detail, loudness and density at once and—by using the control alone—equally across the audio spectrum. But by using the plug-in’s Bias Curves and Bias control, you can vary the strength of the Intensity control’s effects in different frequency bands.
The Bias Curves fashion the effects’ frequency response using either one of several included preset frequency curves or a custom curve you create by adjusting sliders to boost or attenuate different frequency bands. The rotary Bias control is a master control that attenuates the range of all frequency-band boosts and cuts at once, whether in a custom or preset Bias Curve (precluding the hassle of lowering multiple sliders in turn).
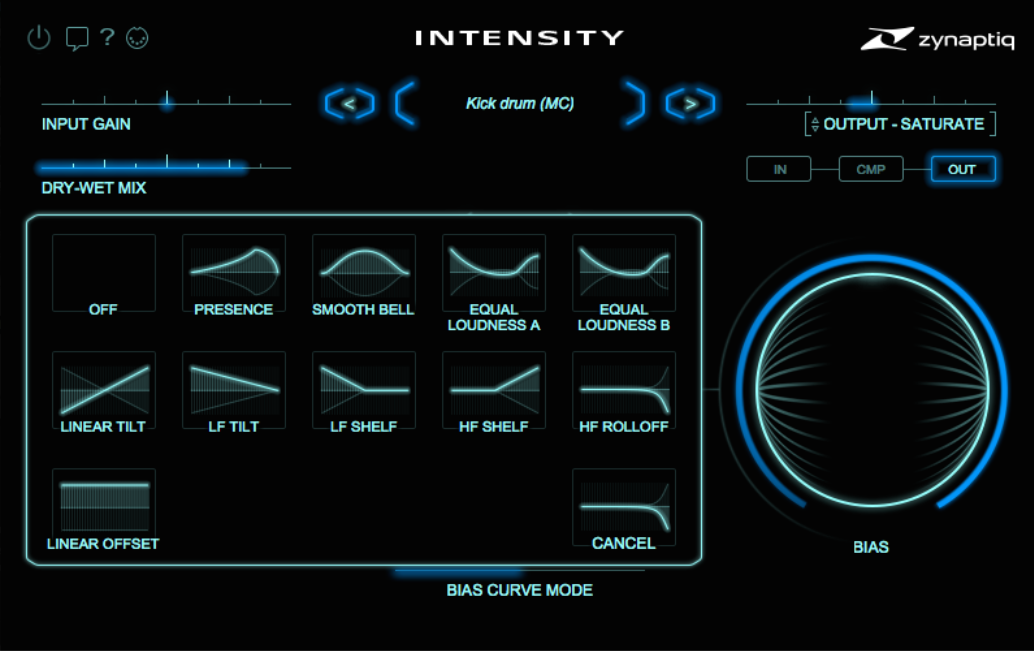
Click on the Presets button in the Bias Curve Mode toggle (situated at bottom-center of the GUI) and then click on the rectangular Bias Curve button in the GUI’s center to produce a menu of 10 preset frequency curves (see Fig. 2). Select among the following curves to temper Intensity’s effects across the audio spectrum: two equal-loudness curves (which boost extreme highs and lows), a couple of “tilt” curves, low- and high-frequency shelving curves, a broad bell-shaped curve (spanning the full bandwidth), high-frequency roll-off, presence boost, and linear offset (effectuating equal boost or cut across all frequencies).
Related: Review: Zynaptiq Adaptiverb, by Michael Cooper, Feb. 16, 2017
Hover your mouse over a curve to instantly preview its effect, or click to activate it and close the Bias Curve menu. You can also select Off to null the last bias curve applied or Cancel to exit the menu with no changes made. With the exception of one of the tilt curves, all the preset bias curves are unipolar (wholly positive or negative in amplitude).
If none of the preset bias curves deliver the sound you want, you can fashion your own curve by first clicking on the Custom button in the Bias Curve Mode toggle; doing so produces a set of nine sliders you can raise or lower to produce—with the rotary Bias control set fully clockwise (+1.0 setting) or counter-clockwise (-1.0)—up to 12 dB of Intensity boost or cut at nine fixed frequencies. Four buttons below the sliders let you respectively double (“x2”) or halve (“/2”) the current decibel value of all sliders, invert their values (boosts become cuts, and vice versa) or set all sliders to 0 dB at once.
Technically speaking, the Bias control is a bipolar, linear multiplier with values ranging from 0.00 (when set to its noon position) to ±1.0. When the Bias control is set to 0.00, the currently selected Bias Curve has no effect and the Intensity control’s effects are applied equally across the audio spectra. Adjusting the Bias control away from a fully clockwise (+1.0) or counter-clockwise (-1.0) position progressively decreases the range of the currently selected bias curve’s boosts and cuts in each frequency band. For example, a +0.5 Bias setting halves the value in each band (+12 dB boost becomes +6 dB boost), whereas a -0.5 Bias setting inverts and halves each value (+12 dB boost becomes -6 dB cut).
Other controls adjust input gain for the plug-in up to ±24 dB, output gain up to ±12 dB, and the dry-wet mix. Selecting Output-Saturate in a pull-down menu for the output-gain stage sends the signal through a soft-knee, saturating limiter (in which case the output-gain slider adjusts the amount of drive into the limiter). The limiter saturates the output signal at slider settings at or above -3 dB.
When you activate the Lvl Comp (level-compensation) switch, the plug-in tries to counteract level changes caused (only) by adjusting the Intensity control. Clicking on the CMP switch, situated below the output-gain slider, compensates for level changes produced by all of the plug-in’s controls. Since the CMP switch does not react instantaneously to control adjustments, you should generally use it only for monitoring your control tweaks and not while rendering Intensity’s effect (such as when printing a mix). Clicking in turn on two other buttons below the output-gain slider lets you hear the plug-in’s input signal (post-input gain slider) and output signal.
If your DAW allows, you can assign various MIDI continuous controllers to multiple plug-in parameters. Clicking on a small MIDI-connector icon in the GUI’s upper-left corner results in a disclosure triangle being displayed beneath each parameter that can be controlled using MIDI Learn. Click on a disclosure triangle to open the MIDI Learn menu for the associated parameter. The menu selections let you activate or deactivate MIDI Learn functionality for the given parameter and adjust settings: You can select the MIDI channel and CC (continuous controller) number, and adjust the linked parameter’s response curve and range.
Extreme or Subtle
Intensity can dramatically transform a track or subtly enhance it, depending mainly on how high you set its Intensity and Dry-Wet Mix controls and whether you activate the output saturator or not. In any case, I usually opted to create my own bias curves, fashioning them in much the same way I would use a conventional equalizer (for example, boosting the bottom end and cutting midrange frequencies on kick drum).
Related: Zynaptiq Pitchmap: Revolutionary Polyphonic Pitch-Shifter, by Michael Cooper, Nov. 1, 2013
Intensity sounded killer on rock drums. Dialing in mostly a wet sound and a relatively high Intensity setting and engaging the output saturator produced much beefier-sounding kick drums and radically more explosive tracks for snare drum and drum-room mics. In fact, Intensity can dramatically jack up room ambience on tracks that contain only a little to begin with. Depending on how much I boosted certain bias-curve frequencies, mic bleed also increased on full drum kits—which was sometimes a plus, other times undesirable.
Boosting a custom Bias Curve’s bass frequencies and cutting its highs—with the Intensity and Bias controls set relatively high—produced terrific results on electric bass guitar. The output saturator, in particular, lent a very dense, in-your-face sound. For tracks that were already heavily saturated, such as hard-rock guitar vamps, I kept the saturator turned off and dialed in the wet sound only about 40 or 50 percent to prevent crushing the tracks’ dynamics while enhancing their density; heavier processing predictably produced too mushy of a sound.
Surprisingly, Intensity also sounded great on a contemporary country lead vocal track. The tradeoff with using many other plug-ins is that they can reduce a track’s perceived depth. But using Intensity, I could actually make the male singer sound like he moved an inch or two closer to the mic. The trick was to use a very low Intensity control setting and 50 percent dry-wet mix with a custom Bias Curve that boosted high frequencies (see Fig. 1). The output saturator was also bypassed.
Want more stories like this? Subscribe to our newsletter and get it delivered right to your inbox.
My complaints with Intensity were minor. I wished I could adjust the center frequencies for the custom Bias Curves’ frequency bands to more accurately dial in the sounds I wanted. Intensity also lacks undo and redo functions. The operation manual is a bit vague in places (this review fills in the details). But on balance, Intensity is terrific. Zynaptiq has once again created a unique and powerful plug-in.
Mix contributing editor Michael Cooper has written more than 500 articles on pro audio over the past three decades.
Product Summary
Company: Zynaptiq
Product: Intensity
Website: www.zynaptiq.com
Price: $379
Pros: Unique. Can make some tracks sound huge, and subtly enhance depth on others. Easy to use.
Cons: Supersizing tracks can boost mic bleed to excess. Can’t adjust center frequency for bias curves’ frequency bands. No undo, redo. Manual needs improvement.