In July, nothing beats the radiant glow of vacuum tubes and that “high-tension” reminder to discharge the power supply before poking around! This month, I’ve got three skill levels’ worth of guitar amp tweaks — just right for your summer-fun experimentation.
BUZZ BE GONE
An urban customer from a famous heavy metal band called about a troublesome guitar amp buzz. Someone suggested a Faraday Shield, a method of “screening” a room to make it interference-proof. Considering that the studio was already up and running, this is an impractical, costly after-the-fact “solution.”
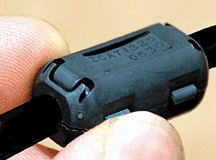
Figure 1: Ferrite clams go around the guitar cable just before the plug at the amplifier input.
It’s good to be reminded that noise is all around us, but more often than not the gear is the problem. I suggested trying a clip-on ferrite clam from Radio Shack or TDK (Fig. 1). These are the blobs you’ve seen hidden under shrink tubing on all types of computer-related cables — video, USB, FireWire, etc.
The noise that sounds like a power-related buzz is often the video-sync portion from a local TV station. It’s 59.95 Hz, and if you listen closely (which is “easy” at metal levels), you’ll notice a slow “phasing” sound as the vertical sync “comb filters” against the 60Hz power line hum. For guitar cables, place the clam just before the plug at the input (destination) end. This simple contraption creates a choke — essentially, an inductive high-frequency (RF/TVI) noise filter. The result? A joyous 80-percent reduction in that nasty RFI, followed by the question, “Now, how do I get rid of the rest?”
The noise mostly plagues amps with plastic input jacks? My Marshall and Vox amps have them, but the Fenders don’t. Keep in mind that tube amp wiring was once point-to-point. “Plastic” jacks were introduced about the same time as PCB construction; they’re stuffed and soldered directly to the PCB, saving that costly “human-intervention factor.” When metal jacks make the metal-to-metal chassis connection, the chassis acts like a noise “firewall.”
Not all plastic jacks are equal. Some have metal threads or an extra metal tab that makes the chassis connection when mounted, but many older models do not. Another solution is to connect a 0.1µF capacitor between the point of entry (the input jack ground at the circuit board) and the chassis. I had the studio tech replace the plastic jack with an all-metal one, and the remaining noise disappeared.
BRING ON THE MICS
Most condenser or dynamic mics have a rising top end that may not be complementary to some types of gritty guitar overdrive. Ribbon mics tend to be more complementary, but they are not the most cost-effective solution for those on a budget. However, one student suggested the Cascade Fathead, which at $159 is a must-have, but that review will have to wait.
Another student came to rehearsal with a Peavey 210 Studio Chorus, an affordable, lightweight “stereo” guitar amp with one dry and one chorus/delay channel. (I found service documentation at www.schematicconnection.com.) Typical of older solid-state amps, this one has no sonic air bag between clean and fuzz. The low end is dry and lifeless, and the top end cannot be miked.
At our first rehearsal, we made do with a Shure SM58 placed five feet away to let the air attenuate the treble and bring some ambience to the mix. Another time, we took advantage of the rear (dark/rejection) side of a pre-silver Sennheiser e609 placed directly in front of the speaker.
THE FILTER FACTOR
Guitar amp purists have their speaker faves for good reason: They can drastically affect the amp tone. Some are bright while others are warm and mellow. This next pair of mods will tame any harsh-sounding guitar amp simply by applying readily available crossover components. You’ll find a table of typical values at www.ptme.com/et/audio/reference/crossovers_passive/component_values.htm.
Do you see where I’m going with this? Not much fidelity is needed from a “full-range” 10-inch woofer, so I installed a passive 6dB/octave filter — half of a two-way crossover network. I made note of the values needed to cover a frequency range between 1.8 and 4 kHz, and then found the nearest standard inductor at www.mcminone.com (part number 50-3019), a “choke” in the form of a 0.5-milliHenry (mH) air-core bobbin inductor. (See Fig. 2.)
There’s a handy online crossover calculator at www.the12volt.com/caraudio/crosscalc.asp#cc, a car audio Website. After some ciphering, I determined the roll-off would begin around 2.5 kHz, so that 5 kHz would be down 6 dB. You’d think this was too low, but it was very effective and made the mic choice much less critical.
IT’S A TUBULAR WORLD
All woofers have a natural low-frequency (free-air) resonance. You can prove this by placing a naked woofer next to your ear and tapping it, using a clip lead to alternately short the terminals (or not). You will be amazed to hear the difference that a simple, passive test like this can make.
The relationship between speaker impedance and amplifier output impedance is called Damping Factor (DF). For a solid-state amp, it is typically a number of 80 or higher, and it essentially acts like a magnetic brake or shock-absorber. The better sonic analogy is how Q (bandwidth) affects an equalizer’s resonance. An amp with a high DF effectively lowers the Q (widens the bandwidth).

Figure 2: A series inductor (coil) creates a passive 6dB/octave lowpass filter typical of simple crossover networks. When combined with a non-typical series resistor, the woofer’s free-air resonance can contribute to the low end.
Back in the all-tube ’50s, amplifier DF was lower and less consistent, the latter being partially due to varying amounts of negative feedback. (More feedback raises the DF.) Even then, there were complaints that better amps and speakers were not as “warm” as the previous technology, so a damping-factor adjustment was one of the solutions.
Inserting a series resistor purposefully lowers the damping factor and can be combined with the previous treble-taming step as shown in Fig. 2. I chose 4 ohms after experimenting with lower resistor values. This reduced the power dissipated by the speaker by a little more than half (3.5 dB), an acceptable loss in this application because there’s ample reserve. Total cost of the choke and the resistor is less than $10 per channel. It’s still not a tube amp, but it’s no longer painful.
Eddie posts items of interest at
www.tangible-technology.com. If you’d like to see more of this mod, just bug him.
Biased Opinions
The subject of replacing output tubes always generates questions about tube bias. At minimum, bias sets the safe operating current, but it also affects the tube’s sensitivity and overload characteristic; when driven hard, it affects its tone. There are several ways to measure the bias current, the easiest being a third-party adapter that goes between the tube and the amp. Inside is a resistor in series with the cathode, plus a voltmeter test point.
A customer wanted to experiment with a range of output tubes, so I installed an adjustable bias circuit and cathode resistors. The figure above shows the power amp schematic. The cathodes — pin #8 on 6L6s and many other octal-socket output tubes — are normally tied to ground. I chose to insert a pair of 22-ohm resistors (just left of the 220k-ohm grid resistors), higher than the standard value because I also wanted to drive a pair of LEDs for a visual indication of current, especially when the amp was overdriven.
The 6L6 data sheet specs the plate current between 55- and 79 mA, depending on the plate voltage (and other factors). If you apply Ohm’s Law to solve for the voltage drop across the resistors, where E=I*R with 22-ohm resistors, then the drop for that current range will fall between 1.21 volts to 1.73V. No matter whether you buy the adapter or try this mod, getting the bias right will help the power tubes last longer and be more sonically consistent.
— Eddie Ciletti