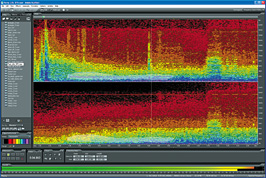
The spectral displays in the Frequency Space Editing function
With roots as a shareware audio editor named Cool Edit Pro, Adobe’s Audition has blossomed into a powerful workstation for audio editing and multitrack recording. Brimming with pro-quality features at a reasonable list price, Audition meets many important needs in the Windows-based studio.
WHAT’S YOUR FREQUENCY?
Spectrum-analysis tools have been around for years, but I was delighted to see frequency space editing added to Audition. A chair squeaked during that piano recording? It might not be visible in a typical wave display, but switch to frequency display in Audition’s Edit view and it sticks out like a sore thumb. That chair squeak will probably show up as a bar of frequencies that’s out of character with the rest of the performance. Highlight what looks out of place with the lasso or marquee tool and zap it out. If that’s a little too severe, replace what you zapped by pasting in a clean replacement from a nearby passage or capture a noise print using the highlighted section (which Audition remembers for the next use of the program’s noise-reduction tool).
START PLAYING AROUND
Audio editing always involves critical listening, which often requires the repeated playback of a single audio segment. Audition provides not one, but two customizable playback buttons. What’s more, you have complete control over pre-roll and post-roll times. I typically set up one button to play the current zoom range and the other to play the current selection with a one-second pre-roll.
BUILD A BRIDGE
If you’re using Audition as part of Adobe’s Production Studio bundle, then you probably have Adobe Bridge. From within Audition, you can open any file in Bridge, where you can set ratings, keywords and color labels to classify and organize your audio files. (There are keyboard shortcuts and other tools to do this efficiently.) Bridge is particularly useful for making sense of large collections of creative content, such as production music beds (or Audition’s huge collection of royalty-free loops and other content). Spend time getting organized, and in no time you’ll be making queries such as “find all WAV files, rated 4 stars or higher, with ‘jazz’ and ‘live’ in the keywords.”
MARK THIS DOWN
Most audio editors have markers you can set within your content, and Audition is no different in this respect. But markers in Audition can represent either single points in time or a passage with a start and end. What’s more, markers can designate beats within a phrase or tracks within a CD project. The Track marker type lets you burn individual CD tracks directly from a single large file of a live performance. (Unfortunately, the marker names don’t become the CD track titles, so you’ll have to retype them.) There’s also a tiny button at the bottom of the markers window that provides access to batch processes related to markers. This is where you’ll go to extract your marked regions into separate files or add a little digital silence to the start or end of each passage.
SHARE AND SHARE ALIKE
Audition’s Multitrack view is used for tracking and mixdown, and an Edit view allows you to do detailed offline editing of individual files. Real-time effects are available in both views, though in Edit view, the real-time capabilities are intended only for previewing the offline operation. It’s often desirable to stack multiple effects in sequence, which is done in the Multitrack view with an effects rack similar to what you’d find in other DAW programs. But, the effects racks in Multitrack view operate nearly identically to the Mastering Rack in the Edit view. Also, the rack presets can be shared between the two. So if you create an effects rack with the perfect combination of live effects and their associated settings, you can call up that combination in the Edit view for offline processing.
HOLE IN THE MDDLE
You might think that Audition’s Center Channel Extractor effect is only useful for giving yourself a karaoke mix of your favorite song, but it’s quite usable for other tasks. Center Channel Extractor is a bit of a misnomer, because you can boost or cut audio from anywhere in the stereo field (left, center, right, surround or “custom,” which lets you specify any values for pan position, phase and delay). You also have complete control over the affected frequency range and algorithm settings, with presets for male voice, female voice and bass. Because you can boost and cut, this effect is quite valuable for making small adjustments to bass or vocal levels after the mix is complete.
HAVE SOME FUN
Audition offers lots of effects, but not all of them will find practical use in every project, though they sure can be fun to experiment with. Use the Doppler shifter to hear what your project sounds like when coming from a passing car. Combine the dynamic delay effect with the stereo field rotate effect and listen until you’re dizzy. Audition’s effects routing is flexible and intuitive, so it’s easy to create combinations of these effects.
Allan Metts is an Atlanta-based musician, software/systems designer and consultant. Visit him at
www.sonicbids.com/Allan Metts.