| MIX VERDICT: ADPTR Audio Sculpt Plug-In |
| THE TAKEAWAY: “Sculpt takes compression and transient processing to an entirely new and superior level of control and transparency. It’s worth every penny.” |
| COMPANY: Adptr Audio • www.plugin-alliance.com PRICE: $299 PROS: • Unequaled transparency in compression and master-bus processing of transients. • Excellent spectral rebalancing. • Frequency sensitive. • Excellent GUI and operation manual. CONS: • Tone Detail control can cause audible artifacts (but can be disabled). • Slightly steep learning curve. |
You’d be forgiven if, like me, you glanced briefly at the GUI for the ADPTR Audio Sculpt plug-in and thought, “Okay, there’s not much new here.” Wrong! Once I started working its controls, I quickly realized ADPTR Audio Sculpt does things very differently—and, in many respects, sounds significantly better— than similar processors.
On the face of it, the plug-in includes four broadband processing modules placed in parallel configuration in the audio path: switchable upward compression/downward expansion; switchable downward compression/upward expansion; tonal balance adjustment (not EQ!); and a transients processor. But there’s a helluva lot more to this plug-in than meets the eye.
ADPTR Audio Sculpt is not a “character” plug-in; transparency is its hallmark, and it’s primarily intended for use on your mix or master bus. Its new algorithm analyzes incoming audio for each processor like a human ear would (for example, distinguishing between increased bass energy and a simple level increase) and then applies to it gain changes on a sample-by-sample basis in each of its processors, producing almost zero harmonic distortion. The results can sound amazing. One note: The unusually long look-ahead detection employed creates latency that makes the plug-in iffy for live use.
BEFORE YOU PROCESS
Your first order of business after instantiating Sculpt is to turn on the Auto Gain function, click its Analyse button and then play at least a few seconds of your track; doing so calibrates all of the plug-in’s controls so that not only does the auto-gain feature work extremely well at keeping the output level subjectively equal to the input’s (thereby aiding wet/dry comparisons), but, incredibly, thresholds for Sculpt’s dynamics processors will also internally auto-adjust to optimal settings as you cycle hassle-free through factory and custom presets.
Furthermore, the analysis saves and loads an auto-gain profile with your DAW’s project. Don’t worry if, for example, your song’s dynamic arrangement careens between stripped-down verses and full-bore choruses; simply save a different auto-gain profile for each song section in the four memory slots provided, then automate the profiles’ recalls along your track’s timeline.
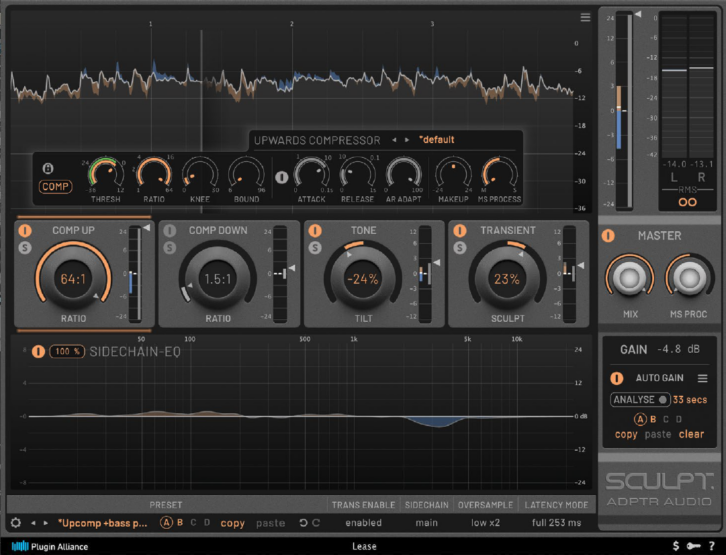
Each of the four processing modules in ADPTR Audio Sculpt — whose basic controls grace the GUI’s center — includes On (active) and Solo buttons, a main rotary control (its function depends on the specific module) and an output-gain meter that shows separate levels for mid (left vertical bar) and side (right bar) channels. In the meter, a thin horizontal white line shows the channel’s current output gain in the module, and the heights of vertical gold and blue bars displayed above and below the white line show the amount of gain boost (gold) or cut (blue) occurring for the channel at the module’s output over the past few seconds. Drag the gray, vertical Range Slider on the right side of the meter to limit to equal extent how much gain can be boosted or cut in both channels (on a per-module basis).
Waves CLA Nx Plug-In – A Real-World Review
KIT Plugins BB Mo-Q – A Real-World Review
At the top of the GUI, the Gain History Graph shows a history of I/O gain changes (y-axis) moment to moment over time (x-axis): Output level (post-processing) is shown by a white trace; blue shading above the white trace indicates (by its vertical extension) how much gain reduction was applied to the input signal; and orange shading below the white trace similarly represents the amount of gain boost that was applied to the input signal. In the opening screenshot, note how Sculpt’s input signal fluctuated between that illustrated by the blue shading’s top edge and the orange shading’s bottom edge (before processing “moved” the level to that shown by the white trace).
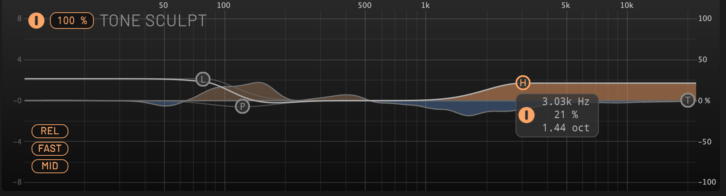
At the bottom of Sculpt’s GUI, the Tone Area displays two graphs atop one another. The one in the background—the Tone Analyser Graph— displays the comparative power (rather than peak frequency responses) of your track’s mid or side channel (you choose which) across the audio spectrum and uses the same coloring schemes— white trace and blue and orange shadings—as the Gain History Graph to illustrate changes to I/O gain. A highly useful Relative Mode shows only variances from 0 dB across the spectrum between input and output.
The second graph, in the foreground and interactive, provides adjustable filters—low and high shelves, peaking and tilt—that make the selected module’s processing frequency-sensitive.
USING THE MODULES
When you click on a module, its main controls appear above it, superimposed over the Gain History Graph. Sculpt’s two compressors/ expanders can each be used in one of two ways: disable the attack and release functions to produce fast and evenly applied gain changes; or, enable them for creative effects such as pumping up drums (dialing in a slow compressor attack time) or adding glue to your mix (setting a long compressor release time).
You can toggle Sculpt’s first module—on the far left of the GUI—to produce either upward compression or downward expansion when the input signal falls below threshold. Both of these dynamics processors include the expected controls for adjusting threshold, ratio, knee (from very hard to very soft), range (using the Bound control), and attack and release times. Raising the AR Adapt control makes the processor progressively less sensitive to lower frequencies (think “thrust” compression effects and more). A makeup-gain control is also provided, but you’ll probably want to leave it set to 0 dB and use the plug-in’s uniquely powerful Auto Gain function instead.
ADPTR Audio Sculpt’s second module offers a similar control set as the first but can be toggled to produce either downward compression or upward expansion when input gain is above threshold. Again, selecting either the first or second module overlays parametric sidechain-EQ controls on the Tone Area at the bottom of the GUI, allowing you to adjust your selected dynamics processor’s frequency sensitivity.
The third module, dubbed Tone Sculpt, employs similar EQ-like controls (these don’t actually adjust EQ) that are overlaid on the GUI’s Tone Area; tweak the controls to fashion the spectral balance you’d like Sculpt’s broadband gain-change signal to create. In the words of Sculpt’s operation manual, Tone Sculpt works “by instantaneously boosting moments that match your target balance and attenuating moments that don’t.” Adjust the Detail control that appears above the module to dynamically enhance or tame resonances in your audio, regardless of the Tone Area’s settings.
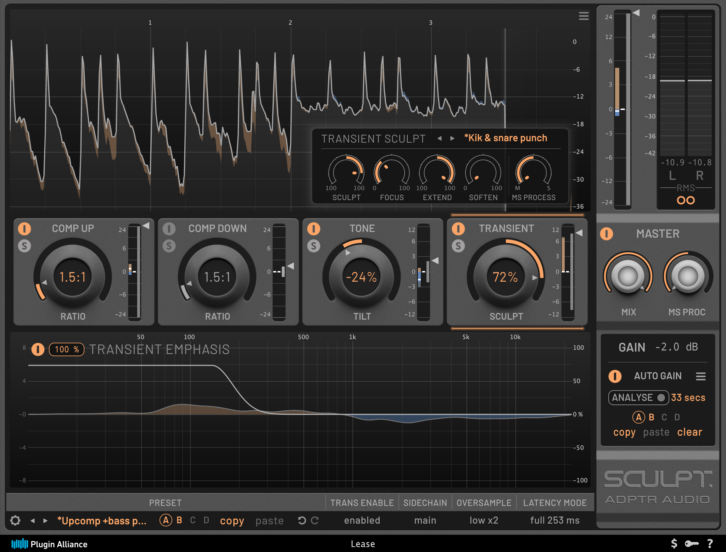
ADPTR Audio Sculpt’s fourth module, Transient Sculpt, enhances or suppresses transients in powerful ways. Use its Sculpt control to boost or cut the gain of transients. Raise the Focus control to decrease the module’s sensitivity to transients so that only higher-powered ones are processed. Use the Extend control to shorten or extend the duration of processing, thereby affecting less or more, respectively, of the transients’ envelopes. As you raise the Soften control, the volume for a transient’s attack portion (when also boosted with the Sculpt control) is progressively ramped up. Parametric EQ-like Transient Emphasis controls—overlaying the Tone Area—let you sensitize the Sculpt control to act to a relatively greater degree on transients that contain a comparatively greater amount of spectral energy in the band you’re boosting.
Each module has a continuously variable MS Process control that lets you adjust the relative amount of processing applied to mid and side channels. (Sculpt analyzes only the mid channel in determining its gain changes.) The mid and side gain-change signals from the four modules are summed and sent to a master MS Process control that adjusts—like a pan control would—the final balance between mid and side processing (not, lest there be any confusion, mid- and side-channel output levels). Each module also features an independent preset library to which you can save your favorite settings for recall without affecting the other modules’ control settings.
In addition to the master MS Process control, Sculpt’s master section provides a wet/dry-mix control and gain-change meters similar to those provided in the individual modules. Additional RMS-reading meters show I/O levels—switchable between L/R and M/S—and controls for soloing individual channels. A bar along the GUI’s very bottom accesses master presets (affecting all modules at once), Undo and Redo functions, A/B/ C/D workspaces, oversampling, and other goodies.
IN A LEAGUE OF ITS OWN
If my punctilious prose leaves you hesitant to confront ADPTR Audio Sculpt’s ostensible complexity, fear not. The excellent operation manual—and GUI—will get you up to speed after a couple of hours of study and related practice, and your efforts will pay handsome dividends.
Simply put, I’ve never heard an upward compression sound anywhere near this good. Forget about crushing a mix’s peaks just to make quieter elements louder—that’s so yesterday! With its attack and release controls disabled, Sculpt’s upward compression added robust glue, ultra-transparently, to a rock mix and made the bass guitar sound more even and sturdy, all while completely preserving punchy drum transients. Sculpt’s Transient module sounded equally extraordinary, boosting kick and snare transients in a full mix with greater selectivity and leverage than many other similar processors I’ve used. Especially amazing was the Extend control’s ability to boost the drums’ sustain without affecting other instruments in the mix. This is the stuff of magic!
But Sculpt’s downward compressor should not be disregarded; enabling its attack and release controls to pump up percussive rock mixes, it quickly became apparent Sculpt was the best master-bus compressor plug-in in my substantial arsenal. You know how compressors usually decrease depth and, sometimes, stereo width? Not the case at all with Sculpt—this is transparency with a capital T.
The Tone module’s EQ-like controls did a great job balancing a mix’s spectrum. On the sole downside, the module’s Detail control gave inconsistent results, sometimes creating artifacts while failing to tame a specific
resonance, and after a while, I shied away from using it. Specifically, on very rare occasions, it created fleeting audible dips in a mix’s overall level when both the Tone Tilt control was set to a negative value (to boost bass frequencies) and Detail was likewise set to a negative value to minimize resonances across the spectrum. Tuning a multiband compressor on an offending instrument or vocal is a more exacting approach.
But we use our multi-processors only for what they do best, right? To wit, Sculpt takes compression and transient processing to an entirely new and superior level of control and transparency. It’s worth every penny.