Introduced late last year, NUGEN Audio’s Paragon reverb plug-in was the first 3D-compatible convolution reverb, supporting up to 7.1.2 channels of audio and making it suitable for use with Dolby Atmos and other immersive audio applications.
NUGEN recently introduced Paragon ST, a stereo version of the plug-in. Aimed at the music production market and priced more affordably than the multichannel version, Paragon ST is the subject of this review.
Paragon ST is a true convolution reverb that offers the wide range of control normally associated with traditional algorithmic reverb. It uses resynthesis technology (developed by Dr. Jez Wells at the University of York) that allows reverb decay and room size parameters of the original space’s Impulse Response to be significantly altered without the use of time stretching, which can cause undesirable artifacts.
Paragon ST also provides features typically not found in convolution reverbs, such as modulation, control over stereo width and microphone distance. Paragon ST requires an iLok for authorization. It supports AAX, VST3, AU and AudioSuite plug-in formats (64-bit only) on Mac OSX 10.9 and Windows Vista or above.
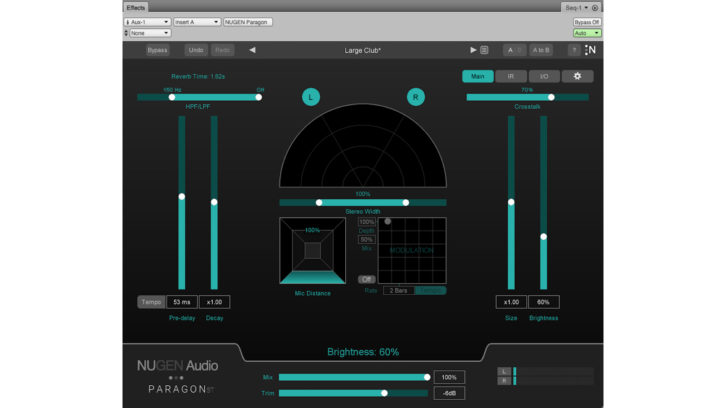
The user interface for Paragon ST displays one of three panels: Main Panel, IR Panel or I/O Panel. Regardless of which Panel is viewed, a control bar at the top shows Bypass, Undo/Redo, a Preset Browser, A/B memory comparison, About, and an Update Icon. Presets are auditioned by scrolling through preset names using the arrows, or by clicking on the Preset Management button to open the preset library.
THE MAIN PANEL
Parameters for a preset are accessed from the Main Panel and include highpass and lowpass filters, pre-delay, decay, size multiplier, brightness, stereo width, crosstalk, modulation and microphone distance. Most of the parameters are self-explanatory, but a few of them merit explanation.
The stereo width control defaults to 100%, but when set to 0%, it collapses the reverb to mono. Conversely, when set to 200%, left-to-right separation is exaggerated.
Microphone distance adjusts the balance between early and late reflections. Lower settings increase the amount of early reflections, while higher settings increase the amount of late reflections.
Modulation adds a chorus effect to the reverb tail. Adding high levels of modulation depth to a vocal reverb produced a nightmarish, out-of-tune effect that would be appropriately disturbing for use in a horror flick.
Crosstalk determines how much dry signal from one channel is fed into the opposite reverb channel. If crosstalk is set to 0%, then the position of the reverb follows the pan of a stereo send into the reverb. For example, if you pan the send left, the reverb returns on the left side; if the crosstalk is set to 100% and the reverb send is panned left, the reverb returns on both sides, though the effect is more prominent on the left. This can be used to create interesting ambient effects where the dry signal is panned to one side and the reverb is panned to the opposite side (more on crosstalk below).
The resynthesis process is not-quite-realtime, so there may be a brief lag while Paragon ST resynthesizes a model. During that time (or when switching presets), the NUGEN update icon in the control bar switches to a circular progress meter. The manual states that changing a parameter in a preset results in a star being displayed next to the preset name, but preset names often displayed a star even when first recalled from the library.
Warm Audio WA-8000 Mic – A Real-World Review
Antares Auto-Tune Vocodist – A Real-World Review
PreSonus PD-70 Dynamic Microphone – A Real-World Review
THE IR PANEL
The IR Panel is where you load, audition and make changes to impulse responses, though you can’t load in your own IRs. Along the right side of this panel is a set of controls for Test Sounds, a library of built-in music and sound effects files that can be used for auditioning IRs. This should be standard issue for every reverb plug-in.
The center of the IR Panel can show either a spectrogram view or the main EQ settings for the IR. The power of the modifier window lies in the EQ nodes that can be applied to either the amplitude or decay response of the IR (up to five nodes each). You simply grab a node and drag it to make changes to the IR.
The amplitude modifiers change the reverb EQ (no surprise there), but the decay modifiers make frequency-dependent changes to the decay rate. Click the + button to add an EQ node in the decay window, drag the node along the X-axis to the frequency range you’d like to change, then drag it along the Y-axis to change the decay time in that frequency range. This is a powerful feature for tweaking IRs that’s very easy to use.
Pressing Reset in the modifier window does not reset the modifier to factory default settings; it resets the response curve to flat.
THE I/O PANEL
The I/O Panel is where you’ll find settings for mix, trim, HPF/LPF and “global” reverb parameters such as pre-delay, decay, crosstalk for input or output, and wet on/off. The HPF/LPF, pre-delay, decay time and crosstalk have independent settings for each channel, but the channels cannot be linked, which is a bit of a drag.
Some of these parameters have the same names as parameters in the Main Panel, which can be a source of confusion. For example, the settings for pre-delay and decay in the I/O Panel are separate from those on the Main Panel. The actual pre-delay or decay in a preset will be the sum of the values on the I/O Panel and the Main Panel, so it’s possible to see a pre-delay value of zero in the Main Panel and still hear pre-delay, depending upon settings, in the I/O Panel.
Crosstalk on the I/O Panel also influences the amount of bleed between channels. The effects of varying crosstalk settings on the I/O Panel and the Main Panel can be a rabbit hole; leave the crosstalk values at the factory defaults and move on with your life.
MAKE ROOM
I used Paragon ST for sessions running under Digital Performer and Pro Tools, and—UI quirks aside—the results were impressive. While listening to some of the presets for use on a female vocal, I landed on “Large Club,” which is absolutely stunning. It sat perfectly in the mix, adding a realistic sense of space without taking over the mix. Modifying it with a shorter decay time and less pre-delay created a great impression of a smaller room.
“Bright Chamber” is a wonderful choice for snare and toms, and even sounded good on kick drum, producing an incredibly natural ambience that had presence in the upper-mids without being splashy. Testing NUGEN’s claim that the resynthesis process doesn’t create artifacts, I cranked the decay and size parameters on this preset to x2 and x3, respectively. The result was a larger space that still sounded natural and maintained a smooth reverb tail.
The top end of Paragon ST is very smooth, and I didn’t have to chop off the high frequencies the way I often do with algorithmic reverbs to keep them from getting “zippy.” The default setting for the HPF in many of the presets allowed more low end in the reverb than I prefer, but this was easily remedied by raising the HPF frequency to a value between 250 and 500 Hz. One particular mix I worked on had a stereo premix of the drum tracks, without any effects. I wanted to place the drums in a space but was concerned that adding ambience to the entire kit would turn it to mud. Not so with Paragon ST.
“Medium Tiled Room” (is that a nod to the PCM70?) gave the drums a lifelike space in which to breathe, without compromising clarity. Changing the mic distance parameter in this model not only affected the balance between early and late reflections, but also impacted the stereo image: As mic distance was reduced, the left-to-right imaging of the kit became more defined, making it perfect for this application.
NUGEN Audio’s philosophy in creating Paragon ST is not about providing a vast library of IRs for convolution; it is more about providing a manageable number of IRs that can effectively be transformed into a wide variety of useful spaces—and the company has achieved that goal. The models are realistic and natural, and can be modified beyond the constraints of conventional convolution reverbs while maintaining those qualities. Definitely recommended.
PRODUCT SUMMARY
COMPANY: NUGEN Audio
PRODUCT: Paragon ST
WEBSITE: www.nugenaudio.com
PRICE: $299 ($149 until Dec. 6, 2021)
PROS: Produces beautiful, natural-sounding reverbs. Allows significant modification to IRs without producing audible artifacts. You can dig deep, but you don’t have to.
CONS: Minor inconsistencies in the UI. Some of the editing parameters don’t