JoeCo is best known for its durable, roadworthy, rackmount audio interface/recorder units. With the release of Cello, the company has jumped into the crowded desktop interface market with a unit that provides an impressive feature set along with boutique-quality conversion and preamps, and the ability to record at up to a 384kHz sampling rate.
Cello requires drivers for PC but is USB class-compliant for the Mac. The unit features USB 2.1 connectivity and works in tandem with the free JoeCoControl application (Mac and PC), which opens up some of its deeper functionality.
Cello is bus-powered but also comes with a DC adapter, which JoeCo recommends using to guarantee full response from the converters.
Hello, Cello
JoeCo lists Cello as a 22×6 interface. On the input side, that includes two mic/line combo inputs (XLR/¼-inch TRS), a ¼-inch TRS instrument-level input, a built-in talkback mic that feeds its own input (input 4), and two ¼-inch TRS line inputs (5 and 6). The company counts the pair of SPDIF/ADAT Lightpipe input ports as 16 additional inputs.
[A brief aside for a reviewer’s pet peeve: Interface manufacturers typically list their Lightpipe I/O in their input/output specs, when they’re not usable unless you have other ADAT-equipped units to connect them to. It would be more realistic to refer to them as expansion ports, rather than count them along with the analog I/O. Pet peeve finished.]
On the output side, Cello features left and right Monitor Outputs (¼-inch TRS) and a pair of independently controlled headphone outputs. You can create up to four low-latency headphone mixes from the JoeCoControl software. More on that a little later.
On the Top
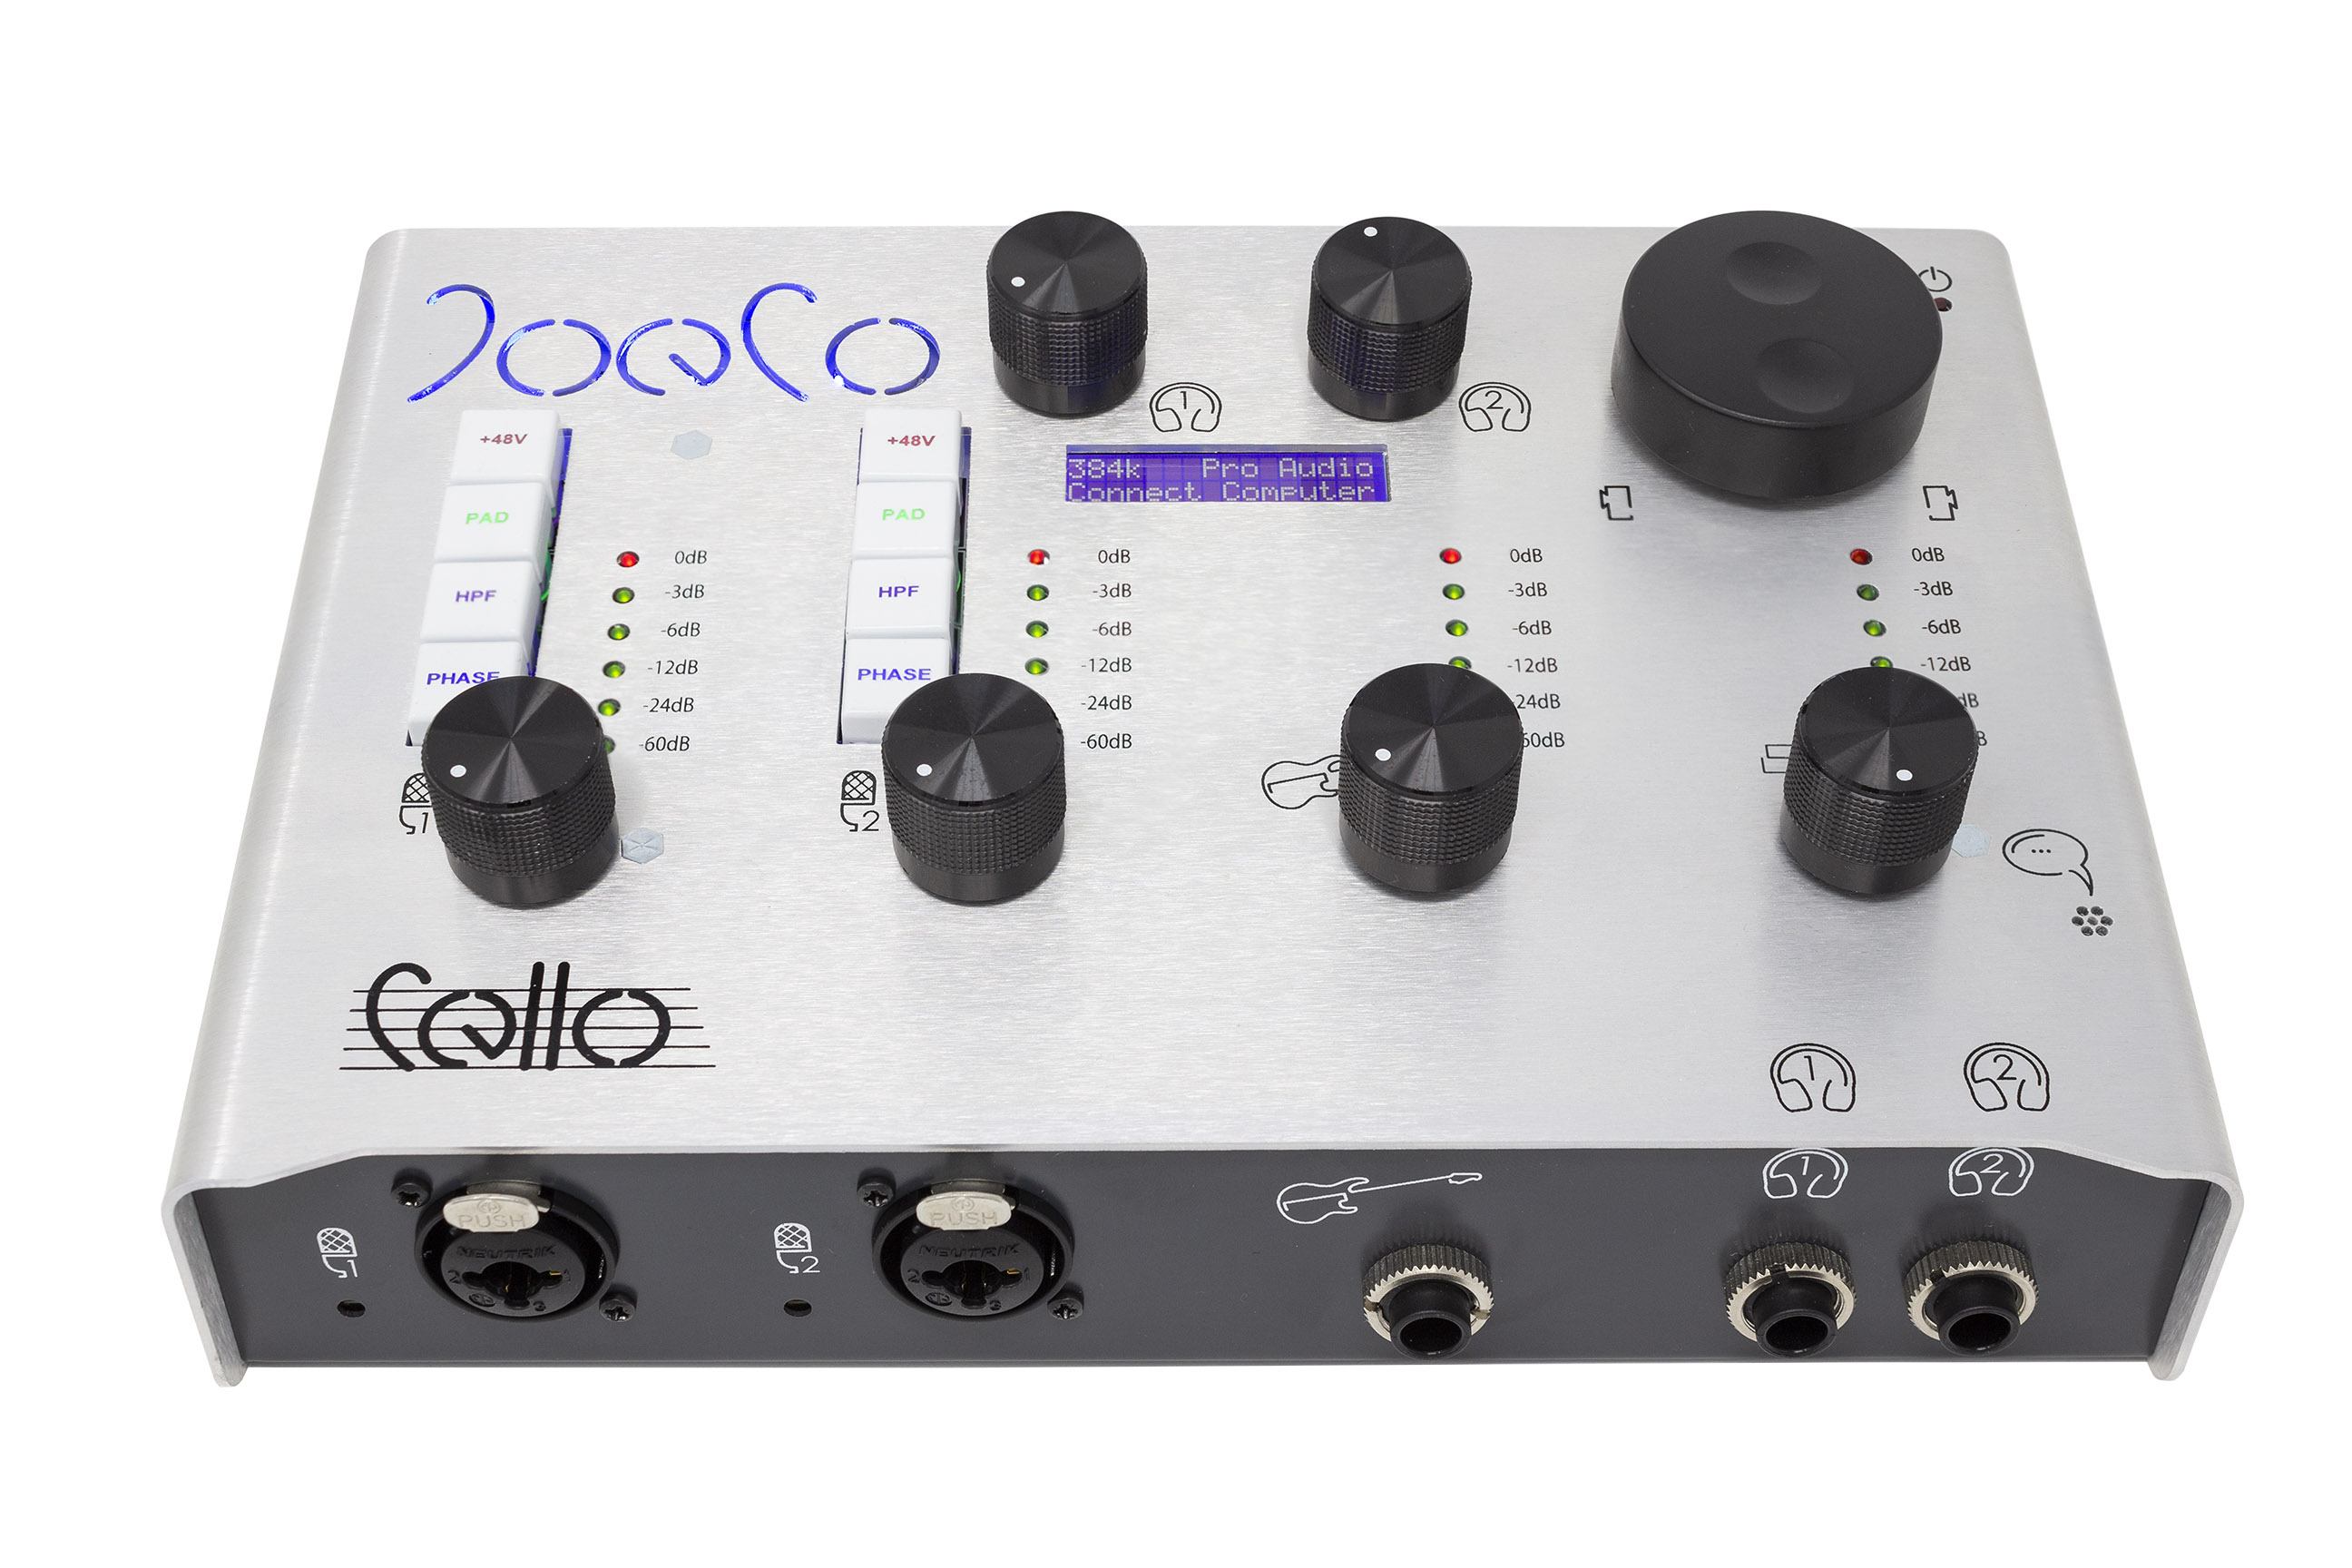
The metal-housed Cello is solidly built. The top panel features all the onboard controls. You get an input knob for the two Mic input channels, Instrument and Line. The button for the Line input is also a switch to turn on the built-in talkback mic.
All four inputs have six-step, ladder-style LED input meters, and the mic channels feature substantial buttons for the +48V phantom power, a -20dB pad, a Highpass filter set at 100 Hz, and a Phase reverse switch.
The upper section of the top panel features level controls for the two headphone outputs, a relatively small LCD that shows parameters like monitor and headphone level, clock source and more. In the upper right-hand corner is a large knob that controls the monitor output level and doubles as a DIM switch for the monitor outputs. When pressed down, you can turn it to adjust the DIM level, which is numerically represented in the LCD at the same time.
JoeCo recommends putting Cello in front of your computer screen—in other words, on the work surface in front of where you sit. Optimally, you should be looking almost directly over it. Because of lack of space on my studio desktop, I had to put it on a surface just to my left. This was a bit problematic, because looking from the side, the input gain knobs blocked the lower part of the LED displays. Fortunately, the levels are shown in the JoeCoControl software, so it wasn’t a big problem.
Front and Sides
Most of the physical inputs on the unit are on the front-facing panel, which has the two combo Mic/Line inputs, the ¼-inch Instrument input and the Headphone outputs. On the left-hand side of the unit, you’ll find MIDI In and Out DIN connectors. A lot of contemporary interfaces leave out the MIDI port, figuring that you’ll plug a controller into your computer through USB. But actual MIDI connectors give you more options and are a welcome feature.
The other connections are all on the rear panel. You get ports for USB-to-host, DC power, the two ¼-inch monitor outputs, SPDIF/Wordclock In and Out jacks on RCA connectors, two optical ADAT IN connectors, and ¼-inch Insert Send and Return jacks for the two mic preamp channels, allowing you to patch outboard effects into the input chain. The Insert jacks double as line-in connectors.
In Control
The JoeCoControl software unlocks a much deeper feature set. To get the application, you have to first register your Cello on the JoeCo site and then wait for a return email with a passcode. Apparently, the process requires manual approval from JoeCo, which means you could have a delay of a day or so before you can access the software.
[I’m sure that JoeCo has its reasons for not just making the software downloadable from the company website, but if they’re going to make you register to get it, it should be an automated process so you can download the software as soon as you’ve finished signing up.]
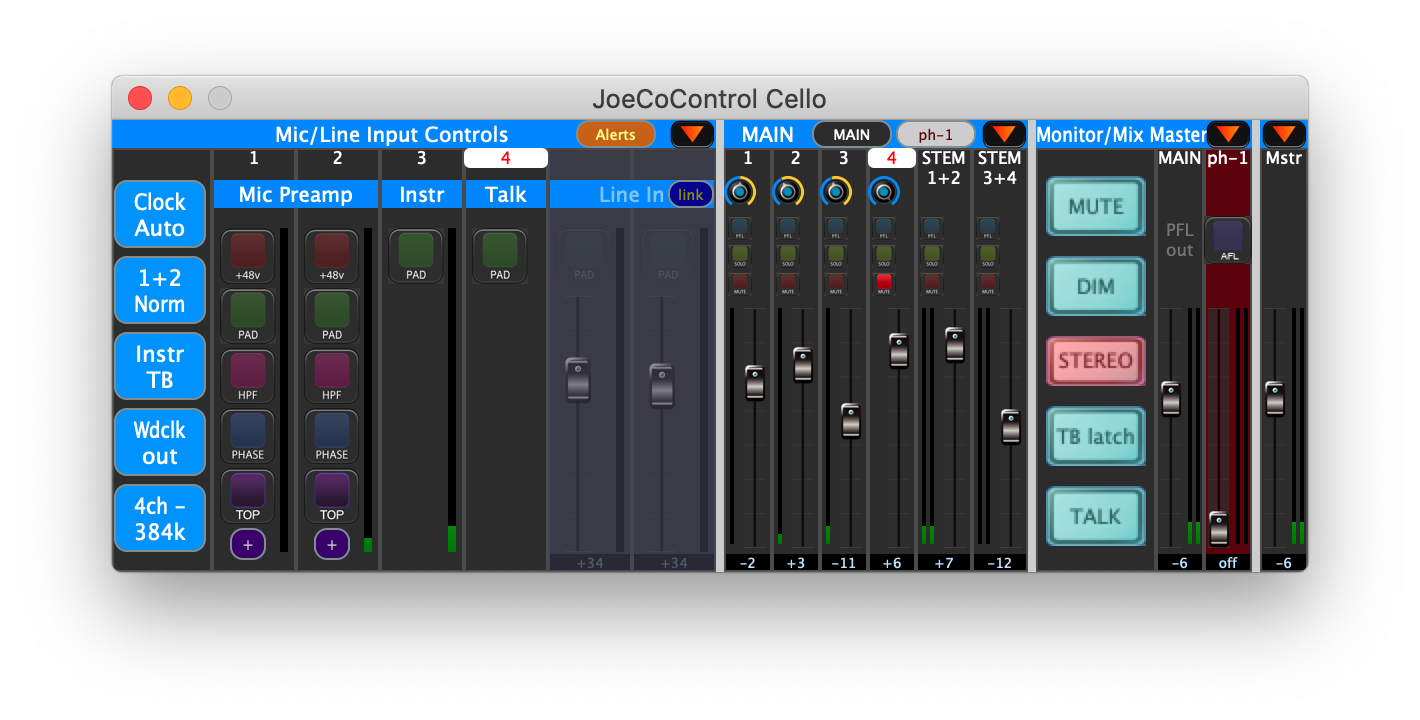
JoeCo Control initially opens in a small rectangular GUI that encompasses all four of its windows: the Input Control panel, Low Latency Mix panel, Monitor Mix panel and Master panel. When I first opened it, I tried dragging the corner of it to see if the GUI would enlarge but discovered that’s not how it works. Each of its panels can be opened as separate, resizable windows by pressing the orange arrow in the panel’s corner.
Once opened, you can make the windows substantially larger; I still would have liked an option to resize the main window so that I could keep all the functions in one place. Having separate windows is surely handy for some workflows, but on a crowded screen, it creates too many items to keep track of for my taste.
Digging Deep
The Input Control window has meters for the inputs and software versions of the buttons on the hardware front panel. For the mic channels, it includes all the buttons from the hardware, plus another called Top, which gives a little high-end boost with a shelving filter.
The Input Control window also includes some crucial preference buttons for functions like clocking (Auto or Internal), turning on and off the built-in MS matrix for the mic inputs (very cool!), turning the digital output on and switching it between Coaxial and Optical, choosing whether to output SPDIF or Wordclock from the Coaxial output, and setting the Operating Mode.
The latter allows you to choose between all channels at up to 48 kHz, 16 channels at up to 96 kHz, 8 channels at up to 192 kHz and 4 channels at up to 384 kHz. If you expand the window, you get two additional buttons, ADC setup and DAC setup, which allow you to adjust the digital lowpass filter on the converters.
According to JoeCo, some sources may sound better with particular filter settings. I found the differences between the parameters to be extremely subtle, but for some this will surely be a desirable feature.
Mix and Match
The software also gives you access to a DSP-based, low-latency mixer, and depending on which operating mode you have selected, you can have up to four mixes available: Main Mix, Phones 1, Phones 2, and SPDIF. The mixes are color coded so that each mixer window is a different color—easy to differentiate, very cool.
The Monitor/Mix Master window lets you access monitor-section functions like Talkback, Talkback Latch, Dim and Mute. Also, you get PFL and AFL options. The latter lets you listen to any of the headphone mixes in the main monitors. As that lets you hear the same mix as the talent, it’s helpful for quickly dialing in levels. You can also select which mixes get talkback, record a slate from the talkback mic directly to the DAW channel, turn on Autodim for automatically dimming when the talkback is engaged, and more. Mixes can also be saved and recalled.
Overall, the monitoring functions are deep and flexible. The only feature I miss is the ability to add effects (particularly reverb) to an incoming source for monitoring.
Sonically Speaking
Cello’s sound quality is impressive. I recorded acoustic guitar and vocals through the mic preamps, and the results were clean, uncolored and natural-sounding. The high-impedance instrument input, which I used for electric guitar and bass, also yielded excellent results.
After having the Cello in my studio for a week or so, and putting it through its paces, my opinion of it is quite favorable. In addition to its high-quality sound and 384kHz sampling-rate capability, it has a feature set that lets you geek out if you want—for example, adjusting the filters on the converters—but is simple enough that musicians without a lot of recording chops will do fine with it, too.
With its solid build quality, Cello makes an excellent portable interface, although it’s equally at home in a permanent studio setup. The ability to add external preamp units through its ADAT inputs means that you could get a Cello and expand it when your needs change.
The unit’s flexible and deep monitor mixing features, and built-in talkback, would make it a great centerpiece of a more extensive setup for full band or ensemble recording. While it might seem a little pricey for the number of mic preamp channels, you’re paying for quality. Cello is “pro audio” through and through.
PRODUCT SUMMARY
Company: JoeCo
Product: Cello
Website: joeco.co.uk
Price: $1,125
Pros: High-quality sound; supports 384kHz sampling rate; built-in talkback mic; solid build quality; up to four headphone mixes; MIDI I/O; M/S Matrix built in; inserts on mic channels; AFL listen helpful for setting monitor mixes; adjustable filters on converters.
Cons: Download access for control software can take a day; meter view obstructed if placed to the side; JoeCoControl consolidated window not expandable.