Since its introduction in 2005, FabFilter’s Volcano creative programmable filter has evolved and now been reimagined so as to be nearly unrecognizable from its beginnings as a vintage-sounding cutoff filter. Veteran users will immediately notice the all-new interface and its gorgeous, lava-colored look. Its efficient layout and the notable amenities are common throughout the entire FabFilter plug-in line.
Under the hood, the sound quality of the algorithms has been upgraded, and the interface has been simplified for programming up to its four analog-modeled, self-oscillating filters. Presets saved in earlier versions will still work— they’re saved in a separate V2 preset folder— although they may sound slightly different because of Volcano 3’s improvements.
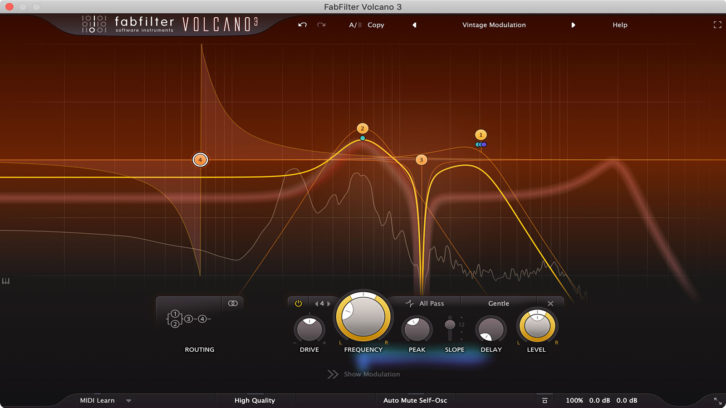
Users of other FabFilter plug-ins will be right at home with the large, central control knob and the semi-transparent, high-resolution spectrum analyzer. The filter display shows the resultant curve using a thick yellow line depicting the combined response created by up to four filters.
I liked that the typical EQ/filter specifications are not used in the controls in Volcano 3. It seems as if they’ve kept it more musical, with frequencies related to a (selectable) piano keyboard graphic directly below the filter display.
WHAT’S NEW?
Besides the original highpass, lowpass and bandpass filters, V3 adds vintage-sounding EQ filter shapes, including bell, low and high shelves, notch, and an all-pass filter. There is an added gentle 6dB/ octave shape and a new Drive control for introducing non-linearity, i.e., internal saturation to any individual filter.
A new High Quality button for internal oversampling has been added, and there is a redesigned envelope generator, a new transient mode for the envelope follower, and up to six X/Y controllers/sliders with adjustable operating ranges. V3 is more visual than ever, with modulation visualization by way of a “source flow” area that depicts which modulators are connected and affecting which filters.
VOLCANO 3 GUI
At the top of the GUI are the undo/redo and A|B buttons, a Help drop-down menu, a new full-screen button and a preset manager. Volcano 3 comes with a huge collection of new, well-designed presets organized into groups. The groups are arranged by category: Basic, Complex, Modulation, Sequenced, FX and MIDI Triggered, plus a big folder of “greatest hits” V2 presets. There are more than 100 new V3 presets included, and they proved vital when I first dove in and started learning Volcano 3.
The GUI is divided into three sections: filter display, filter controls and the extensive modulation section. Double-clicking on any specific frequency or point on the yellow line generates a new node with a popup (mouse-over) info box to display its exact frequency, filter style and a ± Peak control value for the amount of boost or cut.
You can right-click to select the filter’s slope, between 12, 24 or 48 dB/octave, and its shape—lowpass, highpass, bandpass, bell, low-shelf, high-shelf, notch and all-pass. Any of 11 different styles, each with a unique character, can be selected here. It’s one of Volcano 3’s main attributes, so more on that in a bit.
The amount of boost/cut is measured from 0 (flat) to +1.000 (full boost), or 0 to -1.000 (full cut), instead of the usual ±dB numbers. But when the all-pass filter shape is used, since it only rotates phase, changing the same control now shows 0.000 to 1.000 of phase rotation. An all-pass filter’s effect is only heard when its output is mixed with other filters and/or the source audio.
FILTER CONTROLS
Similar to working in FabFilter’s Pro-Q 3 plug-in, you have the ability to adjust parameters right at the node(s), which are also linked to knob controls in the Filter Controls section. For fast access and for checking parameters, you can cycle through the enabled filters, 1 through 4, and verify all filter control settings quickly.
The Routing button shows the way the four filters are chained together. They can be in series, parallel, or combinations of series/parallel. Here I relied heavily on studying the included presets to get ideas about changing filter chain order. I simply loaded a preset and bypassed individual filters in the chain to hear their effect. The Drive control comes next, for setting input level to the individual filters—more drive level, more grit.
The large Frequency control sets the frequency of the selected filter, although I usually just grab the node back in the display and drag it left or right—lower or higher in frequency. For stereo plug-in instances, there is a Pan ring or skirt around the Frequency knob that allows for filtering the left and right channels differently, effectively acting like a center-frequency rebalance control for stereo tracks that works to offset an EQ panoramically. In L/R or M/S modes, half of the filters are applied to the left or mid channel, and the other half are applied to the right or side channel.
I tried boosting an electric stereo (stem) mix of four 12-string guitar parts at around 1 kHz, then panned the filter toward the left side, about an octave down—referencing the GUI’s piano keyboard. This has the effect of boosting the octave down on the left side and the octave up on the right side of this stereo stem. This is like a stereo tilt equalizer, and it’s pretty cool.
The Peak knob “mirrors” dragging the node vertically—up or down in the filter display—to increase/decrease the resonance of the active filter. You may boost all the way into self-oscillation with an excessive peak setting. At the bottom of the GUI is an Auto Mute Self-OSC on/off button you can use to mute that filter; it acts like a noise gate to turn off filter whistles that may continue (like feedback) long after the source audio has ceased.
With the Delay control knob, you can add up to 50 ms of delay to the output of any filter. You can then create comb-filter, Haas, chorusing and flanging effects when you mix a delayed filter with other filters.
MODULATION SECTION
Called modulation targets, almost any parameter of all four filters can be modulated by six different modulation sources.
The XLFO source is a host-synced waveform generator that is malleable into any shape. For using horizontal and vertical mouse movements, there are six sliders and X/Y controllers (joysticks) for adjusting modulation amounts (depth), volume or automating filter parameter changes. You may modulate any filter using a MIDI source, such as the Mod wheel on your MIDI keyboard.
My favorite modulators included the Envelope Generator, which can be triggered by audio or MIDI. It generates a standard ASDR envelope that you can dial in. I also had a lot of fun with the Envelope Follower, which will follow the loudness/transients of the incoming audio and trigger filter changes.
Reverb Foundry Tai Chi – A Real-World Review
Morton KickTone Microphone – A Real-World Review
PreSonus PD-70 Dynamic Microphone – A Real-World Review
Just to spice up an otherwise static stereo pad, I used the side-chain input on the EF to put a midrange “squeak” right in time with the song’s snare drum track. At the final mix level, the actual snare drum track almost covers up this subtle and cool effect. This is a primitive use of a modulated filter, but I’m slowly developing other, more complex treatments.
Making sense of and constructing complex filters with modulators is brilliantly done in Volcano 3. Modulation sources are in “Slots,” added as required and then connected by dragging a virtual “cable” from its output to a “target” filter parameter. Once the connection is made, there is a specific modulation slot panel pop-up menu that appears near the filter control to fine-tune the modulator’s action. Here, each mod source has a different set of parameters, and at any time you may change the targeted filter parameter.
The modulators each have a specific color-coded dot next to the particular filter parameter being modulated. At a glance, it is easy to tell which filter(s) and which parameter(s) are being modulated, even when more than one modulator is connected to the same parameter.
AN ERUPTION OF IDEAS!
Mastering stereo mixes using the Vintage preset uses the Classic style from the FabFilter One Synth and starts with a single lowpass shape at 8 kHz. I switched to the Default preset that has the same 8k filter shape but is cleaner—both Drive controls were at 0. The song I was mastering already had a bit of low-frequency IM distortion, so the cleaner default was better for this song.
When building a filter from scratch, V3 automatically connects them in series—I got in the habit of starting at the left side of the GUI with the lowest frequency as filter 1, but it doesn’t really matter.
I wanted to try keeping the bottom octave of a Fender bass guitar track super-clean and solid, then “rough up” the upper frequencies. Filter 1 was a 24 Hz highpass, 6 dB/octave; Filter 2 was 78 Hz bell-shaped, also a 6 dB/octave, set to peak 0.215. Both filters 1 and 2 used the clean style and -18 dB of Drive.
Next, Filter 3 used a bell shape with the Drive set to +2 dB and frequency at 770 Hz with a Peak value of 0.553, with style set to Metal. The Metal style has a consistent amount of dirt and is not dependent on my bass player’s playing dynamics.
Filters 1,2 and 3 were in parallel, and I loved that you have several choices here to toggle through, making a big difference in the sound.
I added a fourth filter on the output of the three. It was a clean lowpass shape set to 2.3 kHz, with -18 dB Drive. The four of them together? It sounded amazing!
Volcano 3 is a fantastic tool for sculpting tonalities quickly. The simplified interface makes designing complex modulated filters easy and actually kind of fun Highly recommended!