Compression is one of the most common processes in all audio work, yet the compressor is one of the least understood and most misused processors. Compressed audio is an everyday fact of modern life, with the sound of records, telephones, TV, radios and public address systems all undergoing some type of mandatory dynamic range modification. The use of compressors can make pop recordings or live sound mixes sound musically better by controlling maximum levels and maintaining higher average loudness. It is the intent of this article to explain compressors and the process of compression so that you can use this powerful process in a more creative and deliberate way.
Compressors and limiters are specialized amplifiers used to reduce dynamic range-the span between the softest and loudest sounds. All sound sources have different dynamic ranges or peak-to-average proportions. An alto flute produces a tone with only about a 3dB difference between the peak level and the average level. The human voice (depending on the particular person) has a 10dB dynamic range, while a plucked or percussive instrument may have a 15dB or more difference. Our own ears, by way of complex physiological processes, do a fine job of compressing by responding to roughly the average loudness of a sound. Good compressor design includes a detector circuit that emulates the human ear by responding to average signal levels. Even better compressor designs also have a second detector that responds to peak signal levels and can be adjusted to clamp peaks that occur at a specific level above the average signal level.
When sound is recorded, broadcast or played through a P.A. system, the dynamic range must be restricted at some point due to the peak signal limitations of the electronic system, artistic goals, surrounding environmental requirements or all the above. Typically, dynamic range must be compressed because, for artistic reasons, the singer’s voice will have a higher average loudness and compression allows vocalizations such as melismatic phrasing and glottal stops to be heard better when the vocal track is mixed within a dense pop record track. With recording, the dynamic range may be too large to be processed by succeeding recording equipment and recording media. Even with the arrival of 90dB-plus dynamic range of digital recording, huge and unexpected swings of level from synthesizers and heavily processed musical instruments can overwhelm analog-to-digital converters, distorting the recording.
With broadcast audio, dynamics are reduced for higher average loudness to achieve a certain aural impact on the listener and to help compete with the noisy environment of freeway driving. The station-to-station competition for who can be the loudest on the radio dial has led to some innovative twists in compressor design. “Brick wall” limiting is where the compressor absolutely guarantees that a predetermined level will not be exceeded, thus preventing overmodulation distortion of the station’s transmitter. (The Federal Communication Commission monitors broadcast station transmissions and issues citations and fines for overmodulation that can cause adjacent channel interference and other problems.) Another type of specialization that sprung from broadcast is called multiband compression, where the audio spectrum is split into frequency bands that are then processed separately. By compressing the low frequencies more or differently than the midrange and high frequencies, the station can take on a “sound” that stands out from other stations on the dial. Radio stations “contour” their sound with multiband processing to fit their playlist/format.
THE BASICS
There are four basic parameters on all compressors: compression ratio, threshold level, attack time and release time.
Ratio—Ratio is a way to express the degree to which the compressor is reducing dynamic range. Ratio indicates the difference between the signal increase coming into the compressor and the increase at the output level. A ratio of 10:1 would mean that it would take an increase of 10 dB coming into the compressor to cause the output to only increase 1 dB. Ratio is a constant value, as it doesn’t matter how much compression is taking place; the ratio of the input change to output change is always the same. Compressors and limiters are really separated only by a loose definition: Generally, compressors have compression ratios up to 8:1, while limiters have ratios higher than 8:1. Most professional compressors have either fixed selectable ratios (such as UREI’s 1176 with presets of 4:1, 8:1, 12:1 and 20:1) or continuous variable ratios (such as the dbx line of professional compressors). Some recent compressor designs instantaneously change ratio depending on the program’s dynamic content and the constraints of the front panel control settings.
Threshold—Threshold is the level of the incoming signal at which the compressor amplifier changes from a unity gain amplifier (like a straight piece of wire, theoretically) into a compressor reducing gain. The compressor has no effect on the signal below the threshold level setting. Once threshold is reached, the compressor starts reducing gain according to the amount the signal exceeds threshold and according to the ratio control setting. Threshold level could be thought of as the “sensitivity” of the compressor and is expressed as a specific level in dB. The exact moment the compressor starts gain reduction is called the “knee.”
“Hard knee” compression describes this moment as sudden and certain. “Soft knee” or smooth knee compression is a less obtrusive change from simple amplifier to compressor. Soft knee widens or broadens the range of threshold values necessary for the onset of compression. On quality compressors you can switch between hard and soft knee compression. The amount of gain reduction is measured and read on a standard VU meter whose needle rests on the 0 VU mark. The needle will deflect negatively downward to indicate how much gain reduction is occurring in dB. VU meters are RMS or average level responding and do not indicate fast or peak gain changes. LEDs are also used for VU meters, and they will better indicate peak levels. A well-designed compressor will have a good meter that reads input level, output level, gain reduction and any excessive peak output with an LED clip indicator. Once the amount of gain reduction is determined, the recording or operating level is readjusted with the output or make-up gain control on the compressor.
Attack—Attack time refers to the time it takes the compressor to start compressing after threshold has been reached. Typical attack times range from less than 1 millisecond at the fastest to more than 100 milliseconds at the slowest. Attack time settings affect the sound quality in terms of overall perceived brightness or high-frequency content. If you use very fast attack time settings, the compressor will activate very quickly, reducing gain instantly at the waveform level of the sound. Since transient information at the front or attack portion conveys brightness character, especially with percussive sounds, immediately reducing it with the compressor will dull the sound. Selecting a slower attack time will allow the transient portion of the sound to pass through before the compressor starts clamping. However, if the attack time is too slow, ineffective and tardy compressor action may result.
If you compress a snare drum track with a fast attack, you may notice a diminished or shortened attack of the front portion of the snare drum sound. Instead of a good “hit” at the beginning, you will hear a very short “blip.” If the attack time were even faster, you wouldn’t hear any snare attack at all. Adjusting the attack control to a slightly slower attack time will lengthen this blip back to the original snare attack length. Engineers use a compressor to get more attack out of a snare drum by using a low threshold and a high ratio. After making up gain with the output level control of the compressor, the attack portion ends up greatly amplified just before the compressor starts squashing the trailing portion of the snare drum sound. I like to mix this “twacked” sound with the original un-processed snare drum track.
Release—Release time is the time the compressor uses to return to unity gain after the input signal has fallen below threshold. The compressor is said to “release” from gain reduction. Typical release times on popular compressors go from as fast as 20 milliseconds to over 5 seconds. Most engineers envision their compressors doing their job of gain reduction quickly and then releasing quickly to get out of the way. For the most part this holds up for pop recordings, but super fast release times, along with a fast attack time setting, will distort low-frequency sounds, as the compressor is capable of gain change within the period of the sound’s waveform. You can demonstrate this by using a very fast release on a bass guitar compressor and have the player play loud and sustained notes. Over-long release time settings are another form of distortion, since gain reduction is “stuck” clamping the sound down for an unnaturally long time. “Pumping” and “breathing” are engineer jargon words for obvious compressor artifacts or side effects with maximum compression. Sudden and usually unwanted deep gain reduction is called pumping, while a slower return (release) to operating level with a noticeable rise of the noise floor is called breathing. Newer compressor designs have clever predictive and adaptive schemes that reduce these side effects, making the compressor’s action nearly undetectable or at least tolerable in most intense gain reduction situations.
STUDIO COMPRESSOR CLASSES
Most full-featured modern compressors can be set to emulate three classes of compressors: regular compressors, peak limiters and leveling amplifiers. These compressor classes all differ primarily in attack, release, ratio and threshold settings.
Regular Compressors—Though there are no rules and many exceptions, for most music recording engineers tend to use a regular compressor with medium attack and release settings. Most of the time the engineer is looking for a modicum of level control with higher average loudness and some peak protection. Some producer/engineer teams prefer compression that is smooth, transparent and truer to the source sound’s fidelity. This is achieved by using a quality compressor with a higher threshold and lower ratio with medium attack and release settings. This team is looking for a natural sound that doesn’t sound compressed and retains most of its dynamic range properties. Another crew may opt for more severe and noticeable compressor action for a more “controlled” or tight sound. This would call for a compressor set with fairly fast attack and release times, higher ratio and lower threshold and low distortion under maximum gain reduction. With pop record productions, threshold and ratio preferences, along with compressor choice and usage, contribute to a certain production style.
Peak Limiters—A peak limiter is a compressor with a very fast attack time, medium to fast release time, a high ratio and a high threshold. The task for a peak limiter is to stop or control only the very quick, sudden peak levels that will overload the succeeding audio stage. Peak limiters are used in all broadcast transmitters, satellite transponder uplink audio feeds and in many digital audio systems where digital “overs” are not tolerated. Recording engineers sometimes chain a peak limiter after a compressor so they get the best of both worlds: They maintain a higher average loudness with the first compressor, and then protect the digital recorder from flash peaks with the peak limiter. This arrangement is good for recording a widely dynamic singer who also has poor mic technique-a nasty combination for the recording engineer. Aphex Systems makes a unit called the Compellor that combines a compressor, a leveling amp and a peak limiter all in one box.
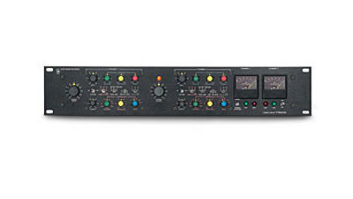
Leveling Amplifiers—The leveling amplifier is a compressor with a medium attack time, a medium to slow release time, a high ratio and a low threshold. The purpose of a leveling amp is to be constantly leveling the signal, always in gain reduction, holding the audio signal down in a smooth way (ergo the name). The average loudness of the program audio becomes higher since lower-level sounds are amplified, and louder sounds are leveled off. The slow release time ensures that sound level doesn’t drastically change or “pump” up and down as it would with a faster release time setting. Early leveling amps had few controls: Ratio, attack and release settings were all internally fixed. Tube leveling amps are popular for bass, guitars, program mixes and vocals because they exert a smoothing action that works well for many production styles. The Teletronix LA-2 is the classic tube leveling amp.
USING COMPRESSORS IN MUSIC
Trying to arrive at proper recording level can be like chasing a moving target, especially if you are working with inexperienced musicians or singers. It is easy to just “pack” the signal from a widely dynamic singer into a compressor, crank it way up and call it a day! On the other hand, the creative and caring engineer may use an equalizer in the sidechain of a compressor to selectively compress certain problem frequencies of the singer’s voice. The sidechain input is a direct path to the compressor’s detector circuitry, where an external signal can also trigger compressor action. Using an equalizer in the sidechain makes the compressor more (or less) sensitive to sounds within the EQ’s frequency passband. Other sidechain compressor applications are de-essing and ducking. De-essing is accomplished by connecting an equalizer to the sidechain of a peak limiter and boosting, with a medium to high Q, the “s” frequencies anywhere from 1.5 to 6 kHz (depending on the singer). Strong “s” sounds are quickly reduced without (one hopes) too much consequence to the rest of the vocal sound’s signal. Ducking is gain reduction that is triggered from a different audio source altogether. The most common usage is to “duck” or lower a music bed (track) whenever a narrative voice-over is active.
SOME PRACTICAL EXAMPLES
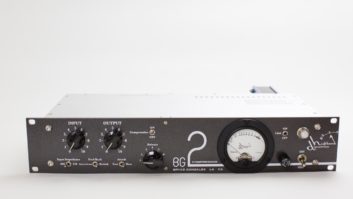
Bass guitar—Generally, bass guitars seem to sound better when using some compression. I sometimes rely on the compressor to pull up some additional bottom end and warmth. I like to use a leveling amplifier for bass guitar such as an LA-2, Anthony DeMaria Labs or a Tube-Tech CL-1B compressor set up as a leveling amp. Based on the song’s tempo and/or the bass player’s style of playing, I might start with ratios of 5:1 with a medium threshold setting, medium attack and a slower release time. Unless you are looking for a pumpy effect or have a very wild bass player that the producer would like to squash, I rarely compress bass guitar more than about 5 dB max VU.
Vocals—A lot of anguish and pain surround the recording of vocals. Maybe some singer insecurities, producer apprehensions and overall great expectations weigh on the arrival of a stellar vocal sound. It’s about preferences, and vocal sound is subjective and contextual within the backing track. It does not exist on its own unless you are recording an a cappella performance. What I might think is a great vocal recording on a certain CD may be not be what the singer and producer are looking for to convey the emotional import of the artist, the song’s lyric or the vibe of the song. At the first vocal recording session, you will want a starting point vocal sound that fits the singer, the song and the production. This starting point sound will work well to capture the immediacy of the moment and hold up later in mixdown. After mic selection, mic preamp selection and EQ setting, a compressor type is decided. Although there is much interaction between all these components, my starting point settings are predicated upon a +4dB level coming from this mic/preamp/EQ chain. For vocals, I tend to use compressors with adjustable attack and release time controls. I like tube-based compressors, although for more difficult control problems I would go to a VCA-based unit. If you were to set the threshold at about 0 dB, the ratio at 4:1, the attack and release at middle positions and adjust the output level for a good recording level, you’d have about 3 to 6 dB of compression and probably make most people happy. This is just a good starting point, and you should get in there and change those settings to your own taste.
Stereo Mix Compression—A popular place to apply compression is on the entire stereo mix as it is going to the master tape. Stereo compression is also applied “after the fact,” such as in mastering, but there is a big difference. If you are mixing your record into a compressor ahead of the master tape recorder (or DAW or whatever), then you are mixing many sources (tracks or elements), each with its individual dynamic content. Making mix moves (especially big gain changes) directly affects the compressor’s action, which, of course, affects the relationship of all the other mix elements, that is, the whole mix! If you do not use a stereo compressor at mix and compress at mastering, then you have just the dynamics of a 2-channel stereo mix for the compressor to react to. Many engineers and producers mix into a compressor and then have the mastering engineer compress again, while others prefer to wait until mastering to compress digitally. A good starting place for the stereo mix compressor is a lower ratio with medium attack and release time settings. Set the threshold (and output level) so that you can hear an increase in level (average loudness) when you A/B the compressor in and out of circuit. Remember, this is just a starting point! You may want to use a higher ratio to control peaks better and/or a lower threshold for more compression and denser overall finished sound.
As with all audio processes, learn to recognize the effects of compression (the pitfalls and advantages of using it), and, as always, use your own ears to go for sounds that you like and that improve the sound of the music.
Gain reduction could be divided into five types based on the electronic method used. Knowing how they each basically work will help you in proper selection and in knowing why certain units always seem to excel in certain applications.
Optical Isolators—The optical isolator section of compressors uses a light bulb (or an LED) to glow brighter or dimmer in response to incoming audio. A photocell (or phototransistor) is used to track the varying brightness of the bulb and change gain accordingly. This is a good example of an average responding detector. The inherent lag time that the bulb/photocell has in response to audio is factored into the attack and release time performance. The Teletronix LA-2 and the transistorized UREI LA-3 leveling amps are examples of this type of compressor. Compressors using this method are used a lot for bass guitar, vocals, program mix and drums. These compressors offer simple, natural sounding control (unless pressed hard).
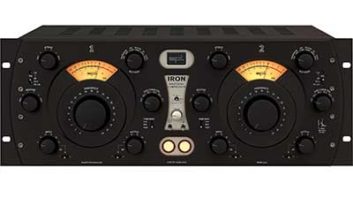
FET—Field Effect Transistor compressors use a special transistor to vary gain. FETs were the first transistor to emulate tubes in the way they worked internally. Inherently a high-impedance device, the FET compressor sounds like no other box, and not many examples exist because of the expense of the extra attendant circuitry required. FET compressors are extremely fast, clean and reliable. I like to use these on vocals where a good amount of compression sounds good or better than the same amount with another unit, and on drums for room mics or individual drum mics. UREI’s 1176LN peak limiter and LA Audio’s Classic II stereo compressor/limiter are examples of FET-based compressors.
VCA—Voltage Controlled Amplifier compressors are the most versatile of all and so are the greatest in number. The VCA can quickly change gain in response to many different detectors looking at the same signal. VCA compressors are for the really tough cases where you want strict control over level and dynamics. However, they can be as gentle as any other compressor or anywhere in between. I like a good VCA compressor on vocals, drums, guitars, synths, bass, mix-basically anytime I need a compressor.
Vari-Gain Compressors—Variable Gain compressors include all units that incorporate discrete circuitry other than VCAs, FETs or opto-isolators. I put the Manley Variable-Mu tube unit in this category, and I like using these types for vocals, drums and stereo mix.
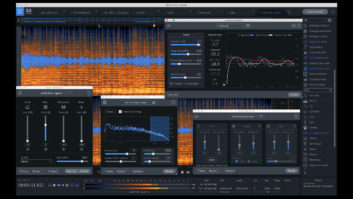
Computer Based/Digital Compressors—Computer-based or digital compressors are now more prevalent, offering the ability to process audio in the digital domain under precise computer control. Digital audio stored in a computer has the advantage of being “predictively” processed. You can have zero attack time gain reduction as well as nearly infinite control of all parameters of compression on a moment-to-moment basis. The Waves L1-UltraMaximizer TDM plug-in for Pro Tools is one example of a software-based compressor. TC Electronic makes the Finalizer Express hardware unit for studio mastering. This is a single-rackspace, stand-alone, digital multiband compressor.