Over the course of its short history, Ableton Live has moved quickly from a novel live performance/looping tool to a full-featured audio, MIDI and now video-capable workstation. Its capabilities rival the feature sets of such venerable studio stalwarts as Apple Logic, MOTU Digital Performer and Steinberg Cubase. Live has evolved so quickly, with new versions coming out like clockwork, that many people haven’t had a chance to catch up with the program’s latest additions. Here are some of my favorite tricks from the past few versions that will help you take your remixes, film scores and live playback tracks in new directions.
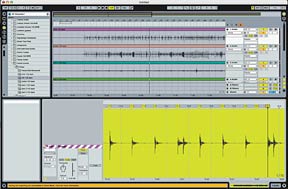
Live 6 lets users apply Warp markers across multitrack recordings at the same time. This feature is ideal for editing drums or imposing a single groove over multiple tracks of the same length.
MULTITRACK WARPING
Live’s ability to radically alter the tempo of audio tracks via Warp markers is one of the most powerful aspects of the program. With Version 6, you can apply Warp markers across multiple tracks at the same time. This is a great way to tidy up multitrack drum sessions. To do this, all of the tracks must be the same length (as is usually the case with multitrack drums). In the Arrangement view, highlight all of the tracks to bring up the multitrack Warping function. From here, any Warp marker changes that you make will affect all of the tracks in the same way. It’s best to use the room mic or the overheads as your guide track, as these sources will give you a better overall picture of the entire drum kit, making your edits more accurate across the other tracks.
CROSSFADER: NOT JUST FOR DJS
Every track in a Live session can be assigned to one of the two sides of the crossfader (A and B, respectively). An incredibly easy technique you can use for sound design, remixing or live performance involves bouncing out your current session — effects and all — and assigning the results to the other side of the crossfader. Once you’ve rendered the file, experiment with different effect chains. This is a great chance to try out old stomp box effects or whatever else you have around. Once you have your desired results, add the new clip back into your Live session and assign it to the opposite side of the crossfader. Assign the crossfader to a MIDI hardware controller. Now with the session playing, you can crossfade back and forth between your original session and the alternate version you just created — and all with a minimal hit to your CPU.
MASTER WARP
Similar to the way other DAWs allow you to create master tempo tracks, Live 6 now lets you designate one track as the Master Warp track, forcing all of the other clips in the session to follow the tempo of the master. This can be useful in a variety of applications — from remixing to sound-for-picture. To access this function, click the Master button in the Sample box (located within the Clip View pane) of your desired Master Warp track. If you designate more than one clip as the master, Live will default to the clip nearest to the bottom of the Arrangement window. Beyond matching sound to picture, this feature is great for synching loops or other elements to a lazy acoustic guitar track, or anything with decent transients that wasn’t recorded to a click.
MACRO CONTROL
Instrument and effect racks are major additions to Live 6. On the surface, many might mistake these as being nothing more than layered instrument or multi-effect processing chains, but that is not the whole story. Each rack has eight macro controls than can each be mapped to multiple controls within the rack and controlled with standard MIDI hardware. For example, one macro control can be used to control the filter cut-off, high EQ and delay wet/dry for an instrument rack. Furthermore, each parameter’s control values can be constrained to certain ranges and even inverted. And while this may seem like too much to keep straight, try using the program’s handy Mapping Browser, which displays all current mapping assignments and is refreshed every time you make a change to the session.
THIS STUTTERING MACHINE
Creating glitchy stutters and fills for your drum tracks used to be a tedious cut/paste affair, but Live makes it a breeze. Beat Repeat (added with V. 5) is an audio processor that does all of the heavy lifting for you. This processor can sample and repeat a specified amount of audio at specific bar and beat locations, all while staying perfectly in sync with the session tempo. And like all controls in Live, everything in Beat Repeat can be assigned to MIDI controllers. A task that used to require an hour of careful editing can now be duplicated with a couple of knob twists.
DEEP FREEZE
Freezing tracks is one of the best ways to save CPU resources, especially when moving a Live session from your main rig to an older or underpowered laptop. Now, the new enhanced Deep Freeze feature in V. 6 lets you edit (cut/copy/paste, etc.) regions, as well as apply automation changes, edit the way clips launch, move frozen MIDI/instrument tracks on to audio tracks and more. And once saved with the Live session, the frozen tracks open and behave exactly the same on your laptop.
Robert Hanson is a former Mix and Remix editor who is very happy to once again call San Francisco home.