Tai Chi, a Chinese martial art dating back more than 700 years, is practiced today as an intense, whole-body exercise using artistic poses, Qigong breathing and energy methodologies. Tai Chi is also the name of Reverb Foundry’s newest algorithmic reverb that breathes new energy into conceptualizing reverb sounds, modernizing sound design and creating novel synthesizer augmentations.
Tai Chi is the third release in Reverb Foundry’s software reverb product line. It joins M7 Link, a standalone software remote controller for the famed Bricasti M7 hardware reverb, and the HD-Cart reverb plug-in, which emulates the classic Lexicon 480L hardware unit. What? You’ve not heard of the company?
Reverb Foundry was founded in the UK in 2018 by Matthew Hill, its lead product developer, and David Bryce, head of sales and marketing. Hill’s other software plug-in company is LiquidSonics, with its Seventh Heaven Impulse Response reverb (a software version of the Bricasti M7 hardware reverb), an algorithmic reverb called Cinematic Rooms, and Reverberate 3 software for combining impulse responses to create wholly new reverbs.
Tai Chi is a 64-bit processor (iLok-authorized) and requires an Intel or AMD processor or Apple’s M1 using Rosetta 2. Native Apple M1 support is said to be coming soon.
NAVIGATING TAI CHI
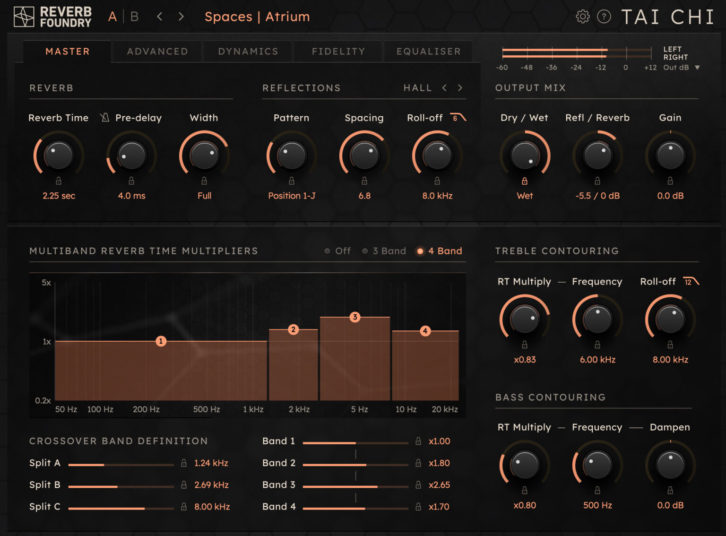
The no-nonsense, monochromatic look of Tai Chi’s GUI, appearing only in black and orange, works well for accessing and adjusting all parameters. I found the manual indispensable for fully understanding Tai Chi’s powerful capabilities. If you don’t want to bother reading, or are just in a hurry, all of the familiar reverb parameter controls are there, with 75 (and counting) starting-point presets included.
Getting to know Tai Chi and its GUI is easy because it is organized into three horizontal rows. At the top, just under the requisite plug-in frame with its preset selection, A/B preset switches and preferences/settings area, is the first row, which shows five selectable tabs or subsections.
They are named from left to right in somewhat of a hierarchy of importance: Master, Advanced, Dynamics, Fidelity and Equaliser. Clicking on any of the five tabs changes the names and functions on the second row’s six controls to the parameters required for that tab.
Morton KickTone Microphone – A Real-World Review
Always visible and available on the GUI’s right side are the input/output meters and the Output Mix section, with Wet/Dry, Reflection/Reverb balance, and Master Gain controls. Rather than using the typical send/return reverb setup, I found it better to use Tai Chi’s internal Wet/Dry Balance—especially for creating signature “hook” effects. Tai Chi works great on stereo submaster buses in Pro Tools, especially for elements such as drums, keyboards or backing vocals.
The third row occupies the entire bottom half of Tai Chi’s GUI. There, you’ll find the Multiband Reverb Time Multipliers. This looks and operates like a multiband EQ, but it controls the RT60 decay times within carefully defined frequency bands. You can select either three or four bands, or bypass it.
For global reverb frequency sculpting, there is a Treble Contouring section with its semi-parametric 6, 12, 18, 24 dB-per/octave lowpass filter, while the Bass Contouring controls enable either dampening or exaggerating the reverb’s low frequencies. I used these sections as finishing touches when programming a new reverb.
MASTER, ADVANCED TABS
When Tai Chai first instantiates, Master is the default tab, with controls and parameters most will recognize immediately. Reverb Time has RT60 values up to 89.9 seconds, culminating in a Freeze feature; Pre-delay is either tempo-synched or variable up to 500 ms; and I loved the Width control, which uses Mid/Side techniques to vary the stereo width from mono up to 150 percent.
Next in the Master tab is Reflections, where you may select the physical space for Tai Chi to emulate, be it a Room, Hall, Church, Garage or Stadium. A control called Pattern works with another control called Spacing; together, they set the reflectivity, or number of reflections, and the time between reflections. Back in the Output section, the Reflection/Reverb balance control sets the balance between the reflections of the selected space and its reverberation. This is a powerful design tool that controls the reverb’s core properties and sound.
Using the Wet/Dry control at fully wet, I found it easier to adjust the ratio of reflections versus reverberation. Reflections are the discrete actual “slap” or flutter echoes in a space. There is a big difference between the number, spacing and color of reflections in Tai Chi’s Room emulation versus its Stadium! Selecting the space is the most important first step in designing a new reverb preset.
Audio-Technica AT2040 Hypercardioid Dynamic Mic – A Real-World Review
Once I had a space picked out in the Master tab, the Advanced tab opens up granular access to more arcane reverb parameters. The manual explains in good detail: Density, Diffusion/ Diffusion Size, Chorus/Mod Rate and Wander.
The Density control sets how smooth the reverb sounds—how well the reflections are heard within the reverb’s tail. I found sustaining synth pads or strings to sound better using high Density values, whereas percussion and drum kits with single, sharp attacks become flams.
The Diffusion and Diffusion Size controls adjust how much the reverb is time-smeared, with higher Diffusion values equaling smoother reverb. Finally, the Chorus, Mod Rate and Wander controls modulate the reverb loops within Tai Chi. The overall effect is to thicken the reverb without too noticeable pitch-shifting. Tai Chi has many of the same parameter names I recognized from classic reverbs I’ve always admired, such as the Lexicon 224 and others.
DYNAMICS TAB
The Dynamics tab has the controls of a stereo compressor because that is exactly what it is! With Threshold, Ratio, Knee, Attack, Release and Trim (makeup gain) controls, you can Compress or Duck either the reverb and reflections, or the reverb signal only.
I immediately tried using Dynamics for a lead vocal in a Pop music mix. The problem was how to retain intelligibility and also have a lush, long, well-heard reverb. The singer sang percussively, with rapid-fire lyrics that quickly started to lose intelligibility as I increased the RT60 time.
I inserted a Mono-to-Stereo instance of Tai Chi into the lead vocal chain right after heavily compressing it using Kush Audio’s AR-1 Lisson Grove plug-in. With the vocal track now stereo, I used an extremely long RT60 time of 7.6 seconds, no Pre-delay, 150% Width, and selected the Stadium space with Wide Reflection Spacing. I then used Duck mode to compress the reverb only and not the reflections (you have a choice) whenever the vocal track exceeded the threshold setting.
Warm Audio WA-8000 Mic – A Real-World Review
Using the Reflection/Reverb balance control, I favored the reflections over reverb so that the vocal had a slapback effect, but the reverb tails were suppressed whenever the singer sang.
However, when the singer stopped singing, such as during a break before the next verse, the super-long reverb continued to sustain through that break! I used the Multiband RT Multiplier to lengthen the reverb decay in a broad midrange area, but went much shorter in the bass so that the vocal track could be “tucked” into the track yet still be understood.
Fidelity is for designing the overall sonic quality of the reverb by distorting the input signal to the reverb processor for the crunchy sound of many vintage 70s and 80s digital reverbs. Controls here include: Input Bandwidth; a Bit Crusher section adds dirt selectively to the Output, Reverb or Reflections in any amount(s); and the Recirculation controls affect the way the reverb loops around itself. The Equaliser does not touch the dry signal and offers 6, 12, 18, 24 dB/octave shelving filters.
LOCK IT IN
One of many new ideas carried out well in Tai Chi is Parameter Lock, which facilitates searching and toggling through different presets by allowing you to lock down any parameter from change, as is normal when switching presets.
I was looking for a room (or plate) reverb with a RT60 of around 2 seconds, no pre-delay and a darker sound. By locking Reverb Time, Pre-delay and the 500 Hz 24 db/octave rolloffs in both the Master and Reverb Contouring sections, no matter what preset I switched to, those basic parameters stayed the same. And there is a way to reset all parameter locks with one click—awesome!
Tai Chi has proven to me to be more than a reverb plug-in by way of its imaginative design and extensive, deep parameter control. Brilliant ideas and products like this don’t come around that often, and I think Tai Chi should be standard kit in any plug-in folder and/or session template. Highly recommended!