Co-founded by Belgian mastering engineer Robin Reumers, coder Jeroen Dreessen and technical engineer Emiliano Caballero, Leapwing Audio has released DynOne version 2, a 64-bit multiband parallel processor mastering plug-in. It is the company’s second plug-in, joining CenterOne Spatial. They both come as VST, VST3, and AU and AAX Native versions for both PCs and Macs.
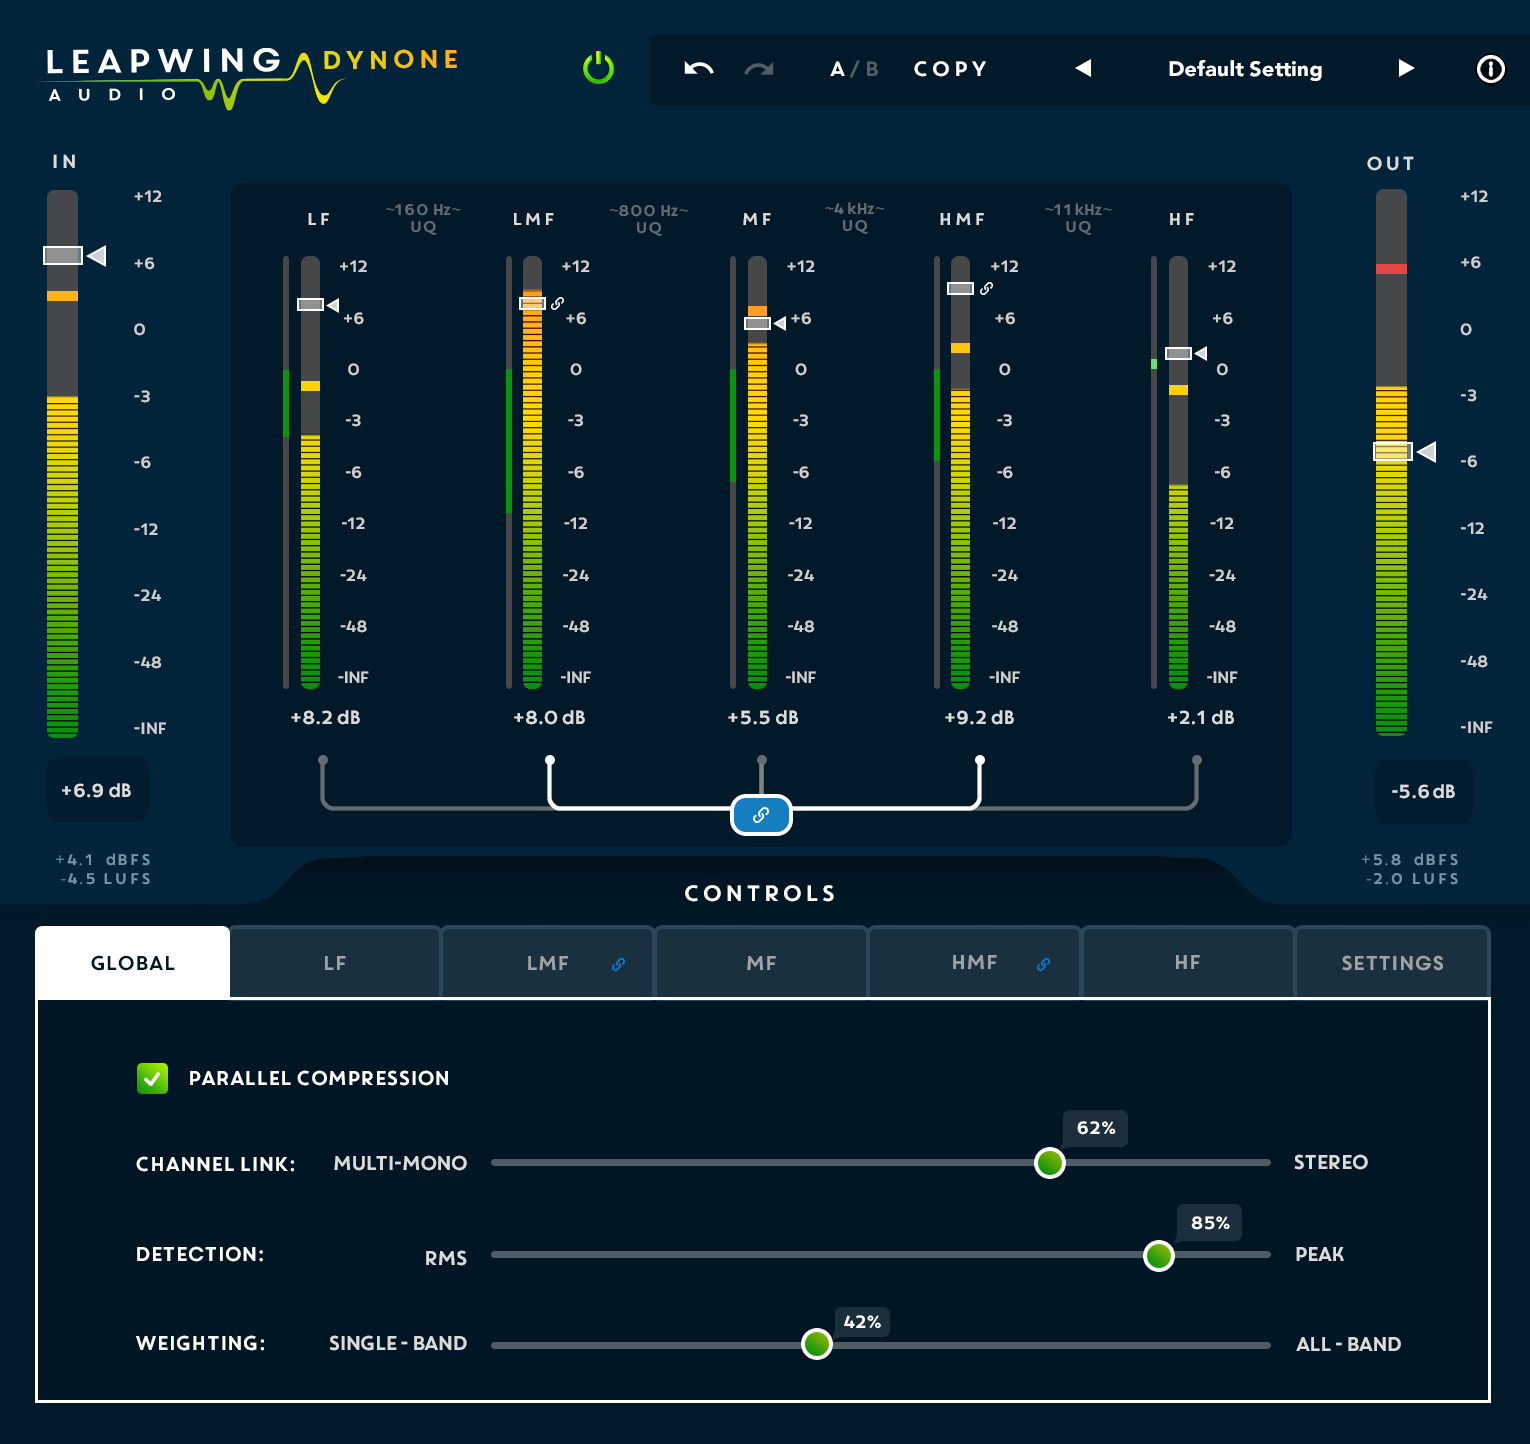
DynOne offers a fresh look at the multiband compression/expansion process, with a choice of either Parallel or Normal operation. In either mode, each of the five bands has its own gain reduction/expansion meter and a fader for setting the level of that band’s contribution to the finished sound. In addition, the five band-faders link together, with the ability to link/unlink any one of them individually. I found that this feature, along with being able to solo any band, made it easy to build a particular tonal “shape.”
The five bands have custom-built crossover filters with non-harmonically related frequencies centered at 160 Hz, 800 Hz, 4 kHz and 11 kHz. There is a choice between linear phase filters called Ultra Quality (default) and Low Latency.
Ultra Quality adds a concomitant jump in CPU usage and increased latency; it measured 4,096 samples at 44.1 kHz, using 256-samples hardware buffer size in Pro Tools HDX 2018.7. The Low Latency mode had 65 samples latency and much less CPU usage and was the mode I used primarily on individual tracks in a mix. With larger track count mixes and many other plug-ins running, I found myself using larger hardware buffer sizes than I normally do—mostly because of my old and slow 2010 8-core Mac Pro tower.
Mastering the Controls
Each of the five bands has a separate drop-down control panel with its own set of adjustable compressor parameters; you can type in numeric values as well. Threshold ranges from -60 dB to 0 dB, and the continuous ratio slider goes from 20:1 down to 0.80:1. (Compression ratios below 1:1 are actually upward expansion ratios.)
There are also Attack and Release controls for each band—dual faders with upper and lower handles to set a range of optimized attack and release time settings based on that band’s Crest Factor calculation. Crest Factor is the ratio between peak and RMS values of audio signals, and each band in DynOne has its own Crest Factor calculator.
For all five bands, attack time ranges from 0 ms to 800 ms, and release times range from 5 ms to 800 ms. Leapwing specifies 0 ms attack time because the plug-in uses a (look-ahead) buffer. The initialized default attack time and release times for each of the five bands range from 300 ms to 400 ms.
Related: FabFilter Pro-MB: Groundbreaking and Intuitive Multiband Dynamics Plug-In, by Michael Cooper, March 1, 2014
When adjusting these settings, the Crest Factor calculation is considered; it would be great to see a visualization of CF in the GUI somehow. New to all this, I found that trying DynOne on individual tracks in a mix was the best way to teach myself and understand these controls. There are also 29 presets you can load and modify to taste, and those told me a lot when getting started.
In the Global window you may select either Parallel (default) or Normal operation, and there is a crossfader to set for using either RMS (default) or Peak detection—or anywhere in between. The Channel Linking fader sets how much the five bands’ gain reduction actions are linked together. DynOne’s five stereo compressors can act independently in 100 percent Stereo Mode, or you can slide the Channel Linking fader toward 0 percent for multi-mono (default) linking.
The Weighting fader controls the sum of a weighted combination of the five frequency bands on total gain reduction. Move the Weighting fader all the way left to Single Band and none of the bands are weighted. The fader can go all the way right for All Bands contributing. I left it at 50 percent (default), where all bands have equal weight.
I certainly found Linking and Weighting to be useful parameters when compressing individual tracks, especially on vocals, kick drum, snares and bass—sources that do not have the spectral complexity of a full music mix. For example, you can “squash” the low frequencies of a kick drum and keep the rest of the sound, with the ambience and air intact.
In Studio, In Action
I installed the 64-bit DynOne AAX Native version in my Pro Tools HDX rig. When you first insert DynOne, it defaults to Ultra Quality, which could be a nagging problem in big sessions with CPU overloading. I would rather it default to Low Latency.
My first impression on the first track was that DynOne is extremely clean, clear and transparent, without typical compressor/limiter coloration or artifacts.
The first track was a problematic lead vocal with crazy dynamics and sketchy enunciation. I used the Low Latency mode. I liked to shift-click for soloing any band(s)—very handy, although I could use a solo clear button, plus it is hard to see which bands are not in solo.
With some careful tweaking and constant comparison, I got my singer loud, clean and clear but not dulled-out and squashed-sounding. I used Parallel mode but not Auto Gain. I also used expansion ratios in the HF and LF bands—an awesome new discovery for lead vocals! Dynamically expanding the top and bottom frequencies of a vocal track is my new secret weapon for getting a compact and controlled midrange for cutting big music productions that become “fat” and airy at the same time.
Want more stories like this? Subscribe to our newsletter and get it delivered right to your inbox.
DynOne will do a complete reconstruction of a kick drum. Here, I wish the low frequencies had a switch to put the 160 Hz band down an octave so the subsonic frequencies could be better sculpted. But I was able to compress at 160 Hz and then expand the upper frequencies. Auto Gain was useful here, and I tried both Low Latency and Ultra Quality and found no significant difference.
I then tried my hand at mastering using Ultra Quality on a country song I had mixed, starting with Auto Gain off (but on later), and Normal mode (Parallel mode off) for my first trials. Generally, I used very low ratios and auditioned each of the five bands in solo to see if I could maximize their sound quality. I’m not a mastering engineer by any stretch, and I’m not sure what I was going for, but here is what I found.
You can take any mix much further in any direction you want.
I was able to make it loud, super clean and clear, bright and crystalline—even go overboard—yet I never heard any ugly distortion. I used expansion on the 11 kHz band, 8:1 ratio on the MF band, Global detection was toward Peak (76 percent) and Weighting was 28 percent toward Single Band. In the hands of a skilled mastering engineer, DynOne could be magical. I liked Band Auto Gain but with all bands on or off.
I found good use for DynOne in cleanly shaping any source. Thicken up direct guitars, remix the bottom end of a drum loop in any way without distortion, or straighten out a synth pad track to fit into your track.
My only beefs? The plug-in reads both input and output levels in LUFS, but the values—along with the frequency bands’ values—are too dark and hard to read. (They are lighter blue over dark blue background!) The band fader handles could be a little larger, and the band meters don’t show gain reduction, only level. Finally, there are no band mute buttons.
Still, DynOne is extremely clean and clear and, at first listen, the sound might appear too subtle in its control and effect. Just remember, it is a precision tool, one that I can highly recommend for both mastering and mixing.
Product Summary
Company: Leapwing Audio
Product: DynOne Dynamics Plug-In v2
Website: www.leapwingaudio.com
Price: $199 MSRP, 30-day trial available
Pros: Super clean and clear; precise.
Cons: CPU-intensive, GUI needs some work.