Drop the name Rupert Neve and anyone involved in the recording business will stop and turn their head. So you can bet it created some serious buzz when Steinberg announced it was collaborating with Rupert Neve Designs to develop the UR-RT series of audio interfaces. The new line currently consists of two units, the UR-RT4 and UR-RT2. The former offers 6×4 I/O and the latter 4×2, and both feature USB 2.0 connectivity. The main feature that sets these units apart from the corresponding models in the regular UR series, other than the price, is a switchable Neve transformer on each mic pre input channel.
The interfaces support both Mac and Windows, and you must install drivers on both platforms. No drivers are needed for iOS because the UR-RT units are class-compliant. However, you will need an Apple Camera Connection kit to hook them up with your mobile device.
Both interfaces come with software packages that include a mixer application (also available in app form for iOS) that allows you to access many features that you can’t from the hardware.
In this review, we’ll look at the UR-RT4. Other than the I/O differences, it’s the same as the UR-RT2.
How It Sits
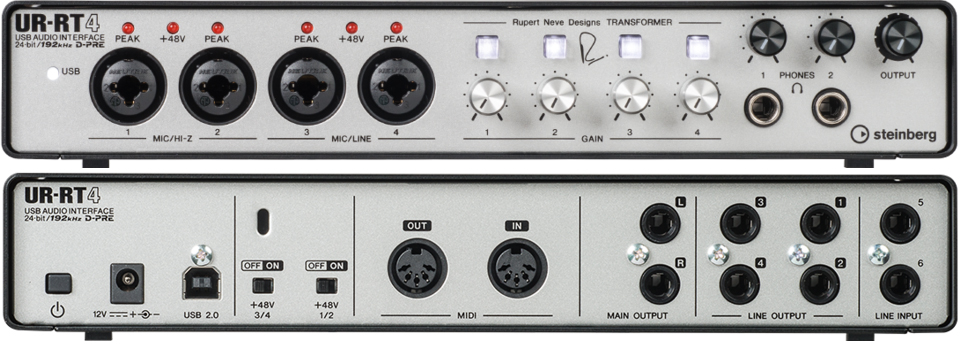
The UR-RT4 is a solidly built, metal-housed desktop unit with most of its controls on the front-facing panel, except the phantom-power switches, which are on the back. The front panel is set back about a quarter-inch, and the edges of the frame stick out over it by that amount, which slightly obscures your sight lines to the front panel if you have it at desktop level.
Review: Steinberg Wavelab Pro 9.5, by Mike Levine, Jan. 31, 2018
It’s not just the frame that causes sight-line issues; the design of the unit (which is approximately one rackspace high) makes it hard to see all the front panel labeling when it is sitting on the desktop. Fortunately, the controls are simple enough that you get to know what’s what pretty quickly.
One of the other design features is a very smart one, however: Steinberg printed the locations of the rear-panel jacks and switches on the back of the unit’s top (it also contains air vents), which not only shows you what’s plugged in where, it makes it easy to find the rather small phantom-power switches on the back panel. Otherwise you would have to feel around for them.
You Got Connections?
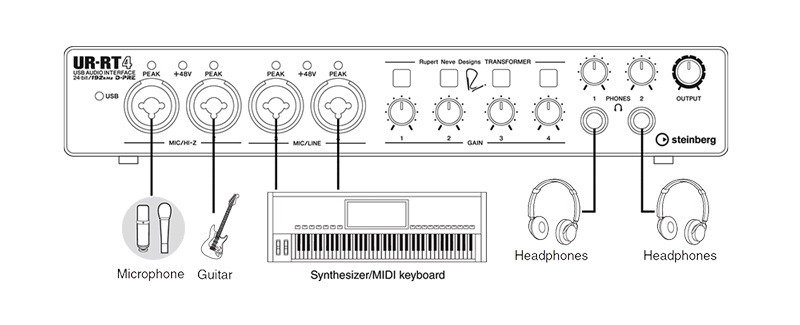
The UR-RT4 offers a pretty flexible I/O setup. On the front panel are combo jacks connecting to Yamaha D-Pre mic preamps, representing channels 1 through 4. Channels 1 and 2 can handle XLR mic or 1/4-inch Hi-Z signals. Channels 3 and 4 support XLR mic or 1/4-inch line signals.
Review: Steinberg Cubase Pro 8, by J. McGraw, June 2, 2015
Each mic preamp channel has a switch to engage the Neve transformer, which lights when it’s on. I’ll look at the transformer’s sonic impact later in this review. Metering on the hardware is limited to Peak indicators, but the included mixer software gives you full meters for each input channel.
You switch on the phantom power in pairs, either channels 1/2 or 3/4. The lack of individual phantom power switches is not a significant drawback, but there could be some situations, say, if you wanted to connect three ribbon mics and a condenser, where you’d miss having them. An indicator light goes on to let you know that the phantom is on for either channel pair.
Rear panel I/O includes 1/4-inch line inputs for channels 5 and 6, which you can switch between -10 dBV and +4 dBu using the included dspMixFX UR-RT4 mixer software.
All told, the unit supports six simultaneous input channels, with a maximum of four microphones at a time. There’s no ADAT port, however, so you can’t expand this for more inputs, which means it wouldn’t be sufficient for recording a band with drums.
On the output side, you get a 1/4-inch main left and right output pair for feeding studio monitors. Also, you get two additional output pairs: outputs 1 & 2 and 3 & 4. These are dedicated outputs for the two headphone mixes you can create in the mixer software, and are supplemental to the two 1/4-inch TRS headphone jacks on the front panel, which feature individual volume controls.
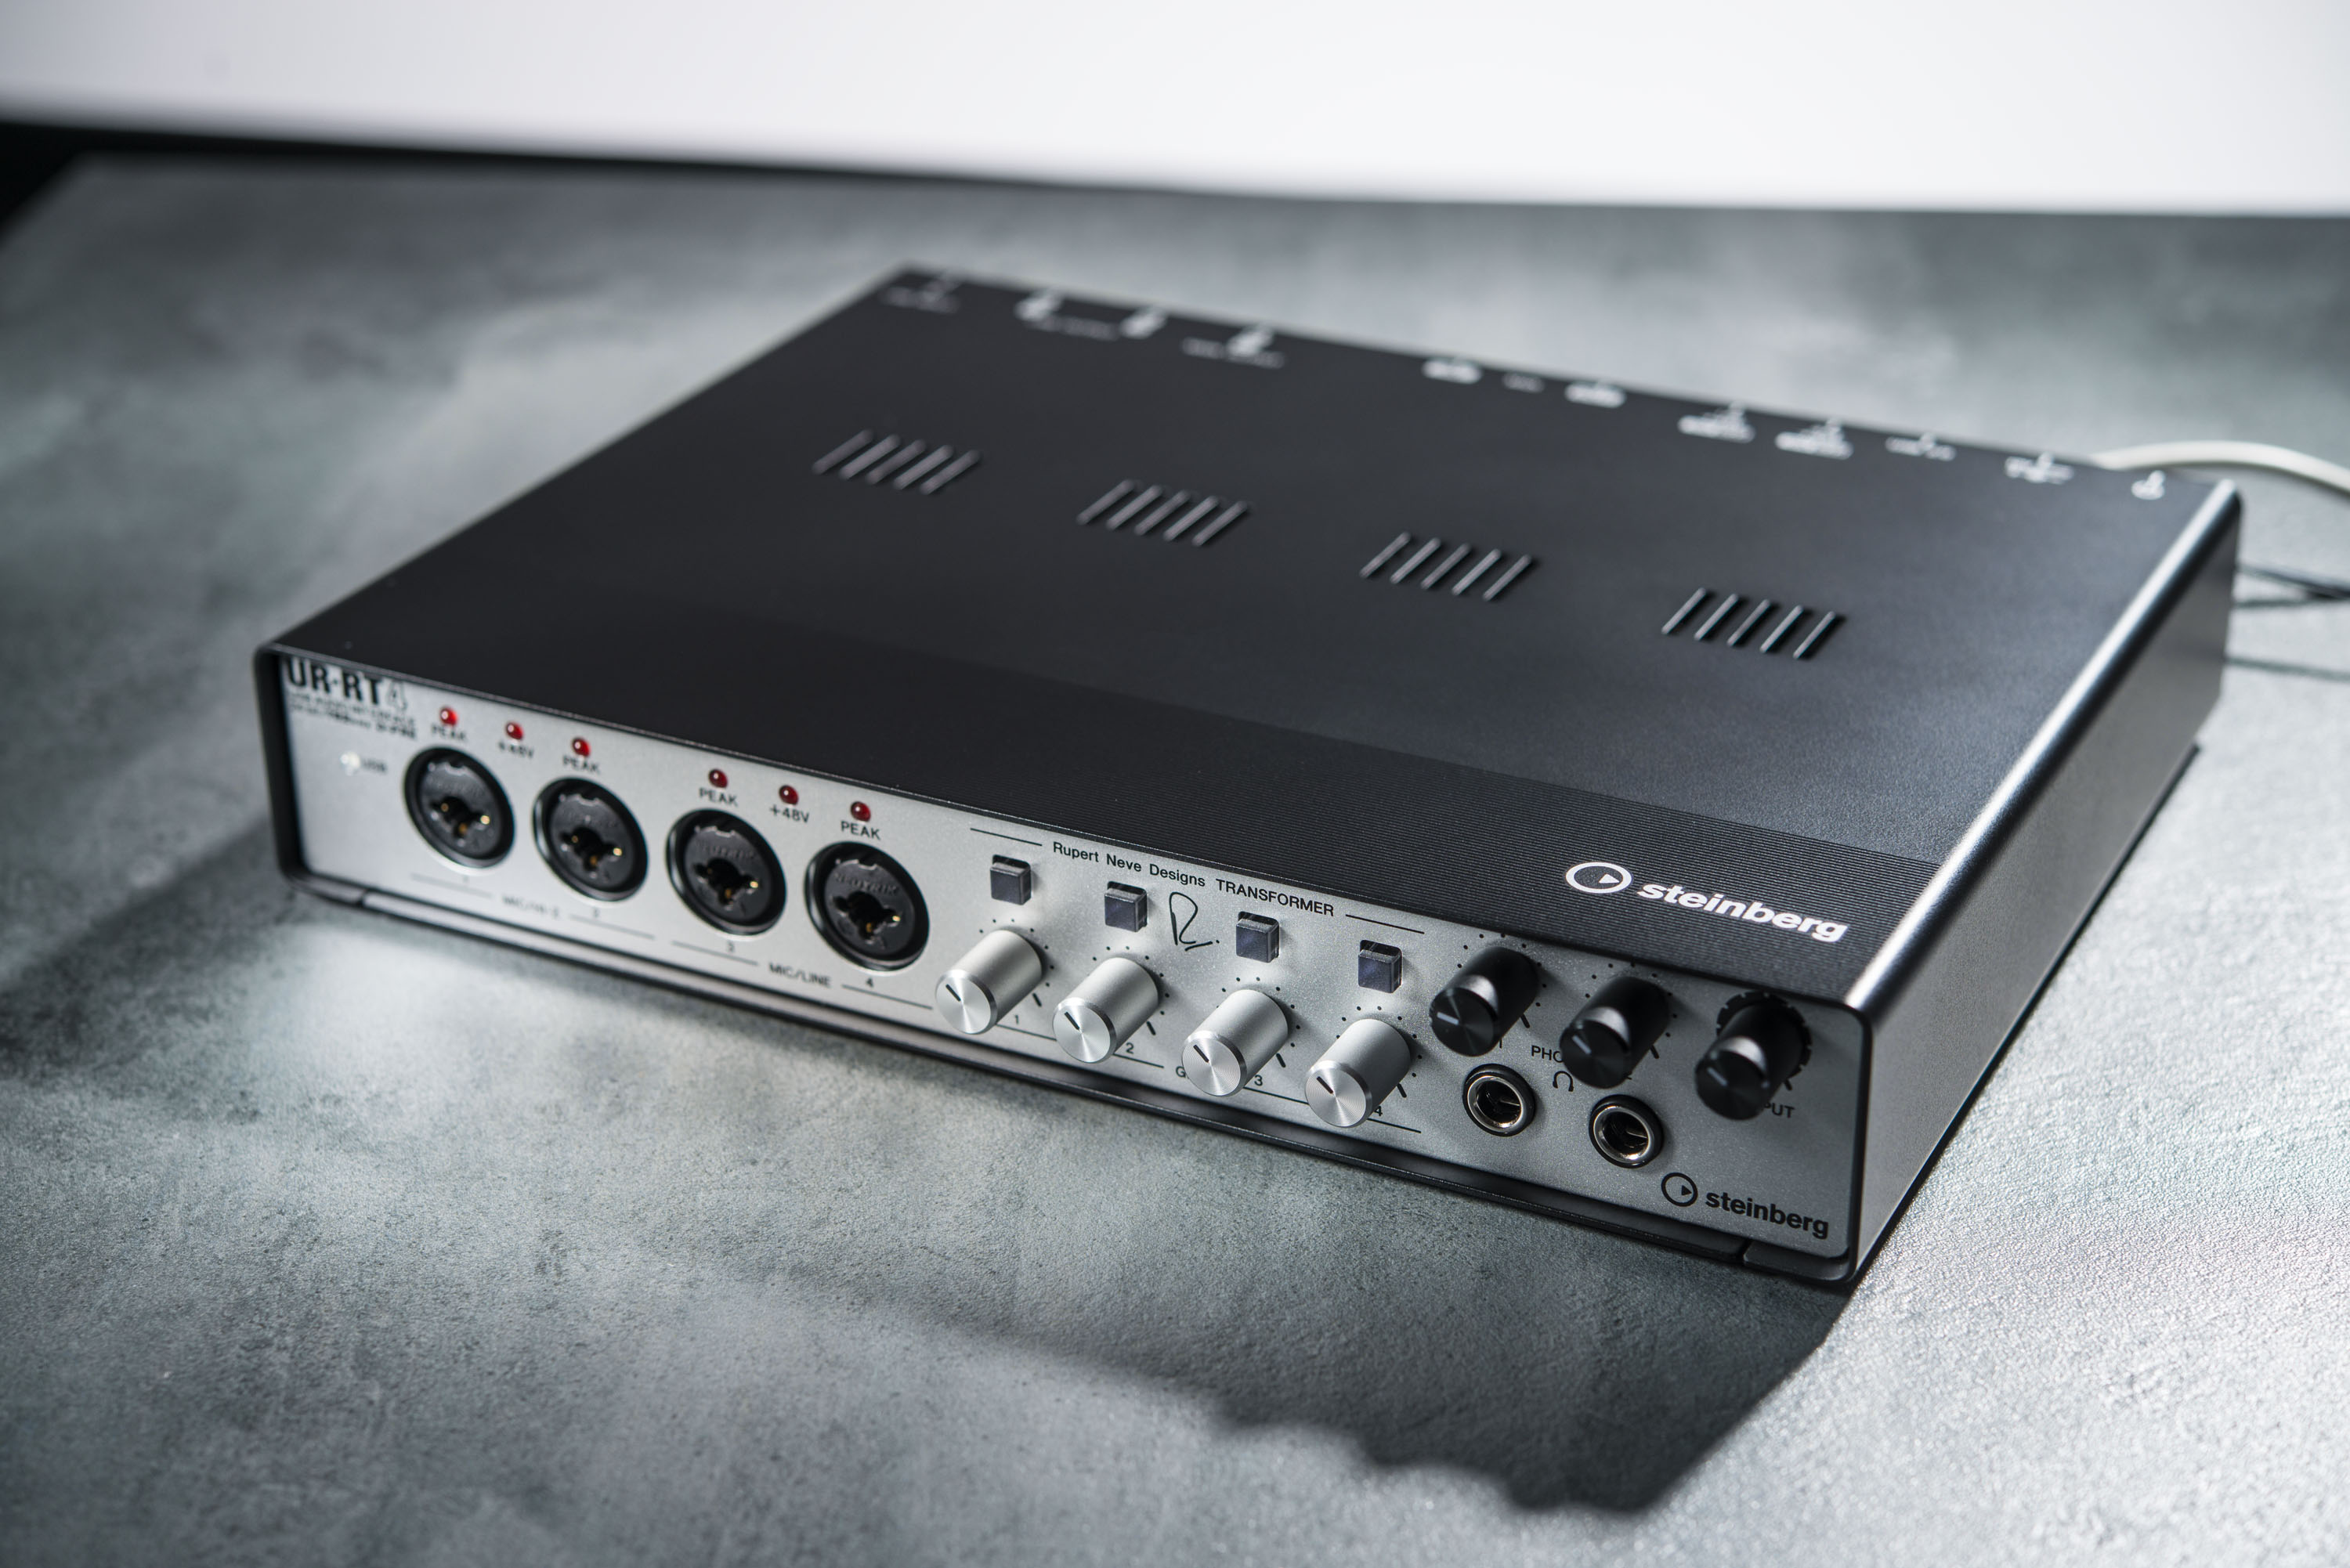
Next to the headphone volumes is a knob for controlling the Main Output volume, independent of the headphone controls.
Rounding out the back panel are MIDI in and Out jacks, a jack for the included DC adapter and an on/off switch.
Super Software
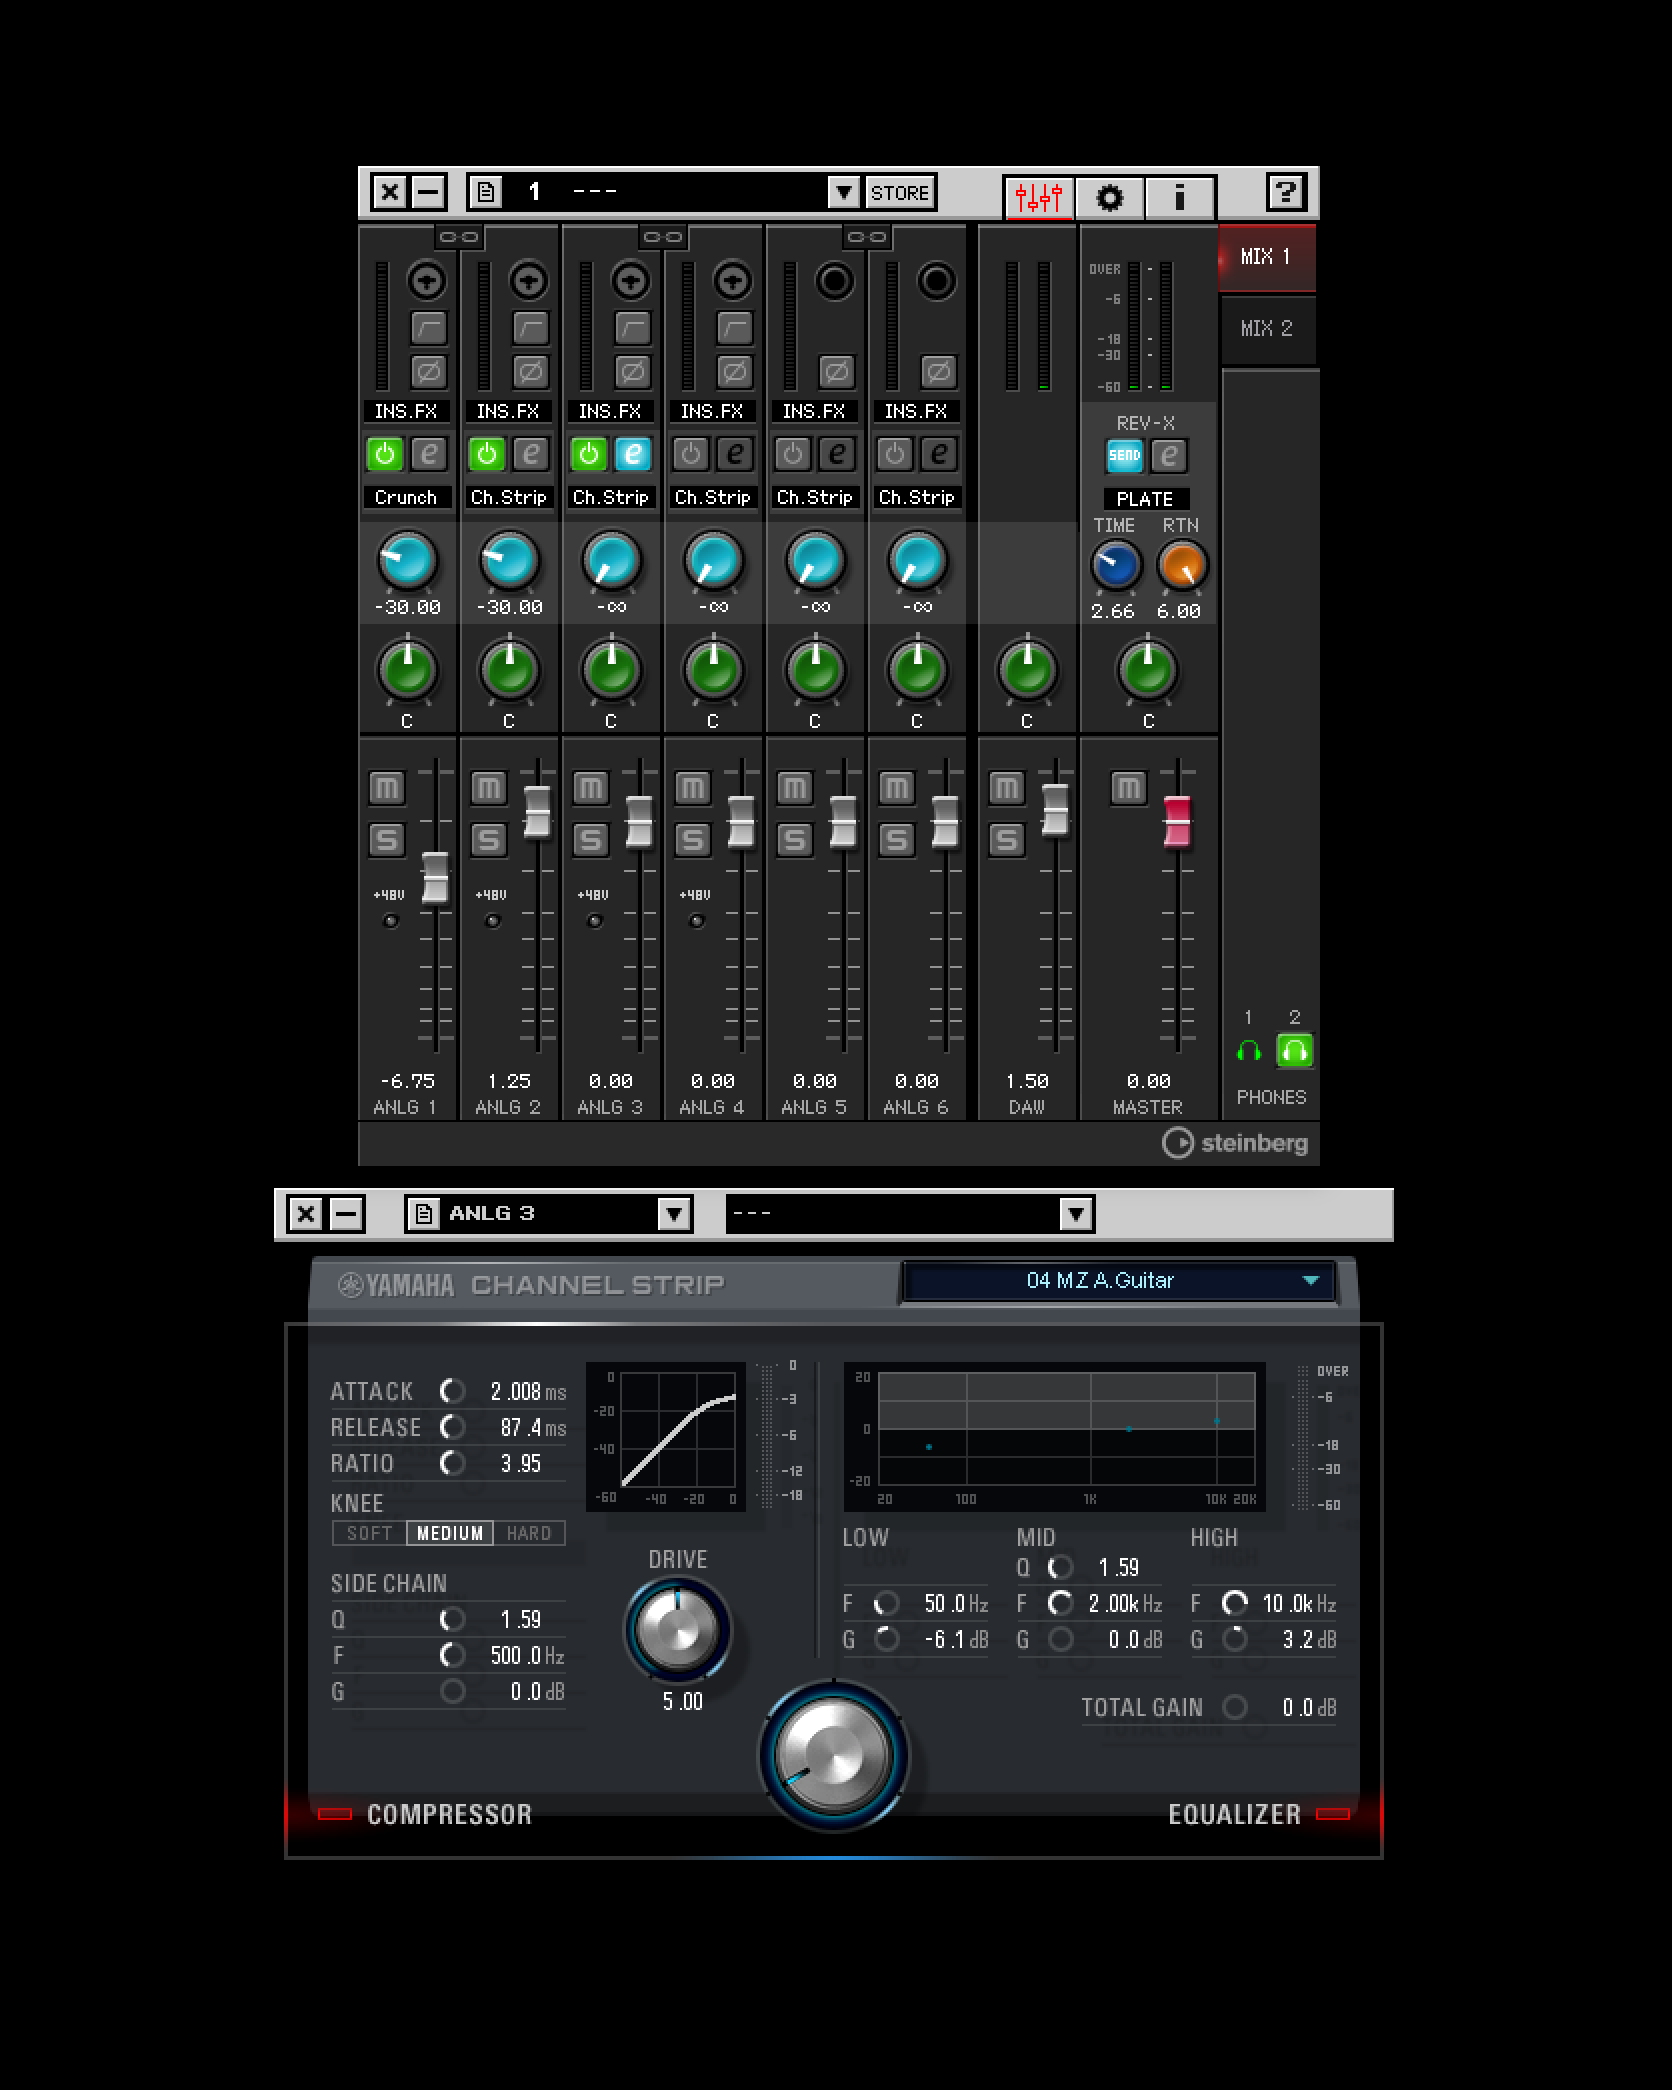
First and foremost, the dspMixFX UR-RT4 application is a software mixer with channels corresponding to all six inputs. You also get a dedicated fader for controlling the level of signal returning from your DAW, and a Master fader. Typically, these kind of mixer applications are complex and challenging to learn. Not so here. DspMixFX is intuitive and straightforward, which is refreshing.
In addition to a pan pot and volume slider, each input channel in the software features a highpass filter, a phase-inversion switch and a reverb send for the excellent-sounding Yamaha Rev-X reverb, which is powered by DSP built into the UR-RT4 itself. The reverb is applied via channel-specific effects sends and a reverb return on the master.
Steinberg Unveils UR-RT2, UR-RT4 Premium Interfaces, April 24, 2018
Each channel can also have one insert effect, in addition to the reverb. The choices are either one of four Yamaha amp-modeling effects (Clean, Crunch, Lead or Drive) or the Sweet Spot Morphing Channel Strip. The amp modelers provide you with the usual amp-style tone and gain controls, and the Clean model also offers a Vibrato/Chorus effect. The Channel Strip gives you a compressor with a sidechain input option and a three-band EQ with semi-parametric low and high bands, and a fully parametric mid-band.
Other than the reverb, which is strictly for monitoring, you can choose whether or not to print the effects. So, if you want to, you can record with compression or EQ, or with the guitar amp modelers. Because recording through a DAW plug-in typically requires cumbersome routing and causes latency issues, having this capability is quite handy.
The amount of available DSP is limited, so you won’t be able to enable insert effects on every channel. I was able to open a maximum of either one amp modeler and two channel strips, or four channel strips, before getting an “Out of FX Resources” message.
Another useful aspect of the software is that it lets you create two cue mixes. These also correspond to the two line output pairs provided on the back to supplement the main output. Again, the setup is straightforward.
Because the UR-RT4’s built-in DSP powers the mixer, you get latency-free hardware monitoring. As a result, the relatively slow speed and narrow bandwidth of USB 2.0 is not a hindrance.
If you use Steinberg Cubase with the UR-RT4, some of the functions of the mixer software, such as setting and controlling the reverb and channel strip functions, are built right into the DAW. You also get a degree of integration with the Cubasis DAW app on iOS.
The software bundle that comes with the interface includes “light” versions of Steinberg DAW software: Cubase AI for Mac and Windows and Cubasis LE for iOS.
Transformative
I tested the UR-RT4 out over the period of a couple of months, using it for a variety of projects and using it for acoustic guitar, Dobro, electric bass, vocals and guitar cabinet.
The sound quality of the unit is impressive. The Yamaha D-Pre preamps by themselves are clean and transparent. When you kick in the Neve transformer on an input channel, it changes the sonic character significantly, adding both brightness and subtle harmonic distortion that are characteristic of Neve designs.
The transformers add a little sonic voodoo that can help spice up almost any source. I loved what it did to DI recorded tracks, particularly electric bass, where the warm sound of the transformer added a lot of character. I liked it on vocals, too, unless I was going for a super clean sound, in which case I sometimes preferred the D-Pre alone, depending on the mic I was using.
Steinberg was smart to make it possible to switch the transformers out of the circuit if you want because it makes the unit more sonically versatile.
The UR-RT4 is an impressive interface. Although the addition of the Neve transformers results in a price that’s double that of the UR-44, which is essentially the same unit otherwise, you’re getting four channels of Neve-quality sound, which I think users will be quite excited about. I also love the easy-to-use control software, the built-in DSP (especially the Rev-X reverb) and the no-latency monitoring.
The build quality is solid, but I do think the physical design could be improved so that you can see the front panel better. Also, if Steinberg could find a way to add optical I/O so that you could bring in more mic pre channels, it would open up the applications for the interface even more. Or, how about a model with eight mic pre’s?
That said, this is a compelling new product that is sure to get a lot of well-deserved attention. Let’s hope Steinberg takes this collaboration with Neve even further on future products.
Mike Levine is Mix’s Technical Editor—Studio. He is also a composer, producer and multi-instrumentalist from the New York area.
Product Summary
Company: Steinberg
Product: UR-RT4
Website: www.steinberg.net
Price: $599.99
Pros: Four switchable Neve transformers. Yamaha D-Pre preamps offer transparent response. Intuitive mixer software. Built-in DSP. No-latency monitoring. Rev-X reverb on all inputs. 4 amp-modeling effects included. Two independent headphone outputs. Solidly built. Supports Mac/PC and iOS (with Apple C.C. Kit). Rear-panel jack and switch locations conveniently labeled on top of unit.
Cons: Parts of front panel obscured when viewed from desktop level. No expansion options. Phantom power not individually switchable. No optical ports for expansion.
Try This
The dspMixFX software makes it easy to apply effects to the inputs. To open the channel strip on an input, press the Effect On/Off button, which is just a little above the pan pot on each channel. Open the Effect Type pull-down menu and select Channel Strip. Press the Effect Edit button and the Channel Strip GUI opens. To print with the Channel Strip effect, leave the Effect Insertion Location set on INS. FX. To set an effect for monitoring only, click the INS. FX button to open the pull down and select MON. FX.