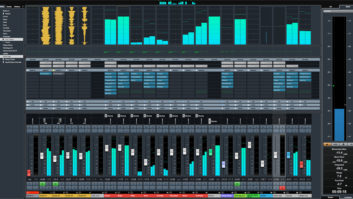
At first glance, Cubase 6 looks and feels different, but not too different. It has a more transparent, cleaner look, and you have additional options to customize the appearance of the controls and meters. That’s all for the good, but alone it’s not enough to ask users to upgrade. Today’s DAW owner wants more features, more power and more interoperability, and Cubase 6 delivers.
I immediately liked the fact that when I moved my mouse over the parts (regions), they became active instantly. No more clicking first, then doing part-based editing: Rolling your mouse around a part highlights your edit options. I can’t speak highly enough about this instant gratification. There also is a quick-control window that gives direct access to about every track parameter you might need, and it’s become much easier to directly access MIDI Learn with VST3 plug-ins.

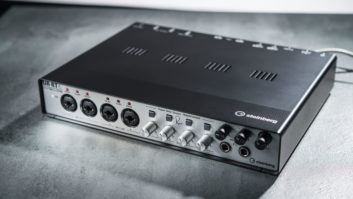
The big kick is not only the interfacing, but also the addition of extensive drum-editing features. Steinberg has worked hard at improving transient detection, allowing for better and more accurate drum editing. With this comes edit grouping to keep your live drums in phase—something that has been missing for far too long in Cubase. In addition, Cubase 6 adds easier vocal comping, a slew of guitar amp simulations and one of the most impressive MIDI features I’ve ever seen: VST Expression, which allows different MIDI articulations on individual notes.
YOU START WITH DRUMS
Cubase 6 now has the tools necessary for improving drum performances and sounds. It has a new “phase-accurate” drum-editing workflow that incorporates several new features. Pro Tools users will find all of this familiar, and maybe that’s the intention.
When working with drums, grouping a live kit into an edit group keeps all of the drums in phase. This is easily accomplished in Cubase 6. You simply make a Track folder, select all of your drum tracks and drop them in. Better yet, select the drums, right-click and select “move selected tracks to new folder.” On your folder track, you now have a new button for making the tracks in the folder an edit group. Any editing done to the tracks will be applied to all the tracks in the folder and keep them phase-accurate.
Now that we have an edit group, let’s test out the new multitrack drum-quantize feature. The panel is very intuitive and easy to use. Enabling hit points on at least one track allows Cubase 6 to use this as a reference. This also gives users the ability to apply varying quantized “strengths” to multiple tracks.
On a song I used for testing, it worked best to move my kick, snare and hi-hat to the top of the group. Adding hit points was simple and streamlined, with great graphics, making it easy to set a threshold for detection of transients and away from drum bleed. As the kick, snare and hi-hat are the most solid beat indicators in this song, I applied hit points to them. Once this was done, the rest was easy. The top section of multitrack quantize has “slice rule,” whereby you can set the strength/detection priority to tracks. So when you quantize, Cubase looks at those tracks as a starting point for all of the slices created in the grouped tracks. (This is similar to generating beat triggers in Pro Tools’ Beat Detective.)
Next I selected Slice (region separate), which cuts the parts into smaller parts from the hit points. Quantize (region conform), which has several user options, will move these new parts and line them up to the grid. Of course, doing this will leave gaps in-between some, if not all of your parts. To compensate for that, your final step is to Crossfade (edit smooth), eliminating the gaps and chances of pops and clicks that happen when cutting parts.
It worked great, though it already feels like old-school technology, especially once you have worked with the likes of Elastic Audio. (Cubase 6 has new algorithms for its Elastique audio.) The problem is that you still need to work in song sections. Be very careful with drum fills and especially cymbals. Once you chop room tone, decay or cymbals, etc., this older way of cutting regions just doesn’t work. To get the best results, I broke the song into song form, separating each section into its own set of parts, including drum fills, and dealt with each section individually with different quantize settings, then dragged out any parts that were being cut off too soon.
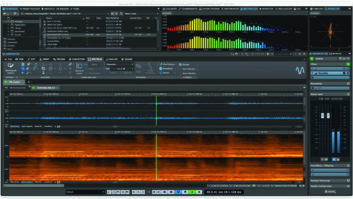
Drum quantizing in Cubase 6 offers great results without large gaps between slices.
TEMPO DETECTION
I’ve had a serious need for tempo detection due to authoring songs for Rock Band. I’ve tried everything on the market, and nothing works as well or as accurately as Cubase 6. Cubase 5.5 only offered the Time Warp tool where users manually defined the tempo, which was tedious.
Inside Cubase 6
To try it out, I loaded a cover-song session where the band used the original as the click track; I felt this would be a good attempt at creating a usable tempo map and giving me a click in time.
The key was deciding which track to use as a reference. I would have liked to select both kick and snare, but I am only allowed one. So I decided on the kick because it usually hits once on the first beat of every bar. With this kick track highlighted, I selected Analyze from the Tempo Detection window. This 6-minute song took about 25 seconds to analyze on my MacBook Pro. So I had a tempo map; however, when played back, the metronome was playing on the offbeat. (I tried this on several other songs and half were on the offbeat. A bit of sleuthing determined that it was songs with a pickup note.) No problem. I selected the “off beat correction” in the Tempo Detection window, and it was fixed. I then noticed my whole song was in ¼ so I created a time signature track, found the first beat of the song and put in my time signature on the first beat of the first measure. Cubase 6 instantly set up the whole song—it’s that easy. If you have multiple signatures, it’s as easy as going to those bar/beats in the song and inserting your time signature.
DRUM REPLACEMENT
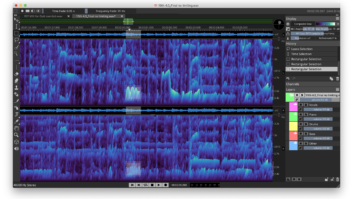
First, this is MIDI conversion, not “sound replacement” or real-time trigger conversion. You have to take each track into the wave editor and set hit points. (This would be a good thing to do before using “multitrack drum quantize.”) Once you feel that your threshold looks correct, select convert to MIDI. You are prompted with a window to select note, dynamics and destination. Transcription, layering and the flexibility of using MIDI make this feature a real winner. But remember, it’s MIDI. If you use external modules, you will have MIDI delay. And while this isn’t the fault of Cubase itself, V. 6 does a good job of compensating for this, but it’s not perfect. If you use anything other than virtual instruments, you will need to manually compensate for the delay after recording. I have tried this similar feature in several other programs with marginal success. Cubase 6 is extremely accurate, but it still comes down to the threshold setting. One setting rarely works throughout an entire song. Again, my best results were separating song sections with more dynamics and converting the MIDI from those. Better yet, Cubase 6 has VST Expression: Use this, and you will have an incredibly accurate and dynamic MIDI drum track.
VST EXPRESSION
We audio engineers and producers are all skeptical when it comes to demonstrations, so I decided to test Steinberg’s. The company’s demo converts a sax solo into MIDI and then applies the new VST Expression. The song I used for drum quantizing has “real” saxophone and flute, so I used that.
It’s a very quick process. Open the track in the wave editor and select Vari-audio. Then use Send MIDI to a track. I selected the best HALion sample I could find for playback. The notes were surprisingly accurate, but the feel was very sterile. Apply VST Expression, which incorporates controller data, per note, giving the MIDI an incredible similarity to the original. It is a sample, but I can see that by using an excellent multisampled VST instrument it will become hard to tell the original from the MIDI version. (Think layers, effects, lead sheets.) After trying it on other parts like flute, bass and vocals, it was amazing. However, this works well on monophonic material only. When using Vari-audio, you can also clean up pitch and quantize notes before converting it to MIDI. The demo is real.
Also, VST Expression allows you to add controller data to each individual note rather than a linear controller progression. Your MIDI becomes more expressive than you ever thought possible.
WRAP IT UP
I am, and always have been, a fan of Cubase. From great customer service, a huge user base, incredible features and mind-blowing MIDI operations, Steinberg always seems to pack in a few more options that ease the creative flow. The question you may ask is, ‘Do I really need it?’ And the answer is yes. Cubase 6 adds the last few things needed to make it an all-in-one package. The app didn’t skimp or throw a bug at me once: I never had one crash while running it for nearly a month every day. If Steinberg’s goal is to keep you in its DAW, the company is succeeding.
Atom Troy is a professional recording and live front-of-house mix engineer, recording artist, and director for songwriting and development at Full Sail University.
Click on the Product Summary box above to view the Cubase 6 product page.