| MIX VERDICT: PreSonus Studio One 6 Professional |
| THE TAKEAWAY: “Studio One 6 Professional offers everything you’d expect in a DAW and more.” |
| COMPANY: PreSonus • www.presonus.com PRICE: $399.95; $15.95/month; $199.95/year PROS: • Lyrics integration. • Powerful new video features. • New Fader Flip feature and many other mixer enhancements. • Customization Editor. • Save and recall of Track Presets. • User-organizable browser folders CONS: • Lyrics implementation could be more intuitive. • Sliders in aux sends too small in unexpanded state. |
Between its launch in 2009 and today, Studio One has matured into a workstation with an incredibly robust feature set. The latest version, PreSonus Studio One 6 Professional, adds a massive list of new capabilities.
In this review, I’ll cover Studio One 6 Professional, the top-of-the-line version and the one you get if you subscribe to the PreSonus Sphere subscription service. Space doesn’t allow me to cover every new feature, but here are the highlights.
NO LOSS FOR WORDS
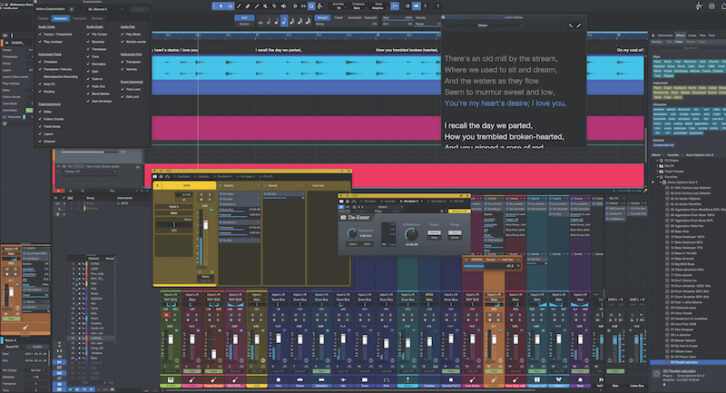
Perhaps the most significant and unique addition to Studio One 6 is the Lyrics Track. A Global Track, similar to the Chords, Marker and Arranger Tracks (among others), opens just below the timeline on the Song or Show page.
Click anywhere in the Lyrics Track, and you’ll get a prompt where you can start entering words. Alternatively, you can drag and drop lyrics directly onto the Lyrics Track. To adjust where words or phrases sit on the timeline, you can click and drag them. Lyrics will even conform to the grid if it’s turned on.
The main area for viewing and editing Lyrics is a separate window called Lyrics Display. Anything entered in the Lyrics Track shows up there (you can also enter and edit lyrics directly in the Lyrics Display). The Lyrics Display is expandable, as is its font size.
The lyrics are synched to the timeline. As a song plays, they get highlighted in blue at the appropriate time, like a “follow-the-bouncing-ball” effect. Moreover, the display scrolls, so the right words will always appear, even in long songs.
After some experimentation, I realized that it’s much faster to line up the first word of each line when entering the lyrics for onscreen viewing. When the song plays, each line gets highlighted at the correct time.
You have the option to assign lyrics to a specific (MIDI) Instrument Track. That comes in handy if you want to record or program the melody onto that track and then use it to create a lead sheet to print or export from Studio One’s Score Editor.
Once you have an Instrument Track with the melody, it’s a breeze to assign lyrics so that they line up with each note head, which is essential for a lead sheet. Using the Lyrics tool, you select a note for the first syllable and type it in. Next, press the space bar, and the cursor advances to the following note.
It took me some time to figure out how to use the Lyrics Track. Its implementation is complex and needs to be more intuitive in certain aspects, but once you learn its capabilities and commands, it’s powerful and flexible.
YOU OUGHT TO BE IN PICTURES
The Video Track is another new Global Track in Studio One 6 Professional. It significantly improves on the minimal video capabilities of previous versions. For example, you can load as many video clips as you want into the timeline via drag and drop (Studio One’s support of drag-and-drop throughout the application is first-rate). The audio tracks from the video clips show up as separate, editable tracks.
Most notably, the Video Track allows basic cut/ copy/paste editing. No, it won’t replace a dedicated video editor, but it does allow you to quickly assemble video clips or work on adding audio to multiple clips in the same session. When finished, you can export the video in several formats, including MPEG-4, M4V and QuickTime.
MIXER MANIA
Of all the areas in Studio One, the Console got the most enhancements, and Fader Flip is the coolest of these new features. Based on similar functionality in outboard digital mixers, Fader Flip lets you temporarily use the main faders to control the levels of any FX, bus or cue mix send.
For example, say you have a reverb send that you’re using on multiple tracks, and you want to compare and tweak its levels across the mix. Right-click or control-click on a send, select Flip Faders (or press the Fader Flip button on the left side of the Console) and the main faders on all the mixer channels become controls for the send levels. It gives you a comparative view of the send levels on every track, and you can adjust them with greater resolution in Fader Flip mode. When you’ve finished tweaking, flip them back.
Also new and useful are Expandable Send and Pan controls. In previous versions, the Sends were hard to adjust because of the small size of their horizontal sliders. Now, you can double-click on a send or panner and get a much larger version.
PreSonus AudioBox Go – A Real-World Review
You can expand all the controls for a mixer channel (one channel at a time) by clicking the Mixer Channel Overview button, located on every channel strip and plug-in window. Doing so opens a sizable dedicated window containing the channel controls, including volume, pan, sends and inserts.
Whether you’re in Mixer Channel Overview or just looking at the mixer at its regular size, the Micro View Controls now give you controls for any third-party plug-in for essential parameters from a channel insert, adjustable right in the channel strip (or the Mixer Channel Overview). If you click on an insert in the channel, its Micro View Controls open. They’re quite small in a regular channel strip, but more comfortable when you switch to a Mixer Channel Overview.
PreSonus also added two additional stereo panning modes, adjustable per track. You can now switch any stereo channel from the default Balance panner to either Dual or Binaural mode. A Dual panner lets you control each side separately. The Binaural panner allows side-to-side panning and uses mid-side processing to adjust the perceived width between 0 percent and 200 percent.
HAVE IT YOUR WAY
Studio One 6 offers many new ways to customize the GUI and your data. Right-clicking in the Toolbar area brings up the Customize button. Pressing it opens the Customization Editor, a separate window with categories for the Toolbar, Inspector, Transport controls and Browser. In each category, you can remove the controls you don’t want to see, then save your settings as a preset.
The new Track Presets feature lets you save track and channel settings for single or multiple tracks and channels.
The Browser Favorites and Folders feature allows you to organize your effects and instrument plug-ins in the Browser. Any plug-in you mark as a Favorite gets automatically deposited in the Favorites folder, and you can create your own folders and arrange your plug-ins however you want. Especially if you have a lot of third-party plug-ins, custom folders can be quite helpful.
New folder-organizing features were also added to the Start Page for customizing how you view your Studio One Documents before opening them.
PLUG AND PLAY
Besides all the user interface and mixer enhancements, PreSonus also introduced a couple of plug-ins—De-Esser and Vocoder—and updated the existing PRO EQ.
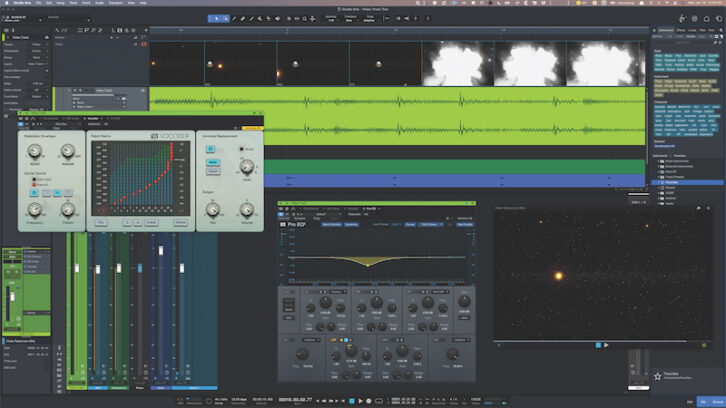
The De-Esser is simple but effective, with controls for Frequency and S-Reduction, adjusting the filter shape and range, and soloing the filtered signal.
The retro-looking Vocoder makes it easy to create classic robot-voice effects and more. It features a matrix in the center where you can graphically edit the levels and I/O routings of the filters. You can switch to Sidechain mode and then use a MIDI instrument to control the pitch of the vocoded source.
PRO EQ3 adds dynamic EQ functionality to each band of an already stellar plug-in. If you turn on Dynamic mode for a band, you can set Threshold and Range and even trigger it from a sidechain. The sidechain functionality is compelling because you can set another track to trigger the boost or cut.
For example, if you have a vocal that’s getting masked by a rhythm guitar part that otherwise sounds great and well-balanced, you could set a gentle but broad attenuation on the guitar that only comes in when the vocal is present.
OPEN SESAME
The new Smart Templates feature gives you starting points for the various Studio One activities (I would have said “projects,” but in Studio One world, that word refers explicitly to mastering).
On the left side of the New Document window, you’ll see a colorful list of Smart Templates such as Record Now, Play Now, Rehearse and Perform, Produce Beats, Master and Release, Create Content Import Files and more. When you open one, it’s populated with tracks, plug-ins and other features appropriate to its purpose.
For example, Produce Beats opens with electronic drums, synth bass and another synth sound with Step Record selected for each. The Record Now template opens to an audio track ready to record (great for capturing those unexpected song idea inspirations).
Many of the Smart Templates contain dedicated floating help windows aimed at novice users, which provide a step-by-step tutorial of the components and workflow in that template.
ONE FOR ALL
Unless you’re working on multichannel audio, which is not supported, PreSonus Studio One 6 Professional offers everything you’d expect in a DAW and more. With its separate workspaces for recording/mixing, mastering and live performance, it’s incredibly robust and suitable for any music genre.
Thanks to the new Lyrics and Video Tracks, the improvements in the Console, and the customization options, it’s more comprehensive than ever.
