Sonicsmiths thinks presets are so yesterday. The company’s new virtual instrument, The Foundry, uses parameter-value randomization instead of fixed presets to create an almost infinite number of unique four-voice patches (four discrete multi-samples mixed together). Specify the type of sound you want—for instance, a mysterious pad or pulsing horror patch—and The Foundry will dish out something different every time. Extremely extensive editing capabilities let you alter the sound much further.
The Foundry is a Kontakt Instrument, compatible with Native Instruments Kontakt 5.3.1 or higher and the free Kontakt Player 5. It comes with more than 19 GB of sample content (15,000-plus samples). I reviewed Version 1.0 of the VI in Digital Performer 9.01 (DP), running OS X 10.9.5 on an 8-core Mac Pro.
Describe It to Create It
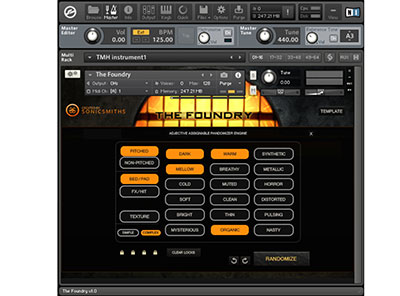
The Foundry’s GUI provides access to different sets of controls in discrete windows. The window for the AARE, or Adjective Assignable Randomizing Engine, is where you create new patches from scratch (see Fig. 1). It includes 25 buttons for selecting voice types (Pitched, Non-Pitched, Bed/Pad, Rhythmic, FX/Hit, Texture, Simple and Complex) and adjectives (Dark, Bright, Breathy, Metallic, Clean, Distorted, Pulsing and so on) that determine the qualities of the sound The Foundry will generate. Every time you click on the Randomize button in the AARE window, parameter values are changed—constrained by your selections—generating a new four-voice patch. Roughly 20 levels of Undo and Redo let you discard and reinstate the random changes made to the sound in the AARE window. (They won’t undo any tweaks made elsewhere in the GUI.) Keep clicking on the Randomize button until the sound that’s created is perfect, or close enough to what you want that editing will get you there.
The Foundry provides numerous effects you can apply independently to each of its four voices: filters, “bodies” (convolution reverbs), distortion, compression, rotor (Leslie speaker simulation), tempo-synched delay, chorus, phaser, flanger, panner, granular synthesis and a 16-step sequencer. The sequencer’s three modes generate notes from your base note or notes, arpeggiate inputted chords, and create rhythmic patterns useful for non-pitched percussion samples. Set the sequencer’s direction (forward, backward, bi-directional or random), number of steps, step duration (for example, 16th note) and shuffle amount. Then adjust each step’s note value, octave range, mute status, velocity, pan, glide status (portamento on or off), and gate (note duration). You can also make one or more notes stutter. A global control adjusts the glide time for all voices at once. Excellent sequencer templates do the heavy lifting for you, creating factory-programmed patterns in a heartbeat.
Six modulators (three LFOs and three envelopes) can be patched to filters, pitch, amplitude and panning. You can bypass all effects and/or all modulators at once using menu selections in the Templates window. The Templates window also provides shortcuts for batch-processing all voices at once in other ways.
In the Performance window, you can toggle individual voices and their assigned effects—for which parameters can also be randomized—on and off, use an XY pad to morph the sound, and lock an individual voice so its parameters can’t be randomized. The XY pad comprises four quadrants, each of which is dedicated to playback of one of the four voices that comprise your composite patch. Drag a node around the pad (using your mouse or MIDI continuous controllers) to create a different mix balance of the four voices. Controls for the XY pad let you record and play back your mouse movements; you can trigger playback with a MIDI Note On event, and playback can be synched to your host’s tempo so that it cycles every bar.
The Performance window provides access to a window for each voice in which you can edit its on/off status, volume, and AHDSR and MIDI parameter values. You can also set whether randomization will affect only the voice and not its FX, LFO or sequencer settings.
Casting Sounds
The Foundry is best used for cinematic sound design and has relatively few uses for music production, as its library all but omits conventional multi-samples of instruments like guitar and piano. Non-Pitched, Rhythmic voice types include metallic hits, pillowy bombs, computer-like bleeps and burpy synth noises. Clicking through various templates for the outstanding step sequencer with these sounds randomly loaded, I very quickly produced an alien dance groove that would be perfect for an intergalactic barroom scene in a Star Wars sequel. What would’ve normally taken me a couple hours to produce took only two minutes.
The Foundry also excelled at creating distorted and pulsing textures and hits for horror and sci-fi flicks. Using the step sequencer, I could create driving rhythmic patterns of disturbing sounds perfect for cinematic action sequences.
Once I got a patch I liked, I could morph between its four voices in real time by dragging my mouse around the XY pad. After recording my mouse movements, I synchronized the pad to DP’s tempo so that the movements would play back from start to finish over the course of one bar and repeat for every successive bar. This worked especially well on polyphonic pitched patches, constantly shifting the timbre of the composite sound. I only wished I could sync the pad’s action so that one cycle would elapse over the course of several bars.
AARE randomization produced poor—often thin- and harsh-sounding—results for pitched beds and pads; I frequently found myself weeding out voices I didn’t like. Fortunately, you don’t have to use The Foundry’s randomizing engine if you don’t want to (see the “Try This” sidebar).
The Foundry is somewhat buggy. The sequencer would often be arbitrarily activated even though I had bypassed it for all voices and locked it out of the randomization process. Parts of the sequencer’s control set would also sometimes be arbitrarily superimposed on other windows.
I found navigation among windows in the GUI to be very unintuitive, with access to some windows granted only by clicking through two other windows. The 15-page operation manual is extremely short on details and inaccurate in places; it directs users to Sonicsmith’s YouTube channel for in-depth video tutorials of The Foundry’s operation. The videos are generally very informative and subdivided into chapters to hasten access to specific information, but they are nevertheless no substitute for comprehensive, indexed written documentation when you are under the gun and offline. The GUI could also use pop-up help for its various controls.
The Foundry excels particularly at designing non-pitched sounds and special effects and at quickly creating intricate rhythmic sequences for them. The unintuitive and cumbersome GUI and inconvenient documentation require that you fully learn and then keep using this instrument—walk away from it for a month, and you’ll likely be scratching your head when you return. But for the film sound designer looking for something delightfully twisted to add to the toolbox, the benefits are well worth the tradeoffs.
Mix contributing editor Michael Cooper is a recording, mix, mastering and post-production engineer and the owner of Michael Cooper Recording in Sisters, Ore.
Product Summary
COMPANY: Sonicsmiths
PRODUCT: The Foundry
WEBSITE:bigfishaudio.com
PRICE: $299 MSRP
PROS: Extensive sample library excels particularly at non-pitched sound design for thriller, horror and sci-fi flicks. Includes excellent step sequencer and XY morph pad. Discrete signal processing for each voice.
CONS: Randomization of pitched beds and pads often produces thin- and harsh-sounding results. Inadequate documentation. GUI navigation is very unintuitive. Slightly buggy.