Every fan of thrillers, action films, and horror and sci-fi flicks has experienced the emotional impact of a deftly executed riser and hit in a cinematic score. But all you have to do is listen to the grand finale for the Beatles’ “A Day In The Life” to realize how electrifying the technique can be for popular music, too.
Designing fresh sounds for and synchronizing a rousing riser and hit can be a time-consuming process. Thankfully, Native Instruments Rise & Hit makes it easy, inspiring and fun. The included, deeply layered cinematic sample library makes dramatic and complex sound design drag-and-drop child’s play. And the integral virtual instrument makes synchronization a breeze: It lets you specify exactly how many seconds or tempo-synched beats the riser will take to go from start (MIDI Note On event) to apex, regardless of the native length of the samples you use.
Getting in Kontakt
Rise & Hit is a Kontakt Instrument compatible with NI’s Kontakt 5 and the free Kontakt Player. The 8.6GB library (compressed to 6.25 GB using KONTAKT’s lossless compression) contains 4,250 samples, mostly recorded at 24-bit/96kHz resolution and down-sampled to 48 kHz. Two samples—one for the riser (or rise, in NI-speak), the other for the hit—constitute a layer, and a single NKI instrument can comprise up to four layers. MIDI notes C-2 through C#3 trigger the rise portion of an instrument, and D3 through G8 trigger the hit. (The two ranges are colored differently in Kontakt’s virtual keyboard to reflect this split.) Included are 750 layer presets (80 with effects processing) and more than 200 preset NKI files (instruments).
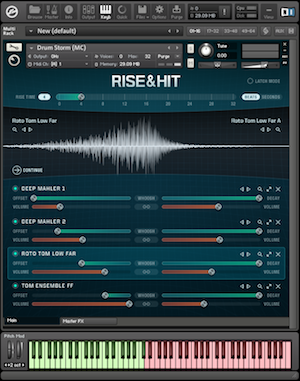
The main page of Rise & Hit’s GUI is where you set up rise synchronization for the currently loaded instrument as a whole; select in turn up to four layers for editing their rise and hit samples’ relative volumes, rise start-time offsets and hit decay times; and view the currently selected layer’s dual-sample waveform (for the combination rise and hit; see Fig. 1). You can sync the rise time (that is, its duration) for an instrument to the host’s tempo and set it to last the number of beat subdivisions (for example, quarter-notes in 4/4 time) that you specify. Alternatively, you can set the rise time in seconds, irrespective of the host’s tempo. Activating latch mode plays the entire sample, even if you don’t sustain a MIDI note for the duration; in fact, I found Rise & Hit played to the end of the sample in latch mode even when I stopped Digital Performer 8.06’s transport immediately after a pre-recorded MIDI note began. Activating a Continue button automatically makes the hit (for all layers) voice at the end of the rise samples when Rise & Hit receives a MIDI note in its lower (rise-assigned) register.
The quickest way to combine sounds is to select factory-preset layers from the Layer Browser, as these each load a complementary rise and hit sample. Clicking on a magnifying-glass icon in any of the four layer slots on the GUI’s main page provides access to the Layer Browser, which is arranged in categories including orchestra sections, voices, bells, electronics and more. Click on a tag button above the browser to further refine the displayed presets to include only those layers that, for example, sound natural (of acoustic origin) or processed or execute a glide (typically upward) in pitch. You can also load an empty layer for adding your own combination of factory samples; more on this in a bit.
Back in the main page, the individual layers you’ve loaded can each be soloed, muted or deleted. By dragging to the right an Offset slider for a layer, you delay the start of its rise sample with respect to the other layers’ start times and compress its length accordingly. Clicking on a layer’s Whoosh button purportedly loads a shorter, complementary sample that serves as an enhanced attack for the ensuing hit; to my ear, it simply shortens the envelope of the currently loaded rise sample and offsets it so that it doesn’t voice until the last moment before the hit sample voices. The layer’s Decay slider adjusts the length of the hit. Two other sliders adjust the respective volumes of the layer’s rise and hit; they can be linked.
Digging Deeper
You can maximize the view of a layer to reveal additional controls that adjust the panning and tuning of the layer and add delay, convolution reverb, EQ, parallel compression, limiting and distortion via effect sends (see Fig. 2). (Parameters for EQ and the dynamics and effects processors are adjusted on the Master FX page, which you navigate to from a tab at the bottom of the GUI.) Raising a crossfade control purportedly causes the transition between rise and hit to be progressively blurred, but I found its effect to be so subtle I wasn’t always certain it was working.

Fig. 2: Expanded view has controls for panning, tuning, modulation and effect sends.
You can also modulate any mix or effect control for a layer. For example, you can create an S-shaped curve for the rise’s volume that peaks at the transition point into the hit. If the effect sounds too overblown, lower the modulation intensity. Modulation for panning and tuning is bipolar, changing value both above and below the current slider position.
As I alluded to earlier, you can create your own custom layers by combining any two factory-supplied samples (one rise and one hit). The Sample Browser—available from the waveform section—is organized into categories in much the same way as the Layer Browser. The Sample Browser also provides a button that automatically loads a complementary rise and hit at once when one or the other sample is selected.
Rise & Shine
Rise & Hit’s library includes a wealth of excellent sample recordings of orchestras, string and percussion sections, choirs (mostly vowel sounds), bells, cymbals (including reverse-envelope), piano, guitar feedback, electronic sounds and various effects (Doppler, reverb and noise)—many with heavy processing. Most of the content is oriented toward cinematic applications, but I can imagine it also being put to occasional use in, for example, EDM.
When you load a layer preset while synched to host, the layer’s volume, offset and decay controls—as well as the instrument’s rise time—remain locked to the values you set previously. That’s a good thing because it lets you audition different sounds while maintaining the envelope you deliberately devised to lock to picture or a song transition. I also liked that I could adjust decay times lower for select layers to morph the relative balance of the instrument’s composite sound toward its end. To trigger only hits, without a preceding rise, I pressed a D3 note or higher on my Roland A-37 MIDI keyboard controller.
On the downside, I wished latch mode was a global setting for instruments; every time I loaded a new instrument, latch mode would turn off, making auditioning successive instruments using my keyboard (as opposed to using a pre-recorded, sustained MIDI note) more tedious. (Fortunately, latch mode stays locked when loading successive layer presets.) Linking a layer’s volume faders nullified any existing offset between the two, defenestrating my carefully wrought balance of rise and hit. I was also disappointed that playing different MIDI notes on my Roland A-37 didn’t transpose the pitch of Rise & Hit instruments on playback. Of course, you can always tune an instrument in Rise & Hit’s instrument header, radically so if you wish—plus or minus three octaves.
A Big Hit?
Rise & Hit’s main application is cinematic sound design, for which it is a great creative aid and huge timesaver. The sample content is wide-ranging and sounds great. Although the GUI can use a little refinement, it is mostly very well designed. Thumbs up!
Mix contributing editor Michael Cooper is a recording, mix, mastering and post-production engineer and the owner of Michael Cooper Recording in Sisters, Ore.
Product Summary
COMPANY: Native Instruments
PRODUCT: Rise & Hit
WEBSITE:native-instruments.com
PRICE: $149
PROS: Sounds great. Rise time is super-easy to sync. Includes many signal-processing effects. Wide-ranging tuning. GUI is mostly very well designed.
CONS: Can’t change tuning via MIDI note. Latch mode is volatile when loading instruments. Linking a layer’s volume faders nullifies their offset. Rise-hit crossfade sounds too subtle.
Try This
To create an especially dramatic riser in Rise & Hit, load four layers for an instrument and stagger their offset and volume controls so that each successively voicing rise sample is louder than the preceding one. The lower-left portion of Fig. 1 illustrates this setup.