Digidesign’s delay compensation works flawlessly as long as you are using Digidesign hardware interfaces. When creating a hardware insert on a Pro Tools TDM system using hardware other than Digidesign’s—specifically, the Apogee Rosetta 800 and Mytek 8×192 AD/DA—Pro Tools’ delay compensation will not correctly calculate the in/out delay. The system will make a “suggestion” of the latency required and apply it to all tracks, but if you listen to a copy of the track soloed side by side with a version carrying a hardware insert, they will not line up in phase. In addition, this “suggestion” changes from system to system, even with the same hardware.
We tested two identical rigs using Mac G5s with dual 2GHz processors with 2 GB of RAM using three Apogee Rosetta 800s, Big Ben Clock and Digidesign Sync IO, and the numbers varied from 11 to 63 samples. No matter what your system suggests as a solution, the total number of samples needed to correct the delay doesn’t change.
The procedure for creating an insert with the correct amount of delay, then testing it, is as follows:
• It’s important to check your tracks for phase lock during this process, so start by creating a copy of the track where the insert will reside, be sure to include the Active Playlist in the copy (Option + Shift + D)
• Create a hardware insert on one of the tracks
• Patch an analog device across the insert’s send/return or simply patch a cable across the insert’s send/return to complete the connection
• Turn on delay compensation by going to the Setup pulldown and choosing Playback Engine. Halfway down the window you’ll see the delay compensation pulldown. Choose the shortest buffer as delay compensation needs less than 150 samples. The system will save your session, shut down and then re-open your session with Delay compensation on
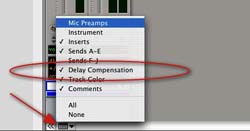
Fig. 1
• At the lower left hand corner of the Mix window, click on the screen icon and choose Delay Compensation (see Figure 1). This will bring up the delay compensation amount under each fader. Be sure your faders are fully expanded to the widest view (Command + Option + M)
• Our test system set the delay at 11 samples no matter the sample rate. The actual total amount of samples needed is based on the sample rate and is outlined in the chart below

Fig. 2
• To achieve the amount of Total Samples Needed to correctly compensate for a hardware insert you must enter the milliseconds listed on the right of the chart below into Pro Tools’ Hardware Insert Delay section found under IO, Setup, Hardware Insert Delays (see Figure 2)
• Once you add the extra delay into the channel’s insert in this way, it will line up the hardware insert in time with the rest of your tracks
Table 1: Apogee Rosetta 800
Table 2: Mytek 8X192 AD/DA