| MIX VERDICT: COMET REVERB PLUG-IN |
| THE TAKEAWAY: “I love that I can load a single preset with five customized reverbs and easily automate between them. Comet has definitely found a place in my mixing template!” |
| COMPANY: Polyverse Music • www.polyversemusic.com PRICE: $149 PROS: • Incredible programmability of musical and beautiful reverbs. CONS: • In the default GUI size, some of the buttons are hard to see. |
Founded in 2015, Los Angeles-based Polyverse Music’s first product in their new line of Polyverse Music FX is their Comet algorithmic reverberation synthesizer plug-in. Polyverse Music also has collaborated with Erez Eisen’s Infected Mushroom, which produces the I Wish pitch freezer, the Manipulator vocal transformer and Gatekeeper, a precision volume modulator.
Comet runs Native 64/32-bit VST, AAX and AU in both PCs and Macs. Some of Comet Reverb’s notable and innovative design features include infinite adjustability for creating any size space, from 1 cubic centimeter to 1 cubic kilometer, and all parameters, including changing the reverb tail’s pitch, are controllable using external CV (Control Voltage) input, both MIDI Note and MIDI CC messages, or conventionally using your DAW’s automation.
Controls and Parameters
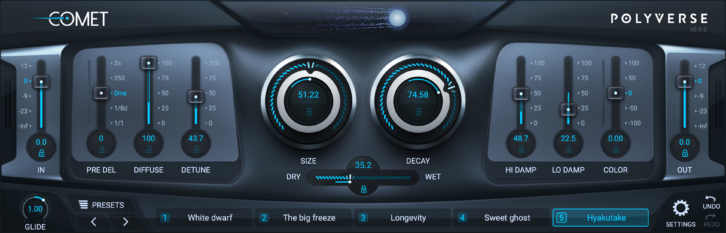
Comet launches with a size-adjustable GUI (100, 150, or 200 percent) with three main controls: Size, Decay and Wet/Dry balance. The Size parameter sets how long it takes the sound to build up within the synthesized space. Longer settings will sound wave-like as the reverb ebbs and flows within a large space. Decay sets the RT60 decay time from 0 up to infinitely long. All of Comet’s parameters have “padlocks”—to lock down any parameter from change when searching and changing presets.
There is the Note Control (a small eighth-note button) under the Size control for enabling MIDI Note control as outlined in the MIDI Controls section of the manual. With Note Control on, Size, Decay, changing Preset Morph slots and Decay Tail Stop are all controlled via pre-mapped MIDI notes.
The Decay Tail Stop button manually clears the reverb’s buffer and instantly chops off the reverb’s tail. You can also use MIDI CC #120 or push G#-2 with Note Control enabled.
There is also the Comet Image animation traveling left-to-right across the top-center of the GUI. When making parameter changes, the visual shows the reverb’s size, decay length and diffusion. I found that along with both the Note Control and Tail Stop buttons, this animation is hard to see in the (default) 100% GUI size.
Unique Controls
The main GUI page has both Output and Input level faders. The instruction manual encourages experimentation with overdriving the Input into saturation. I did try saturating the input with loud snare drum hits and overdriving it while turning down the output. Comet produces approximately the same reverb but it was thicker, denser and a little darker. I like having this ability for building a reverb sound.
I also liked the cleverly designed and very musical Pre Delay fader for up to 2,000 ms of pre-delay. When you push the fader upward from the 0 center position, it reads in milliseconds. Pulling the same fader downward changes pre-delay into musical note values in straight, dotted or triplet subdivisions from 32nd notes up to whole notes (full measure).
The Diffuse control is for setting the density of reflections; it and the Detune parameter are a big part of the sound and functionality of Comet. Detune is for slightly modulating the pitch of the reverb tail—a subtle amount sounds best for reverbs. But I could “abuse” these parameters and crank Detune and Diffuse for very wacky effects.
Hi Damp and Lo Damp are standard digital reverb controls and work great with properly designed ranges for programming the overall nature of the reverbs in Comet. Damping “virtually” changes the spectral makeup of the reflections within the synthesized acoustic space. The Hi Damp and Lo Damp settings work in conjunction with the Color control.
Color works like a tilt equalizer—it adjusts the reverb’s overall brightness or darkness with a center 0 neutral position. Pushing the fader (+) boosts highs and rolls off lows, and conversely pushing the fader (-) boosts lows and rolls off highs. Apart from the Pre Delay control, all the parameters are notated in raw numerical values and without scientific nomenclature.
Preset Morphing Slots
At the bottom of the GUI is a row of five morphing slots each containing a preset. I like this feature for quickly auditioning and switching between five different reverbs when searching for just the right one—there is no preset dropdown list to “wade” through. I could have my five go-to presets always at the ready. User presets save the entire state of Comet, including the reverbs loaded in all five morph slots. You could save presets with five short reverbs, five long reverbs with pre-delay, or five medium reverbs—whatever you like.
And there is no shortage of factory presets! I clicked on the Presets button, and the preset browser window overlays the main window with five Categories: Small, Medium, Large, Eternal and Artsy. I counted more than 20 presets for each of these five categories! I liked that the presets in Comet are not “burdened” with typical digital reverb names like room, plate, chamber, wood room, tiled room or hall.
I could easily load any preset listed in the browser into a slot and keep the window open with the Sticky button—just touch a morphing slot and then touch a preset to insert it.
Changing Between Presets
As with changing parameters, morphing or changing from one preset to another is programmable via MIDI CC, CV external control voltages as well as your DAW’s automation. Comet would make an ideal FOH mixer reverb for easily changing preset reverb effects for every song, or even reverb changes within songs.
Something I really had never considered in digital reverbs is the time it takes to change from one preset to another. Comet continuously outputs reverb even while morphing between presets; there are no gaps while the new preset loads.
The transition time between two presets is controllable using the Glide control. You can automate (or use MIDI or CV) to set the transition time anywhere from 0 up to 30 seconds. Like the Pre Delay control, Glide uses time in milliseconds or musical notes from 1/16th note up to 16 full measures of your song’s tempo.
With preset morphing, Comet automatically solicits so many ideas for sound design and music mixing! For example, if you have sound in Comet’s buffer while synthesizing a small room and you change to a much longer reverb preset, during the transition time you will hear the pitch of the reverb tail “dive,” or go down in pitch. Similarly, changing from a long reverb to a shorter reverb causes the pitch of the tail to go upward during the morphing transition time.
In the Studio
For a very special dynamic lead vocal reverb, I automated preset morphing to change between two reverb presets I had modified: a longish, dreamy reverb originally called “The Becoming” for the verse, and a much shorter reverb originally called “Comet Halley” for the double-time choruses. At the end of the verse, the singer would hold a long note right up to before the downbeat of the chorus and then continue singing the chorus vocal without a gap.
The producer wanted the verse’s long reverb tail to evolve to the shorter sound “futuristically,” so I automated the Glide control to start its transition during the last measure before the chorus—during this one measure I had the singer “bathed” in reverb. So by time the chorus’ downbeat hit, Comet was synthesizing the shorter reverb. The added effect was that the reverb tail’s pitch went up at the same time as it changed to the shorter RT60 time of the Comet Halley preset. Once I got it dialed in, this sounded awesome and launched the chorus!
MIDI Control
I tried programming Comet using my Line6 Mobile Keys 49 controller. Clicking the Learn button changes the main page over to the MIDI/CV Settings page.
The settings page has “learn” buttons for all the parameters you would want to map MIDI controllers or CV. I mapped MIDI CC 7 (Volume) to the Size control and CC 10 (Pan) to the Decay control. This makes adjusting these two controls always accessible from my MIDI controller.
The manual has complete MIDI setups for most DAW systems. In Pro Tools I used a MIDI track in “record ready” routed to Comet and recorded my CC changes; that data shows up in the Edit window for further refinement. In the Pro Tools edit window, automating changes in the five preset morph slots are represented in the plug-in automation by five different stepped levels, like volume automation.
For an awesome Leslie/Tremolo effect on an acoustic guitar, I used a very short reverb: Size was 5.83 and Decay was at 10.00, but both Diffuse (45.0) and Detune (73.7) parameters were set excessively high. I used Comet as a send/return effect but had it set to 100 percent wet. I carefully sent a little feedback of Comet’s output (Watch out!) back to its input and picked up a tape slap effect also.
Very Capable Reverb
Comet uses a modern reverberation engine with immense potential for dynamic programmability using MIDI, CV or conventional automation. I can now “play” the reverb sound in real time for dramatic effects that sound great and always fit.
I’m now coming up with reverberation ideas and effects that sound lush and smooth. I love that I can load a single preset with five customized reverbs and easily automate between them. Comet has definitely found a place in my mixing template!