
Back in July, I taught a two-week, full-immersion class that re-created Beatles-style recording sessions. Our space, dubbed “Not Too Shabby Road,” was outfitted with six analog tape machines, lots of tube/retro gear and two turntables. With five students, there was a job for everyone — tape op, editor, separate recording and mix engineer positions, plus an “effects operator” who was responsible for tape-based echo, flanging and ADT (artificial double-tracking). The gear and tracking techniques were covered in this column in September 2007.
WELCOME TO PART 2
As you step into class at the crack of noon, imagine all that vintage gear — warmed up and at the ready — creating its own version of “aroma therapy.” Each day, we listened to finished recordings on vinyl and read excerpts from the reference material — Recording The Beatles (Kehew/Ryan) and The Complete Beatles Recording Sessions (Mark Lewisohn). Certainly, no pop band is better documented than the Fab Four.
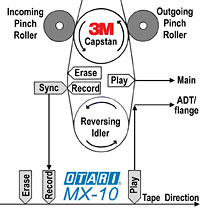
A separate sync output was added to the 3M ½-inch 4-track. When sent to the Otari MX-10, it was possible to create a range of comb filter effects like flanging, chorus and ADT.
In the analog-only control room, the best takes of the Please Please Me album session were compiled, edited if necessary and assembled on a master reel. (The song list included “Please Please Me,” “Anna,” “Misery,” “Baby It’s You” and “Do You Want to Know a Secret,” plus “Honey Pie” from The White Album.) Four-track bounces were mixed on a mid-’70s Raindirk desk routed through a pair of modified UREI LA-4 optical limiters to another 4-track. The songs determined whether mono or stereo bounces were required. Along the way, students learned the importance of proper documentation.
We quickly realized that two days of tracking had generated more material than could be processed by one class in the remaining week. But thanks to the “backup” Pro Tools rig in the studio — and a little help from our friends (teaching assistants and volunteers) — two simultaneous crews worked in analog and digital domains to get enough done for the listening party on the final day of class.
DIGITAL LO MEIN
“The Medley” from the Abbey Road album (starting with “Sun King”) was the last of the rhythm tracks to be completed. Immediately after, the students gathered up their notes and chose the best of five takes. A rough mix from the 4-track was made to ¼-inch, 2-track tape to test the edits before applying them to both the analog and the digital multitrack. Initially, we planned to overdub “The Medley” in Pro Tools and then fly the overdubs back to the 4-track bounce reel, but time limited us to the overdubs and a rough mix.
“Revolution,” “Savoy Truffle” and “Cry Baby Cry” were also done within Pro Tools. To the best of our ability, tasks were scheduled in such a way as to allow us to independently work in the control room and studio. The digital team ventured “off-site” to nearby Master Mix studios (Minneapolis) for piano overdubs, and I sang “Mean Mister Mustard” and played horns on “Revolution” (all through a lovely Coles 4038).
SIMPLY REDD
EMI’s REDD 37/51 recording consoles had a single bass and treble “pop” equalizer per channel — a 100Hz shelf, 5kHz bell/boost and 10kHz shelf/cut, the latter providing similar, if limited, curves to what a Pultec EQ can do with its separate boost and cut controls. There was also an optional, fixed bass lift on each mic channel and specialized outboard EQs for additional frequencies.
In stark contrast, the Raindirk EQ was not particularly accommodating — the midrange bandwidth was too narrow and the single high frequency was too low — so we relied heavily on Dave Hill’s Summit equalizers and the Manley Massive Passive, both based on the Pultec (Bell Labs) design. If necessary, tracks were re-routed through the Altec 438 and Manley Variable Mu compressor/limiters, as well.
For the Please Please Me session overdubs, lead vocals were recorded with a modified Nady 1150 multipattern tube mic into the Altec 438 preamp/compressor. For background vocals, we used the Cascade Fathead ribbon through a Summit preamp and EQ. If there was an extra track, the vocalists were repositioned around the Fathead, including sneaking in the lead vocalist at the ribbon’s null point. This not only provided a different texture and mix of the background vocals, but it also added a subtle depth/ambience to the lead vox. Vocals were either recorded in the studio or in the perfectly reverberant lounge area, the latter simulating the amount of reverb on The Beatles’ first album.
THE “L” WORD
The Please Please Me sessions predated the use of a Leslie as an effects device, but we took the liberty of using it on the guitar solo for “Baby It’s You.” A Fender Strat — feeding the DI input of the Summit mic pre — was filter-optimized through the Summit EQ and compressed with a dbx 163 before being routed into the preamp pedal of a Model 825 Leslie with a single-speaker “Rotosonic” woofer. It was recorded in the reverberant lounge area with two Cascade Fat Head ribbon mics about four feet from each side of the cabinet (above and angled down).
ANALOG OOOHS, AAHS AND OOPS
Punching in the solo was something new to the students; the sheer terror of getting out in time was eased when I blew the first one (there was no tape counter), giving us an excuse to redo the guitar solo. One tricky punch-out was made stress-free by inserting a piece of leader tape at the out point.
Tape delay is one of the effects instantly available when using an analog tape recorder. The tape delay is determined by the distance between the record and play head, plus the tape speed. Even at 30 ips, however, the delay may not be short enough, so EMI engineers took advantage of a feature offered by their multitrack tape machines — simultaneous output from both the sync and repro heads. The resulting range of effects included ADT, the precursor to using digital delay. Before ADT, whenever The Beatles doubled their vocals — live or overdubbed — you can often hear them messing up the lyrics. While this adds to the charm and character, it must have been a cool relief when technology came along to save the day.
GEEK OUT
I modified the 3M’s signal card so that a separate sync output could then be routed through an Otari MX-10, the obvious choice because it has varispeed. 3M’s Isoloop design puts a great deal of space between the record and playback heads, much more than the MX-10, which ran at about 7 ips to match the 3M at 15 ips. (See the figure on page 94.) Once the delayed signal was exactly in sync with the 3M’s repro head, turning the varispeed control slowly up and down would create quick, easy and “emotionally controlled” comb filter effects like flanging and chorus. Again, the students commented on analog’s tangibility factor.
Varispeed on Beatle-era tape machines was more of a process than a built-in feature. In those days, the “mains” frequency determined the capstan motor speed. The AC power-line frequency is 50 Hz in the UK and 60 Hz in the U.S. To be independent of the mains, EMI engineers used a stable oscillator, with easily repeatable settings, feeding a power amp capable of driving the motor.
Simultaneously changing speed and pitch on a DAW is about as complicated as it was in The Beatles’ era because it changes the sample rate. On Pro Tools and other workstations, this feature requires an external clock that’s often limited to a range that won’t “freq-out” the system. In the analog domain, you must be careful not to change the speed too quickly to protect the tape from being wrinkled. Varispeed allowed one of our vocalists to switch from baritone to tenor.
ZOOM OUT
All during rehearsals, I was admittedly torn between accepting the spirit of the moment and pushing for greater authenticity. Hovering too much would have killed the vibe before it could take flight, so I chose to experiment with mics and placement rather than become the overbearing producer.
From the control room, the most egregious “errors” were related to guitar dynamics. I made repeated trips back to vinyl to emphasize The Beatles’ dynamic control and restraint: Supporting guitar parts were remarkably understated, key guitar parts were heavily pushed (and especially obvious if you independently listen to left and right channels of “Savoy Truffle,” for example).
Somewhere between superimpositions (overdubs) and mixing, the mental light bulb went bright. We got a sweet, rich tone that worked perfectly for a lead lick, but the neighboring chords on either side were over the top. A seasoned pro would have pushed the lick more and held back on the chords, or — in modern times — separated the parts on two separate tracks. The solution in Pro Tools was to reduce the chords’ level so that they were below the distortion threshold. That made a big impression on the guitarist, who also happened to be the teaching assistant and Pro Tools operator!
THAT’S A WRAP!
I believe the project met the student’s expectations. From the submix/bounce to the final mix, everyone took the sonics more seriously because less could be done post-bounce — a big contrast from last century’s joke about “fixing it in the mix.” They saw the value of incorporating the “discipline” of working in the 4-track domain into their next digital project. Many expressed interest in buying an analog machine.
The class made us all realize the power of many creative forces working together to yield a body of work that is truly greater than the sum of its parts. Our collective artistry may have paled by comparison, but the journey on this long and winding road paid us all back tenfold.
Eddie thanks everyone who helped make this Summer Session possible. Visit
www.mixon line.com
for sonic samples and pictures.

LISTEN: Must Play
Baby It’s You
LISTEN: Must Play
Honey Pie

