
I wasn’t planning to write three articles about vintage AKG mics before summer kicked in, but what’s on the bench trickles down. This month, the problems are less electronic and more organic. To cut to the chase, when a stereo tube mic has cable issues, it’s not a quick trip to the audio store.
THE TOUR BEGINS
After servicing a mic, I usually record a test vocal alongside a “reference” mic, and if time permits, I’ll also use it during a session. Even without the comparative analysis, classic mics have an instantly recognizable quality. On room tone, there’s a low-frequency extension that makes you feel at one with the space, and then there are those in-your-face vocals that sound thunderous at three feet. There are simply too many things I want to know more about, and having two or more of the same mic helps quantify the primary characteristics, such as output level, “tone” and noise. Of course, with any vintage gear there will always be variables, whether due to production changes, factory-customized options, user mods, age or the result of repairs made over the course of several decades.
To recap (no pun intended) my own Austrian Mystery Tour, it began with a troublesome, somewhat abused solid-state AKG C 414 EB-P48 and the observation that tube mics are easier to service because their circuitry is far less complex. Typically, elderly capacitors are suspect. But unless a failure is obvious, I’m inclined to test first before attempting a wholesale replacement. Some of the capacitor choices in the AKG C 24 were made for me due to space limitations in the mic, but I also replaced the electronics’ carbon resistors with low-noise, metal-film types to minimize the variables when it came time to evaluate tubes.
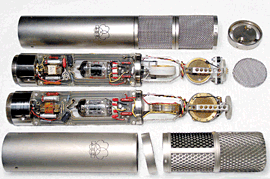
Figure 1: two versions of the AKG C 24—serial number 443 (bottom) with the original brass CK-12 capsules and serial number 986 with the “newer” nylon capsules
Of the three C 24s I’d seen so far, two were Mk-2 versions like the one at the top of Fig. 1. One came with a modified N24A (Mk-1) power supply and a nonstandard (but factory-looking) multipin connector at the base of the mic. The C 24 at the bottom of Fig. 1 is an Mk-1; both mics in that photo came with the newer N24S power supply. (I found schematics for three power supplies, two of which had an external box for pattern control.)
BALANCING ACT
My first C 24 encounter was with an Mk-2 with a bad cathode-bias capacitor that caused the channels to be unbalanced. The older C 24 also had a balance issue that was not resolved by changing the bypass caps — surprise. Fortunately, I had a “compatible” Mk-2 for comparison. Both mics and supplies were swapped until the cable revealed a problem at the power supply end.
I expected to be back in business after finding the break and cutting back past the damage. The results were better but not fabulous, so I used an ohm meter while massaging the cable from end to end. There was no “smoking gun”; two of the conductors had higher resistance than the others, and I was unable to localize the troubled area. I didn’t want to whittle the 35-foot cable down to a stub.
Figure 2a: The damaged cable (above) included a dual spiral-wrapped copper shield, three heavy-gauge wires for high current (inset) and eight thinner conductors for audio, pattern, B+ and spare. Below, Gotham Audio’s standard mic cable (GAC-4/1) shows a similar construction style.
Even though years of abuse had eventually taken their toll, the inherent cable quality was still obvious — very similar to what Neumann supplied back in the ’60s and ’70s. The shield was double spiral-wrapped copper and easy to work with. (See Fig. 2a.) The other mic had a 70-foot cable with a copper-braided shield and loosely fitting, color-coded, cloth-over-plastic insulation. It was equally beautiful in its execution, but as you may know, braided shields can be hard to work with (although you’ll find a tip in Fig. 2b).
Figure 2b: How to prep a braided shield. Step 1: Compress the shield as far back as it will go. Step 2: Slowly bend the cable while poking through and stretching the shield until the underlying layer is exposed and a loop is created. Step 3: Poke through the loop with a rounded, blunt tool until the wires can be pulled through. Step 4: Separate and prep the wires for soldering.
GIMME CABLE
At first, I hoped the long cable could be cut in half, but the customer needed the full 70 feet so that the mic could be flown over an orchestra and reach the control room. The search was on for a replacement cable.
Gotham Audio manufactures GAC-7, a 7-conductor cable for mono tube mics that’s similar in construction to the original. Five of the conductors are 26-gauge (AWG), each comprising 72 strands, while the other two filament conductors are 20 AWG with 252 strands. Mogami’s W3172 6-conductor cable has two pairs each of 22 AWG, 26 AWG and 28 AWG for filament, audio and high voltage for the plate and polarizing voltages, respectively.
The C 24 requires a minimum of nine conductors and a shield. Belden had three grades of computer-data cables, each with six twisted pairs (for noise immunity). The extra wires could be paralleled to handle the extra current required by the filament.
At this point, I really wasn’t in the position to be picky; in addition to being technically suitable, the new cable would have to fit into the connectors. I also knew the data cables would not have the “feel” that we’ve come to associate with a fine mic cable — that less-than-technical audio requirement of “cable amnesia,” a lack of memory that makes cables easy to wind and unwind.
Thinking there was no alternative, I was ready to buy without samples when I called Kelly Kay at Josephson Engineering to ask for advice. He provided a short Mogami “mono” sample and suggested I call Marshall, Mogami’s U.S. distributor that also markets MXL mics. Phil Tennison at Marshall had an 8-pair cable with a braided shield — not quite as sexy as the double-spiral shield, but I was back in business.
Figure 3a: male C-24 plug with original strain relief.
SNAKE EYES
Figure 3b: male C-24 plug with home-brew strain relief.
At each end of the cable is a 12-pin connector, of which nine pins are essential; the tenth “connection” parallels the shield via the metal shells. I am not sure that any of these mics had its original cable — the style didn’t match the mic’s vintage — but work had obviously been done: Screws were mismatched, threads were stripped and an entire strain relief was missing. (Compare Figs. 3a and 3b.)
The male end of the cable mates with the power supply, and as I pondered how to do a nice clean job, it became evident that one strain relief was “lost.” There was almost no clearance between the strain relief and the solder cups. Figure 3a shows the newly installed Mogami cable with the original strain relief. To make what little room there is, it was necessary to trim ⅛-inch off the solder side of the male plug (plastic and solder cups).
Figure 3b shows a strain relief fabricated from an inverted rubber boot from an XLR combined with a soft piece of red plastic. Screwing the end cap onto the clamshell/metal housing provides enough pressure to secure the cable. I wired each connector twice because my first attempts weren’t very pretty and there was some stress when trying to make everything fit into place.
STAY ON TARGET
You might think I’m out of my mind, but this is what it takes to establish consistency, and the job wasn’t done yet. The connectors were defluxed, the silver contacts deoxidized and treated with Caig ProGold. There was a polarity issue on one channel (the power supply had been converted from Tuchel to dual-XLR connectors) and a funky polarity switch.
Although the tubes that came with the mics were acceptable, I checked these for noise over a two-day burn-in period and auditioned several other tubes. The biggest challenge with dual-triode tubes is finding equally “quiet” sections, particularly avoiding “shot noise,” a rocky, low-frequency sputtering sound that’s more annoying than steady hiss. Several of my NOS tubes tested well in a C 12 (where only half the tube is used), but suffered from this disappointing ailment. One surprise was an Electro-Harmonix 6072/12AY7; there were no rocks and the hiss seemed a bit darker and less obvious.
So this repair chapter is over — almost. After each repair and restoration, I anxiously await customer response. I sometimes call months later to see how things are going. But sometimes, no news is good news.
Audio files for this comparison can be found at
mixonline.com and www.tangible-tech nology.com/music/mics/c24.html.

READ: The Full Series


