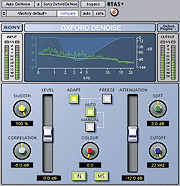
The DeNoise module is intuitive—even with 19 controls.
With its Oxford EQ and Reverb, Sony Oxford has established a reputation for excellence in plug-in design in a very short amount of time. So it’s no surprise that Sony Oxford Restoration Tools combine an innovative approach to traditional noise-reduction processes with some additional features that address specific areas in audio restoration.
Three RTAS modules comprise the Sony Oxford Restoration Tools: Oxford DeClick (including DePop), Oxford DeNoise and Oxford DeBuzz; these plugs also work in AudioSuite, although manual DeClick may yield slightly different results with AudioSuite. You may also want to turn on delay compensation in Pro Tools because the sample delays for the plugs can be disconcerting in playback: DeClick is 2,794 samples, DeNoise is 10,208 samples and DeBuzz is 7,137 samples. Minimum configuration includes Windows XP or Mac OS 10.2.6 or later, 800×600 minimum display, Pro Tools 6.1 or later and an iLok USB Smart Key.
DECLICK AND DEPOP
DeClick repairs “impulsive disturbances” of up to 5ms duration (and no shorter than one sample). It is clearly meant to be used primarily for vinyl restoration, although I restored some forensic audio so that voices were audible in a badly damaged recording. With severe damage, large pops may still be heard as quiet “thumps” in Playback mode, but when manually de-clicking pops in AudioSuite, Restoration Tools often “flat lines” the space where the click had been. It’s quite different than Sonic Solutions’ manual de-click because you’re often left with nothing graphically, but during playback, the absence of the click plays through without disturbance and the remaining audio sounds natural. For moderately damaged vinyl, you can get fine results in a fairly short time.
The DeClick module comprises two sub-modules: Pops and Clicks. You can noiselessly switch either or both in or out, and you may switch the entire module in or out without glitching using the In buttons. The Pops’ sub-module has three controls: Threshold, Soft and Sensitivity. Threshold separates the larger pops from smaller clicks (also called “crackle”), Soft controls the duration of detected pops and Sensitivity controls the probability that audio will be detected as part of a large pop or click. Although the manual states that Sensitivity will not usually need to be changed from its default 50-percent setting, I found that in some forensic settings, results for pops were usually better with Sensitivity set to 100 percent.
The Clicks sub-module comprises two controls: Sensitivity and Repair. As in the Pops sub-module, Sensitivity also determines how likely audio will be detected as part of a click, but because clicks and crackles are much smaller than pops, its granularity of resolution is improved by giving it a fader rather than a rotary pot. Repair salvages high frequencies when de-clicking audio with high-frequency harmonic structure, such as brass instruments, strings and female vocals. DeClicking can also (to some extent) repair audio with clipping distortion. The Repair process involves interpolating the surrounding audio and, because the flattened peaks are detected as clicks, the plateaus caused by overs can sometimes be gracefully reshaped into less-offensive audio.
COME ON FEEL DENOISE
DeNoise provided excellent results when I needed to reduce boominess and air conditioning in indoor dialog, as well as cleaning up outdoor dialog by reducing ambient noise of distant traffic and wind rustling dry leaves. With its Automatic mode, DeNoise gracefully adjusted to dynamically changing noisy environments, and it was a no-brainer to remove hiss. Its frequency-dependent attenuation curve, one of the module’s most useful component, provided a quick way to tweak out offensive areas and target them for maximum noise reduction.

DeBuzz controls frequency tracking with Adapt and Freeze settings.
The DeNoise module is complex with 19 different controls, but most of it is fairly intuitive. In a dark-blue window in the upper third of the module, there’s a display of the audio spectrum from 0 to 20 kHz and level from 0 to -144 dBFS. The Noise Fingerprint is shown as a hyphenated line that approximates the contour of the spectrum of the noise. The current spectrum of the noisy audio appears as a jagged line.
Near the center of the module is the Auto mode switch that enables automatic updating of the noise fingerprint. To the upper left of that is the switch for Adapt mode, which updates the automatic noise fingerprint every 50 ms when in Auto mode. With both of these switched in, DeNoise tracks audio where the noise spectrum changes over time. This mode is also useful when a “clean” sample of noise is too short to produce a snapshot fingerprint or where there is no area in the program to create a snapshot fingerprint with the Freeze switch. In Auto mode, the Freeze switch stops updating the automatic noise fingerprint (and switches off Adapt).
The Smooth control usually resides at the maximum setting, but if there are specific tones in the noise spectrum, it’s best to reduce smoothness to allow the fingerprint to more accurately reflect the “bumps” in the frequency spectrum. Level adjusts the vertical level of noise fingerprint in Manual and Auto modes.
Manual is the most intuitively obvious mode if your source program’s noise spectrum is white or slightly colored. Just move the level to adjust the vertical level of the noise fingerprint and adjust the color control from fully counterclockwise (white noise) to halfway (pink noise) to fully clockwise (red noise).
The Correlation control regulates the de-correlation between the noise fingerprint and low-level signal in Auto mode. The attenuation control and the frequency-dependent attenuation curve add together to give the total maximum noise reduction at each frequency. Beyond the cut-off frequency, this overall attenuation level is applied non-dynamically; below the cut-off frequency, the de-noise process operates normally. It’s useful for band-limiting material that has initially been recorded at a lower sampling rate and exhibits aliasing or a whistling corner frequency in fingerprint contour.
Mid/Side control (stereo instantiation only) applies noise reduction to the side channel only of a stereo pair; mid channel is unaffected. This control is most useful for de-noising FM radio broadcasts where most of the noise is in the side channel.
The DeNoise module provides a lot of control to the user — the more complex routings can be a bit daunting at first. It isn’t a terribly steep learning curve, however, and the rewards for learning the system are well-worth the effort.
WHAT’S DEBUZZ?
DeBuzz uses Adapt and Freeze switches that control how the buzz frequency is tracked. In Adapt mode, the frequency fader sets the initial search frequency for tracking a buzz. In Freeze mode, the fundamental frequency is not tracked and the buzz removal filters operate at the current frequency level of the fader.
In the dark-blue window in the top third of the module, the display shows the fundamental frequency at which the buzz filter is operating and a confidence bar that shows the level of confidence in the buzz detection in Adapt mode.
I found that with small buzzes, it was useful to examine the signal with a spectrum analyzer (I used Waves’ Paz) to see where possible buzz frequencies might be located. This enabled me to hone in on fundamental buzz frequencies a lot faster than slowly moving the frequency fader.
Sharp sets the Q of the notches for buzz harmonics removal. Select Weak mode when buzzes have harmonics that lie at or below the level of the desired signal; conversely, use Strong mode when the buzz is generally louder than the level of the desired signal. Depth is usually left at minimum: -144 dBFS. If you’re removing good signal along with the bad, then you can raise it — but only as a last resort. The Gate fader controls which range of amplitudes in the source material gets filtered. (You just keep moving it downward until you start to hear the buzz and then back it off a bit.) There’s also a bandwidth control that limits the frequency spectrum of the buzz filtering.
It’s a straightforward set of tools, but proper buzz filtering can be extremely tricky if you don’t have the patience to locate the fundamental frequency or frequencies; sometimes, you need to run DeBuzz twice.
LET’S GET CLEAN
At JamSync, I work with a lot of independent video artists. The Oxford DeNoise and DeBuzz plugs proved invaluable on Ben Dixon’s Skarecrow, a hayseed horror flick that suffered from a bad cable on a boom, hum and complex noise with different and combined fundamentals, and environmental noise that threatened to completely engulf the dialog.
I found that DeBuzz worked amazingly well with hum that could be heard sneaking into musical passages as the dialog was raised. Simple filters simply wouldn’t do, but I would often hum the fundamental, check the note with a tuner, check the pitch against my handy frequency chart and plug that value into DeBuzz. Several times, I would remove one component of the hum and then find a remainder with a different fundamental pitch. I was able to again go through the routine and remove the remaining component with no perceptible damage to the dialog and very little to the score. (I was working with a pre-mixed stereo track.) Yanks beware: This British plug instantiates with 50 Hz as the default fundamental. I wish there was a preference for State-side engineers to switch that to 60 Hz.
DeNoise worked wonders on open field shots in which the Tennessee wind kicked up storm after storm of dust. DeClick helped the bad cable problems to some extent, but the “skritch” (multiple quick embedded clicks) and double-click common with this type of problem often responded better to a simple cut and paste with a preceding or following cycle of the waveform.
By far the most annoying problem with the soundtrack was the varying levels and frequencies of background buzz and hum. Oxford DeBuzz took care of that when none of the other tools in my plug-in kit would touch it. I was able to shift the sound from horrible at points back to the horror it was intended to show.
DELIGHTFUL, DELOVELY
True to their heritage, the Sony Oxford Restoration Tools deliver a lot of power in a well-designed package. If you already have Sonic No-Noise and Waves Restoration Bundle, this is still a worthwhile addition because it offers several things not found in those packages. If it’s your first foray into noise-reduction software, the Sony Oxford Restoration Tools are a good place to start, and the accompanying manual is an excellent introduction to noise reduction and removal techniques.
All in all, it’s a very desirable bundle, with easy surface-level control for novices and power and deep control for pros. Price: $1,195.
Sony Professional Audio, 800/686-7669, www.sony.com/professional.
K.K. Proffitt is the chief engineer at JamSync, a Nashville-based studio specializing in surround sound production.