Proper documentation of a system and communicating accurate data to an assistant or the next person in the workflow chain can assure that a job gets done properly from beginning to end. But where do you start? It’s often difficult to add notes to an existing document without cluttering the original or ending up with a ream of resources that can be hard to follow and maintain.
One solution is to embed definitions and/or instructions into the document. Adobe Acrobat Professional’s Tools allow you to add notes to an existing PDF that are hidden until the user clicks on a specified section of the document. The PDF could be a technical drawing, JPEG, or really anything you’d like, while the “note” could be an audio file, text-based instructions or an explanation of a piece of gear or system.
This can be useful in a number of situations. For instance, in a live sound for worship setting where there may be various users running a system and there is little time for formal training, an interactive PDF could act as the first step in the training process. Using a document of this type, created by technical staff, would allow a potential user to walk through the safe operation of a live sound rig at their leisure and in a self-directed fashion. This could be followed by testing or a practical hands-on proficiency assuring that the newbie or unfamiliar user can pull off the assignment while saving time and resources that are often dear.
Fig. 1
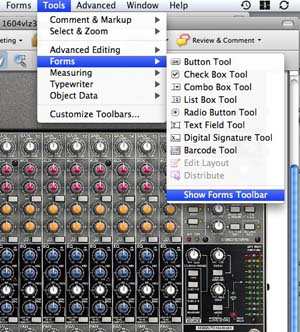
The first step is to make a PDF of the photo, screen grab or drawing. I started by opening a rendering of a Mackie 1604 VLZ console and choosing to print it from my MacBook laptop. From the print screen I chose to save it as a PDF. Next, I opened my PDF in Adobe Acrobat Professional and chose to show the Forms Toolbar from the Tools pulldown (see Figure 1).

Fig. 2
From the Toolbar I chose the OK button (see Figure 2), which brought up a crosshair cursor that allowed me to specify a section of the console in a box. I chose to highlight the entire Channel 1 strip, but you can specify any part of the document. The next step is to double-click on the section you highlighted, which will bring up the Button Properties window, which allows you to set up a variety of options.

Fig. 3
First click on the Appearance tab and set the fill color to No Fill (see Figure 3). This will make the grey box clear so the document underneath will be visible.

Fig. 4
Next, click on the Actions tab, choose Mouse Down with the Select Trigger pulldown and then choose Run a JavaScript with the Select Action pulldown (see Figure 4). This will open the JavaScript editor.

Fig. 5
Type the following into the editor without the dashes: -app.alert
(“PLACE YOUR TEXT HERE”, 3)- Choose OK on the editor and Close on the
Button Properties window (see Figure 5).

Fig. 6
To test if your annotation will appear, choose Preview on the Forms Toolbar (Figure 6).

Fig. 7
You should be able to click on the section you highlighted causing a
window to appear with your text (see Figure 7). You can repeat this
process as many times as you’d like, highlighting and annotating
sections of the document until you’re finished.
The finished product should be opened with Adobe Reader, which is free;
Apple’s Preview will not allow you to view the annotations.


