This process will work with Roxio Toast software Version 7 or 8; we used V. 8 for this demonstration.
1. Start by bouncing your mix(es) from your DAW in a PCM stereo interleaved format at the desired resolution. We chose 96kHz 24-bit WAV files for our DVD, the maximum allowable for DVD.
Figure 1
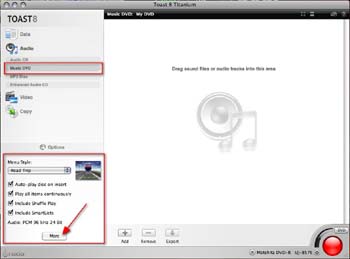
2. Open Toast and choose Music DVD on the left side of the interface. (See Fig. 1.)
3. At the bottom left side of the Toast interface, choose your menu style and options, then click “More.” (See Fig. 1.)

Figure 2
4. After clicking “More,” click on the “Encoding” tab on the next screen to select your audio format (see Fig. 2). Choose PCM and your sample/bit rate (in our case, it was 96 kHz/24-bit, stereo.). From this screen you can also choose your Menu style and title and your Disc options by clicking on the appropriate tab. Click OK.
5. Drop your files into the center of the Toast interface where it says “Drag your sound files or audio tracks into this area.”
Figure 3
6. Once the files are in Toast, you can edit your song titles, add a picture and make a playlist by choosing “Edit” from the top of the Toast interface, then choosing “Text” or “Playlist.” (See Fig. 3.)
7. Insert a blank DVD into your drive and push the large red button on bottom right corner of the Toast interface.
Bonus Tip: Adding MP3 and High-Definition iTunes Compatible Files to Your DVD
When making a high-definition audio DVD, you can also include downloadable full-resolution 96 kHz/24-bit WAV, AAC and MP3 files that will be compatible with iTunes, iPods and many other portable digital audio players. Just two caveats: This involves burning a second disc as your master and means you’ll have redundant files in multiple formats, which can max out the disc. However, in our tests we were able to fit 12 5-minute songs in three formats on a standard DVD.
1. Create MP3 and AAC files from your original full resolution WAV files using your DAW or iTunes. In iTunes, go to Preferences>Advanced>Importing to set your import preferences. We chose 256 Kbps.
2. Make three new subfolders and put all your AAC, MP3 and original full-resolution files each into an appropriately named folder.
3. Insert the original DVD (made with the PCM files bounced from your DAW) into your computer and open it by double clicking on the CD icon (see the above tip, “Making a High-Definition Audio DVD Using Toast”). Drag the VIDEO_TS and AUDIO_TS folders to your desktop, these files and your new subfolders will be used to make your new DVD.
Figure 4
4. Choose New Disc from the File menu in Toast and click on Data, and then DVDROM (UDF) from the submenu. Drag the VIDEO_TS, AUDIO_TS and all your subfolders with the AAC, WAV and mp3 song files into Toast. (See Fig. 4.)
5. Burn the DVD.
6. To view and download files, open the DVD on your computer and choose the appropriate file, or play the DVD from your DVD player.
Figure 5
7. You can check the resolution of your files by single clicking on the file name then press Command + I. The Summary tab will give you a list of file info including the resolution of the file. (See Fig. 5.)